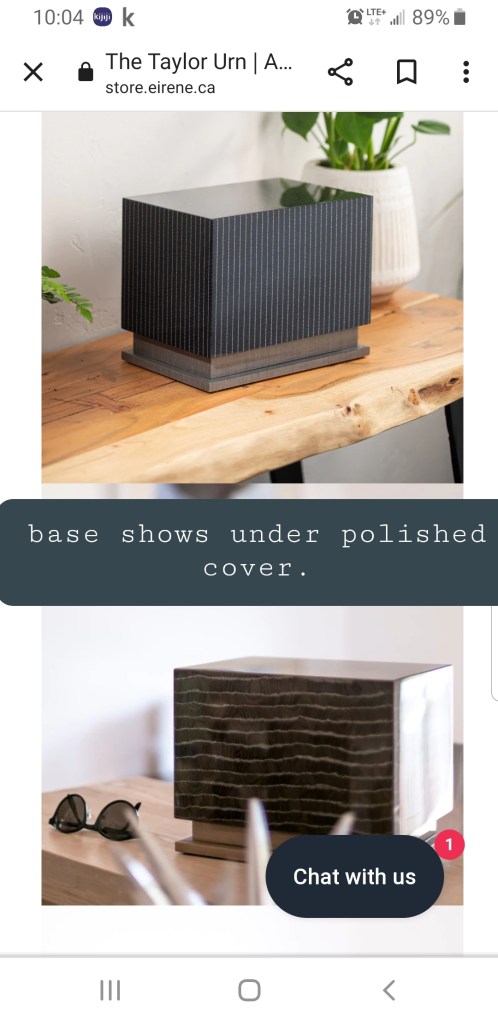
I have been asked to build a Wooden Urn in three pieces. A base, a nested low profile tray, and a highly polished outer cover, that shows off some of the base. The base will have rubber feet. The tray will be lined in felt. The whole outer shell polished to a high sheen, and clear coated. It’s for an extended family member. At least they get to choose the specifications and fit n’ finish. Perhaps have it in their ownership for a while before they need to use it. I’m hoping this isn’t a race against the clock type of thing. There may be a question of stains, and wood type, but I think Spalted Maple or Ash would be classic looking, and stain nicely. Plus I have lots of it, and won’t need to charge through the nose for acquiring it either.
Some decisions to make before I begin: use the wood I have on hand (Spalted Maple or Ash) or purchase a darker hard wood (added cost) what colour felt to line the low profile tray: Burgundy, Yellow, Blue or Green. Any possible stain colour for the base portion, unless we go bare wood and a clear coat finish. Any additional details to include or forgo.
Some brief time spent doing research has led me to build something along the lines of the below. Classy without being obnoxious or ostentatious.
The three portions of the build. Outer cover, urn and low profile tray.Where I realize the base is meant to show, and I need to order rubber feet.
The first project, is a moose fence topper I’m making for my mum. I have it all cut out, but I need to sand & paint it. Then ship it out to Campbell River in pieces. I’ve been really busy as of late with my day job, and the winter temperatures makes working in the shop less than ideal, but the Urn is a big deal, so I may just brave it. Plus we are getting ever closer to the February thaw, and I would like to spend some time in the shop again. Not certain what this will do to my VF-1 Valkyrie time line, but that can wait. This is a matter of death after all.
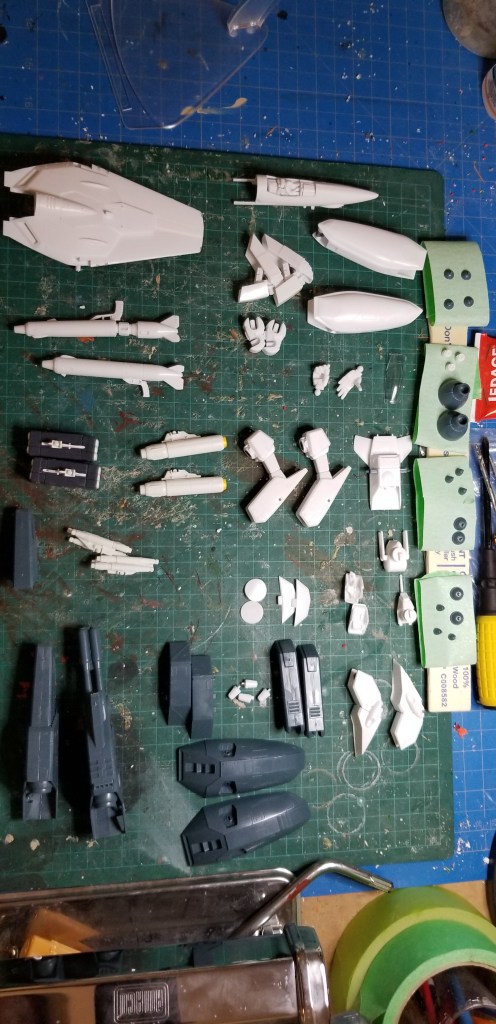
The last two weeks, whilst busy with work, have included some leaps and bounds forwards with my model kit build up. I finally have all of the individual components cut off their sprues, cleaned off the nub marks, sanded where required, and built into the appropriate sub section piece, (ie.) Elbow, knee, ankle, hip, hands, cockpit etc etc… Below is a picture of all the parts laid out ready for priming soon.
All parts laid out, with thruster cones separated onto painter’s tape for ease of painting, and keeping track of the smaller bells.
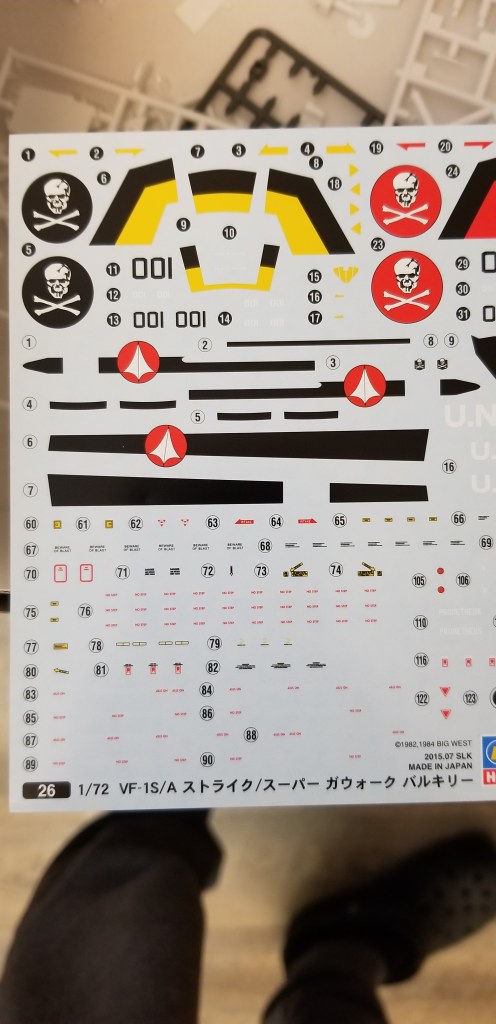
I am going to use the yellow & black version of the water slide decals, image below. To change up from the red/black version I already have.
Going for yellow accents this time around.
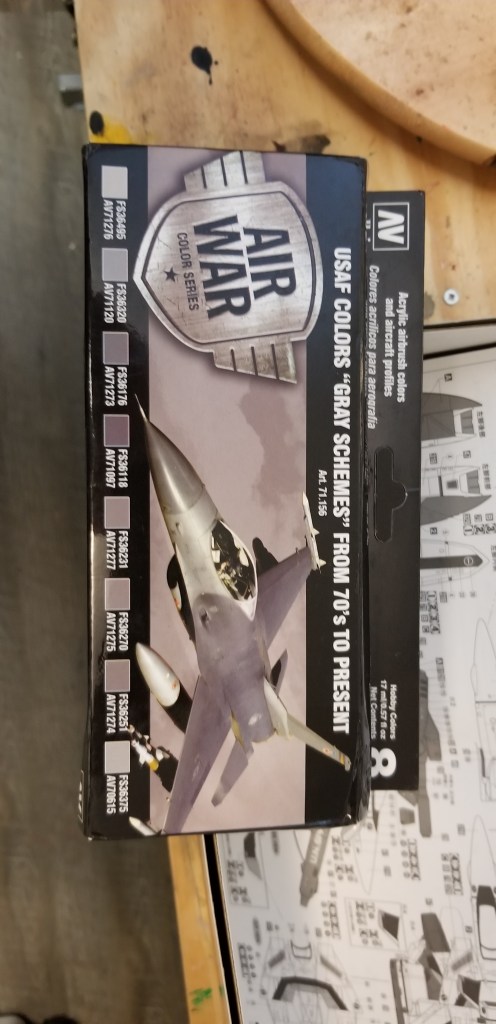
As far as a paint scheme is concerned, I’m going to use USAF colours to make this model look a little more custom. My airbrush nozzle is too large to accurately achieve individual panel coverage, so I’ll need to tape off sections to get colour variations from the paint set I have in hand. A mixture of light greys on top side & legs, and the dark greys & black for the laser canons, major weapons attachments (darker grey plastic elements shown above) feet, vents, and other odds and sods. Plus oil washes, panel lines, decals and rust effects. I ordered the Tamiya 10mm low tack tape to help me with masking after all the priming and base coating is done. My hope is, that by leaving everything in smaller parts I can do a far better job of masking, and eliminating overspray where I desperately don’t want it. Fingers crossed! Then a high gloss coat to round out the sprayed portion of the build up.
I will need to paint the cockpit & pilot separately, as there are lots of edges and bits to pick out & high light. I’m really trying to make this one look legit, so no real time limit, but I’d like to not still be doing it in March. If you catch my drift.
Vallejo USAF colour range. Variations on grey.
I’ll finish it off with prominent decals, and the clear plastic stand. I’d like to be done by the end of February, but that will depend on workload, my kids staying healthy, and all the PA Days, & Holidays, and weekends not interfering too much on my schedule. We’ll see how that pans out.
Paint & decal instructions.
Work has been steady throughout January, so I haven’t even had the chance to crack open my illustrated children’s book. To be totally honest I haven’t even given much thought to how I will depict my two main characters, Lemon or Smush. Which is kind of important. The story is written. I have done five or six drafts, and I’m happy with where it is. But, I do need to get those pesky illustrations done. I know I focused a great deal of my free time into reading half of this years book list up front, and meticulously picking through my VF-1 model kit build up, so I didn’t leave much time for the book. Nor did I feel as though I needed to. I haven’t sculpted yet so far this year, nor painted, nor done any wood working, so… gotta pace myself. Too many hobbies, and too little free time. Have managed to play my guitar a few times, which is really nice for a change. That is very relaxing. Loud, but relaxing. Let us not forget that both my kids do four extra curricular activities per week – each. So my evenings are spent playing chauffeur/ assistant coach/cheerleader and water boy. So evenings aren’t exactly free time for me either.
Hell, here I was thinking I’d start Book Three of collected short stories this winter, like immediately after Christmas break, but that hasn’t hit me yet either. Do I go a whole different route? Or stick with what I have developed and just find a new angle to explore? Not sure. Really need to think about it, and write up some outlines. Maybe later. I’m pooped.
That’s it, game over, today is the last day of my 365 day writing challenge. Obstacles met and over come. Bam! Something about apples….
But seriously, it’s a big day for what amounted to a difficult task. We had power outages, illnesses, trips, travels, and heavy work days that made this a real barn burner of a challenge. But I got through it all. Wow!
But now what? Maybe I go the whole Calendar year? that adds what, an additional seventeen days? Not bad. Maybe I can break the 200,000 word mark? I thought i just might do it, but I got to around 185,000. So close enough, I think.
So what’s on the docket today. I think I’ll do a double header and will begin my year in review of the wood working projects I built this year. There are several, so settle in. I made furniture, jigs, objects, and some pretty random items to be certain. I did at one point have the list in chronological order, but that list has gone into the ether, so now i’ll just have to randomly talk about the things as I recall them. No don’t worry, it’s not off of the top of my head, I did spend some time the other night writing them all down – again. Just not in any order beyond what i could remember first.
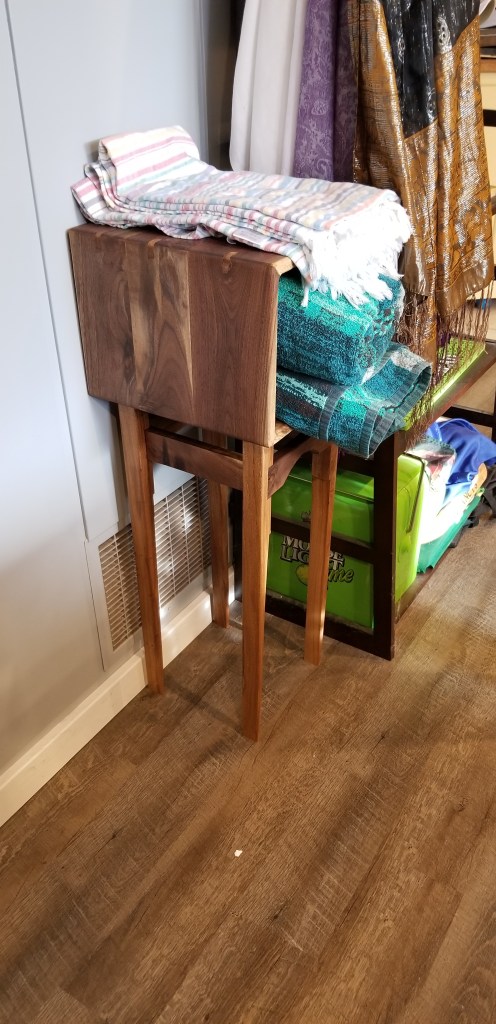
For my sister in-laws baby shower I made two new Cedar newel posts for my in-laws house. As I recall those were about 8.25″ square, and about 2″ high. I painted them white, and they are still affixed to the front exterior stairs. For the new rabbit Butter Scotch, I made two rabbit houses, one was a 13″ square, the other was smaller to fit into the reserve cage at the cottage. In September I used dowel construction to build a Pine display unit for my kids toys, and for them to play dolls on. My youngest has since etched her name into the top with a black ball point pen. I made a rather tall end table to display things in, that was Walnut & Ash. I made a tapering jig for the legs, so that counts as another build item too. I made a Hickory & Ash end Table / coffee table with slatted shelves. That currently sits in our basement and has not been attacked by either child as of this time. After several long years I completed the last 80% of the Ash screen door, that went up prior to my wife’s birthday party in early June. Has not collapsed or fallen off it’s hinges as of this time of reporting. Ha. I used a bunch of scrap wood to build a cubby system for all of my drills, drivers, heat gun, and staple guns, pin nailers etc… It was more shop infrastructure, than anything else. Much like the wheelie cart for my planer & jointer. It isn’t much to look at, style wise, but it’s sturdy and easy to move around in the confined space of my shop. I took some time to try to see if I could build a proper floating shelf drawer out of Walnut. It has a blue felt pad on the interior, and has remained fairly square since I built it. That also taught me not to use Wax on Walnut, as it clouded over almost immediately, so now I use the wax only on non visible portions to lubricate drawer slides and moving parts under jigs etc etc… For the farm orchard I built a scrap wood bench, that was four feet long, and a foot wide, and about fourteen inches tall. My wife, and my mother in law wanted some place to sit when watching the kids down at the farm when they go tree climbing, or apple picking. It weathered the Dericho wind storm and stayed put, also remained upright, when trees fell, and the silos were mostly ruptured. Go me! At the cottage I refinished an old iron & wood bench. Sanded it down, and put two or three coats of tan stain on it. That was done in about a day, less than that, late one afternoon in August. On the lathe I turned down some Walnut bases for some sculptures, namely my Hellboy bust and the cruddy looking great ape I made where I botched the nose terribly. I also turned down a handle for the screen door out of Maple from our tree out front. In the shop I built two peg boards, a Dado jib, the aforementioned tapering jig, and a 45 Degree cutting jig, plus a smaller tenoning jig that I used on my Pine Display Unit. In the way of metal work, I built a router sled flattening jig out of angle iron and nuts and bolts, doing the cutting with my angle grinder and a cut off wheel. That was pretty loud, and thrilling. Didn’t set fire to anything, so that was a major plus. I built a whole slew of Ash chisel caddy’s that hang on the wall. I built two toy boxes, one large one out of Pine, soon to get caster wheels, and a smaller one out of Cedar for my little ones bedroom. And last on the list is the Air brush caddy I made for all my paints, mask and the air brush compressor unit. That feels like just about everything that I made this year. If I remember anything else, I’ll be sure to mention it. I have posted photos for many of these items in previous posts throughout the year, so i won’t bore you with more at this point. Just kidding. Here they are in no discernable order. Also, just realized I made a massive Ash charcuterie board this year too. Duh!?! Can’t believe I forgot about that, I only see it 8n the kitchen every single day.
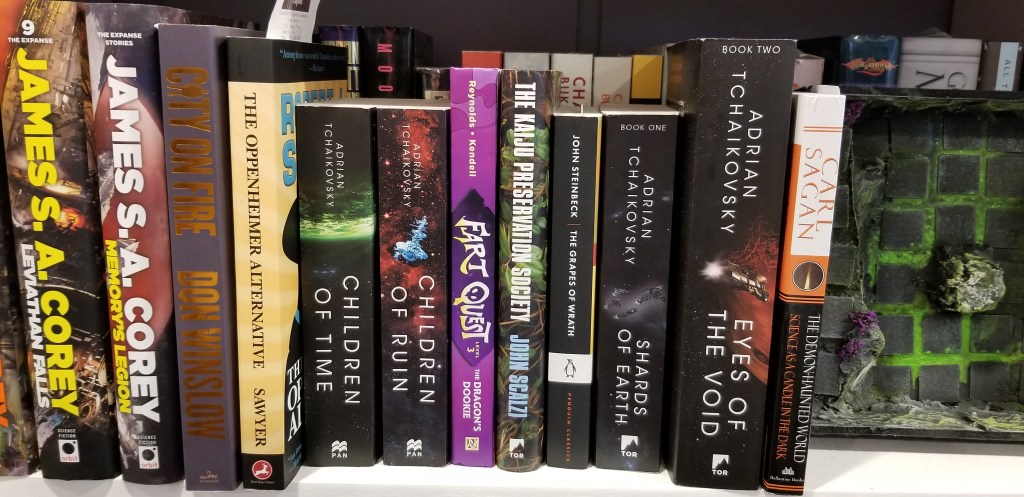
That wraps up the build portion. On to THE BOOKS! This year my goal was to read twelve of them. Sometimes I waste precious hours scrolling twitter when I could just as easily read a book, so try as I might to resist the sirens song of doom scrolling, I often did, rather than read. So I’m a bit short. I gave up on the Grapes of Wrath about half way through. But I do know I will go back to it. It was just starting to lag a bit back in August. Also the last book, Carl Sagan’s about the Demon Haunted World, is good, but I’m not sure if I’ll actually complete it before 12:01am on December 31st, or a few days into January. Here is the list of what I read this year.
The twelve books of 2022.
This year I found Adrian Tchaikovsky and read four of his novels. I have a fifth ready to go as a Christmas present. I also have a Mary Robinette Kowal book to open aswell. I am anxiously awaiting any new Lady Astronuat books she might put out. Also if Martha Wells could pump out two Murderbot books per year I’d be very happy about that as well. I will also pursue more of Don Winslow’s books in the coming years, as Man on fire was really good. I don’t typically do crime drama, but it was compelling and easy to read. More of that please. I was more than happy to find a Robert J Sawyer book I hadn’t yet read in the Oppenheimer faux history. That was really great too. I, like many others, have been waiting for George R.R. Martin to finish the last damnable book of the Fire and Ice Series, so I’ll drop fifty sixty bucks on that hard cover whenever it comes out. Not to forget the fun romp that was John Scalzi’s The Kaiju Preservation Society. That was a pleasant read last spring. I’ll have my eye out for any of his new releases aswell. I see that Fart Quest has book four out. I’ll order that for my birthday come Spring time. That’s a really beautifully illustrated series that turns on D&D charm, and general fantasy tropes. Meant for kids and pre-teens but I get a kick out of it just the same.
Not much else to say. Had an email from a client whom I did work for late last year, looking to pick up where we left off, and that’s about as great a recco as I would like to get. Repeat happy customers that come back year after year. If you could only see my grin.
So this is it. The big Kahuna. Once I press send the challenge is complete! Wishing you all well. Those who followed along playing the home game. I don’t think I’ll stop just yet. I’ll aim for New Year’s Eve. Put another 17vseconds on the clock ref, I have a few plays left in me to go. Ciao Bella! Love you all.
I have spent a great deal of time, over the last three years watching people build & make things on YouTube. Everything from home remodels, to hand made furniture, slab tables and machining. I would like to think that attempting much of this would be fun. Not that I’d be any good at it, but rather to experience it first hand, noise, smells and all. I never cared much for machining as a kid, though my father did it as a tool & die maker, thus a skilled tradesman, before moving into consulting and being a bridge between the shop floor, and the white coat techies and their sales staff. Now I wish I had access to some machining tools of my own, and an ear to bend to help figure things out. I would have had a riot of a time getting some furniture building tips from either of my grandfathers. Both of whom passed away before I even thought about doing it myself. They made chairs and tables in England, before and after the second world war, of which only one grand father had to take part. I myself had a brief stint in wood shop at school for several semesters, built some sets for a university play I was in, and then worked in a cabinet makers shop for a few months making antiques repairs, and milling up baseboards and trim for twelve hours a day, and cleaning up saw dust endlessly. So the wood shop wasn’t totally foreign to me, but I didn’t know I was going to fall for it this hard.
Now that there is no way to get it, I’d really appreciate their hard won expertise (my grandfather’s more so than the German cabinet maker). They could have sat, tea in hand, and pointed and watched as I worked on projects, chiding me for silly mistakes, or making corrections to my order of operations. Those are things I could really go for now. But alas, the furniture makers are more than a decade dead now. No video or hand books left behind of things they’d learned or wanted to pass along. I do have a hand made T square from my Grandpa Holyome. A dense hardwood straight edge he fashioned. Which I use fairly often. I’m not Mr Precise, so it works wonders on eye balled projects. I have properly machined tools too, but those I bought, they weren’t built by my family decades ago. A life time ago now.
When I get to thinking about all of that lost experience and knowledge I feel a little sad. What do they say now, like tears in the rain, or a breath on the wind. Gone.
I’m sure there were some small but strategically important hints or tweaks to techniques that would have gone a long way to improving my skills which they might have shared with me. Not only that, but to have made better memories with them. In all honesty, if they weren’t dead, they’d still be in England, on a six hour time difference. Not living next door or just up the road from me. And they’d both be in their mid nineties by now, anywhere from 94-98 years of age. But the fantasy was, nimble of mind, comfortably close at hand, teaching as we went. Cup of tea to keep them comfortable. Oh well. C’est le vie.
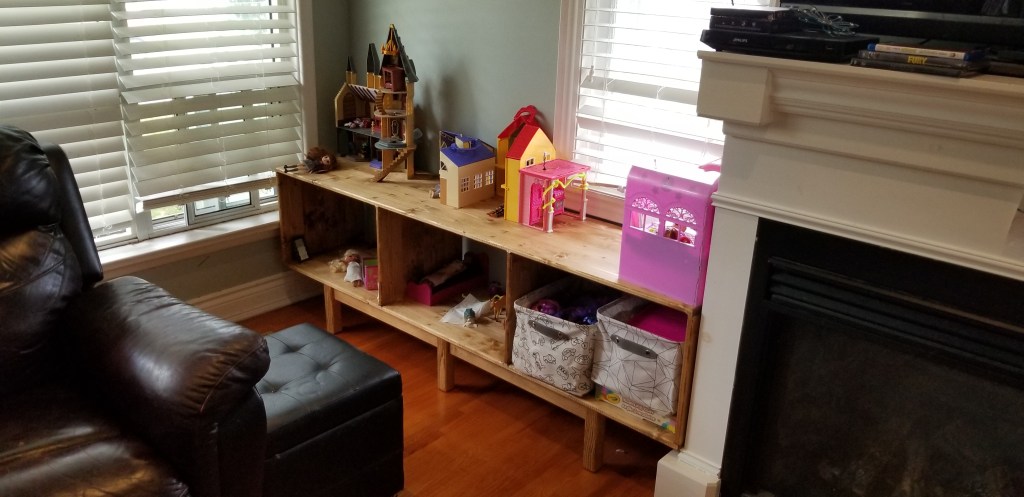
We managed to get a substantial coat of wax on the shelf unit yesterday, and we’ve given it twenty four hours to dry, and now I’m going to bring the shelf unit inside and begin to tidy up the living room and all of the loose toys. We have canvas bins that will fit nicely, so I’ll bung loads of gear into those, and leave the top for dioramas and play sets to get left in situ.
So far so good the wax is dry, and the unit fits in the space. Though I seem to have misjudged the thickness of the baseboard. Most likely due to the quarter round against the floor, which I failed to notice. Oh well. It fits in between the fire place and the front windows, and tucks under the windowsill of the fireplace wall. Fits over top of the fireplace kick out, and does not cover the wall socket/plugs/outlet. I am mostly happy.
Fits in the space, given all of the restrictions. Just not as snuggly against the wall as I was aiming for.
Next steps. Clean and sort toys on the floor into bins and cubby holes, and then sigh a breath of relief that it all works mostly as intended. I may still need to cut a 2″ hole in the top for power cords to more easily access the wall sockets/outlet, but we’ll see.
Looks as though I can get a vacuum underneath it fairly easily, which is a plus with my messy family. Updates to follow, as I get through the last leg of this project. Looks as though with the help of the toy box, and a couple canvas bins I have been able to leave as much playable surface as possible for the kids, and can still access both windows, and not interfere with the floor vent or fireplace. I’ll call that a win!
Floor is now empty of toys – for the minute the kids aren’t here that is!
My only qualm about it now that I’m done, well – beyond one corner not being 90° against the fireplace so the error is very easy to see. Is that I should have put in a second tier to one of the cubbies. Most likely the one with the wall socket contained within. Then I could have used that shelf to store the kids chrome book and have a dedicated charging spot that won’t get bumped or knocked. The shelves are 16 inches deep, so you really have to try to get at something pushed all the way to the back. But whatever. I can build an insert out of plywood for that, if it becomes absolutely necessary. And to think I sat on this idea and ruminated over it for weeks before I got started. How did I miss a dedicated charging shelf? Idiot. No matter. It’s done, it works, and I’m happy with it. Mostly. For now. To think if I had of made it from Walnut that would have been a $1500.00 job, easily. Just in materials, not even time and effort. It would also weigh about 200lbs if done in Walnut. Using pine cut both costs and overall weight, by an awful lot.
How I see it when seated to watch tv when I’m at home alone. Looks reasonable to me. Yes, I wear crocs, how suave of me.
The unit is finally taking shape after a few weeks of lingering on the bench, languishing in stoppage after stoppage. I still have quite a ways to go on it, but progress has been made over the last week.
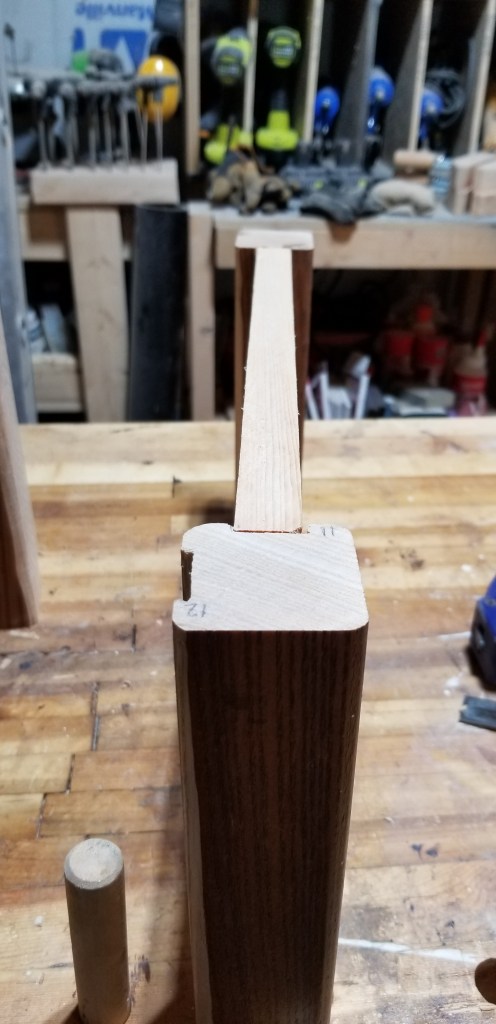
I hand cut all twelve mortises. Well two of which, the through and throughs, were done on the table saw once I had build a quick & nasty jig to clamp the legs to so as to not put my hands near the blades. But all of the .25″ deep mortises were chiseled out by hand over two or three days. I am currently busy with paid design work. So I’m slow moving with home infrastructure projects.
Hand cut chisel mortises.
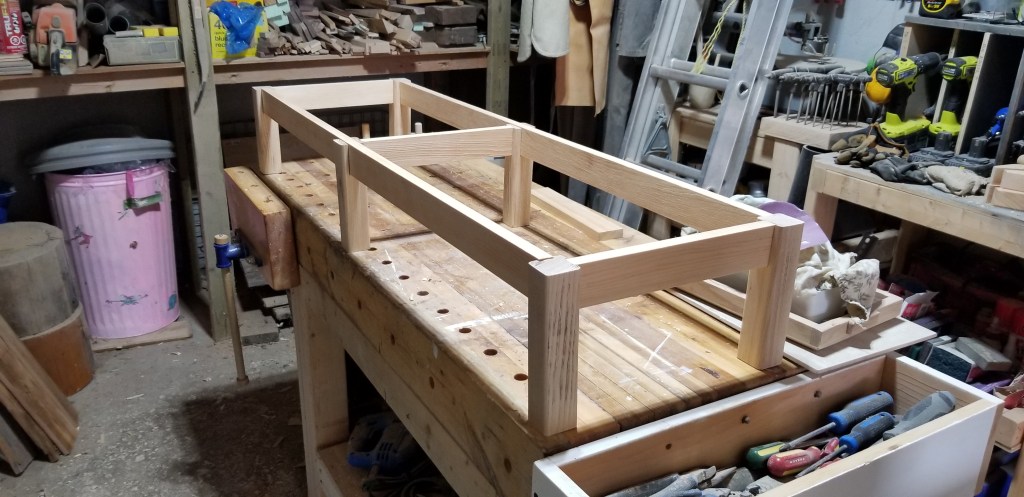
Then I completed a dry test fit which lead me to do some last minute rasp work for better fitment. Nothing major. I put the whole base together to test things out which was tricky to do single handed, as my pressure fit mortises are shallow, and I knocked it down a half dozen times tugging on corners that weren’t square. But I got it to stand freely of it’s own accord.
Test fit of first two hand chiseled mortises.After considerable wrangling I did manage to get the whole base dry fitted together and it stood by itself for 24 hrs without collapsing. A good sign!You can see here how shallow I cut those mortises. Just a tiny pocket to rest in. So delicate.
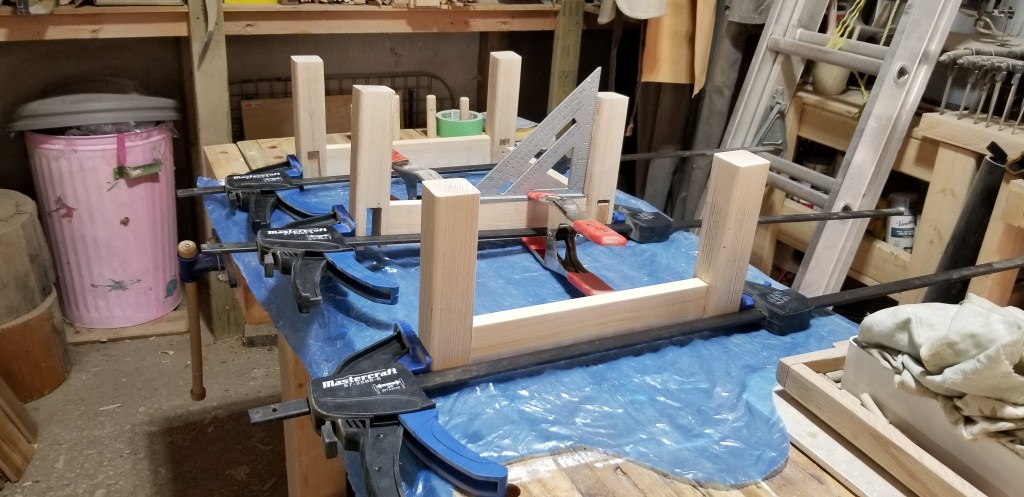
Then as of yesterday I began to glue up the cross braces for the base, three pairs of them. Glued and clamped for assembly. No real hassles here. I glue up on my bench over blue plastic garbage bags. Only need to glue a vital piece to your wooden bench once to know never to do it again.
The braces in glue up. One tricky leg needed a set square clamped in place in order to remain 90 degrees. Probably should have done them all like that. Next time!
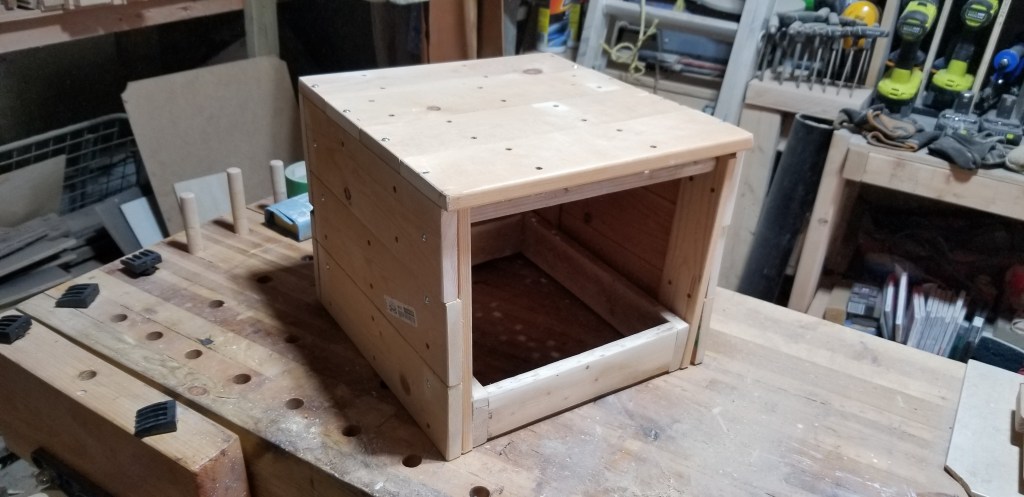
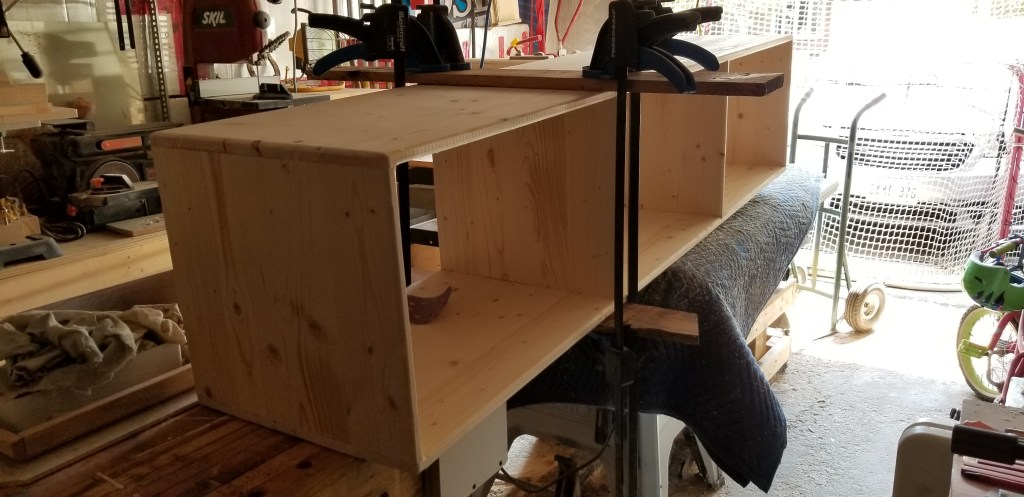
The top box was formed several weeks ago. Measured, cut, built using a dowel construction method, sanded, glued up, and sanded again. Still needs more sanding and then I can stain both it and the base portion together. Then I will use dowel to connect the two pieces, apply finish and bring it inside.
Fixing a dowel burst on the display surface. Peeled back a strip of pine, chopped out over long dowel, glued and clamped pine strip. Seamless.In need of about two more hours of focused sanding. Then it’ll be ready for stain & finishing.
I’m excited to see it all come together. I used three 72″L x 16″ W x .75″ H pine laminated boards for the top box. Plus 1.5 72″ x 5″ x .75″ pine boards that I cut down into 2.25″ H strips for stretchers and braces and used along the back of my box to strengthen it against any possible racking. The six legs are made of Ash, and are 1.75″ x 1.75″ x 8″h. That I had laying around from a new set of stairs that got put in at the cottage two years ago. I’ll post a photo once I get it all completed and set in it’s final resting place in our living room.
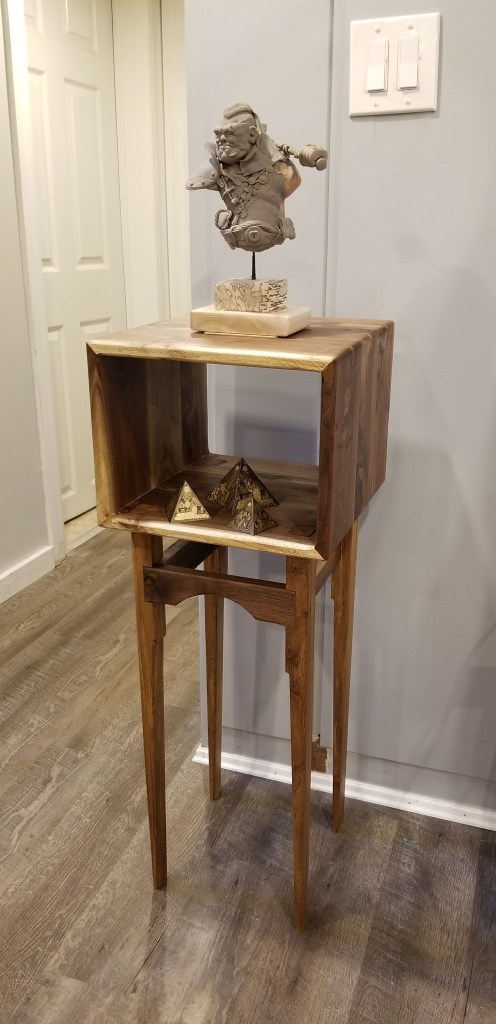
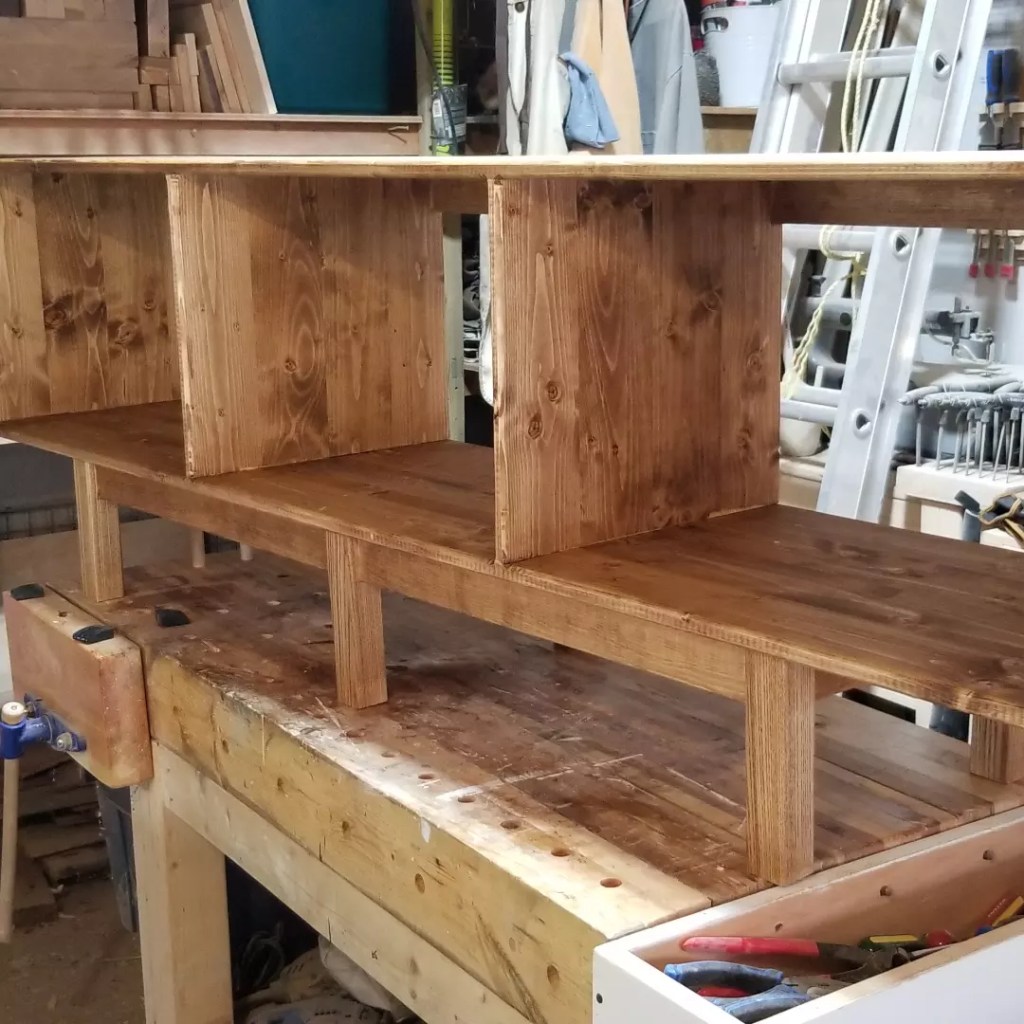
**UPDATE** I managed to get Walnut tinted Danish Oil stain on the base and shelf portion, as well as put in the dowels to join the top & bottom together. Waiting on the glue to dry as we speak. Last item is a 400 grit scuff followed by some Osmo poly clear wax to pick up the shine/gloss. So excited!
Walnut tinted Danish Oil on the base.Walnut tinted Danish Oil applied to all of the shelf unit.Test fit for base placement prior to drilling out and fitting the dowels to join the two pieces. Almost finished. Can see the finish line from here!
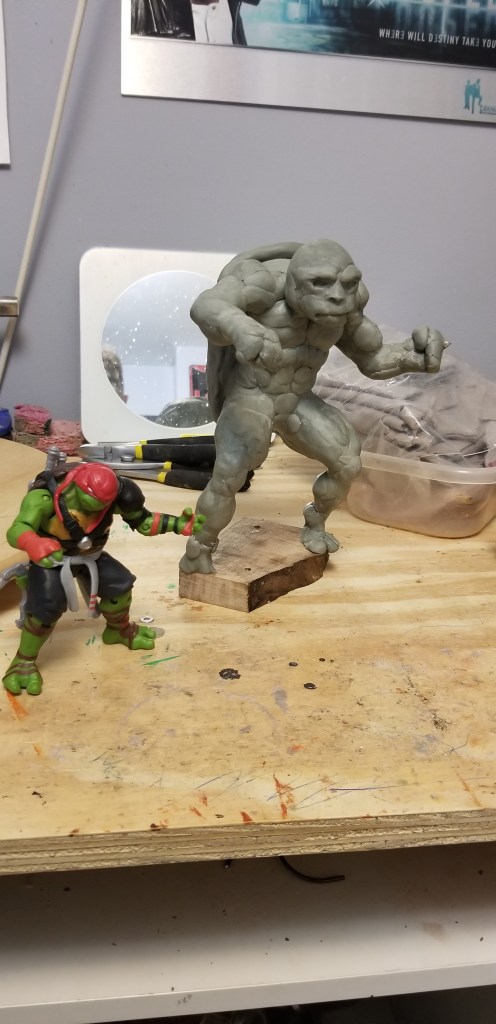
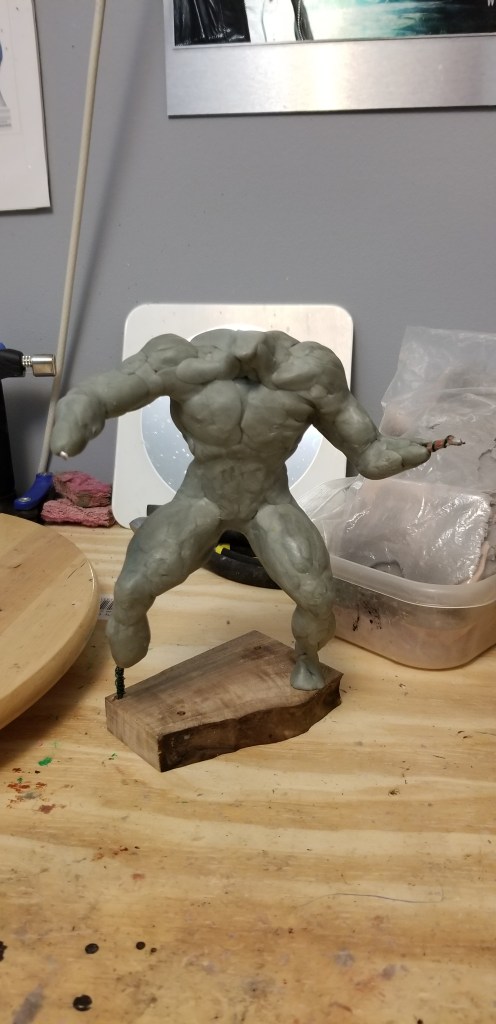
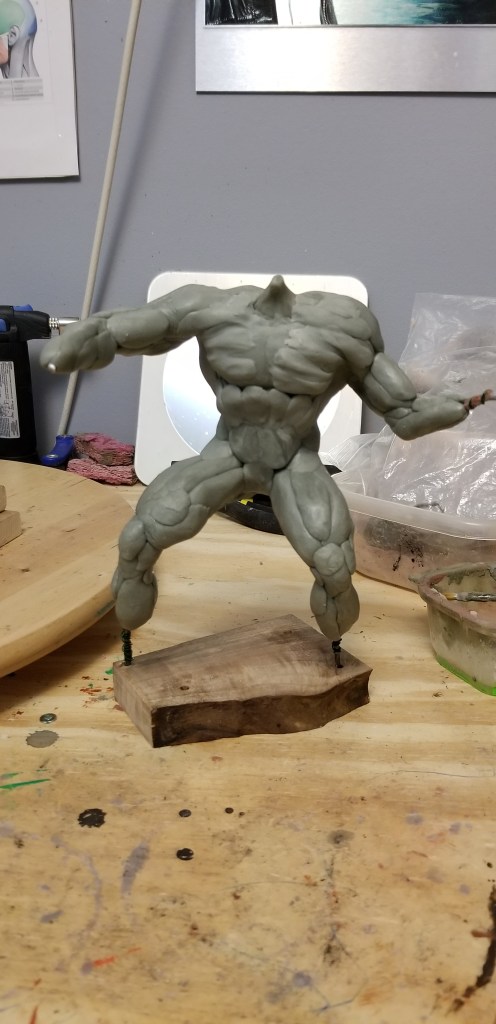
I haven’t sculpted a full humanoid figure in a number of years, so starting off with a Ninja Turtle in a medium I don’t typically use was going to end up one of two ways. Either the best thing I had made to date, or a low res copy with lots of learning curve errors for the type of materials I used. Can you guess how I feel it went? Yeah, the latter and not the former. I will say this though, free standing, a plus, looks like a turtle, kinda, and now it’s done. Three pluses in its favour. A great introduction to Apoxy Sculpt. I like that I don’t have to bake it afterwards. But as I don’t sculpt full time, I’m not able to wait for things to semi harden to go back in and make crisper adjustments, like I would with Sculpey. I have six some odd pounds of sculpey so any more sculpting done this year will use it ( Super Sculpey), rather than the last 1/3 of the Apoxy sculpt I have left. I like the idea of apoxy for weapons or add ons that want to harden before I finish the figure/bust I’m working on. Green stuff is great that way too. Next steps, more sculpting – yeah! And also painting my two finished items.
Work on the shelf unit is coming along slowly, as per usual. Have the box built, and round overd applied to all front facing edges. Needs a hell of a lot more sanding, and some minor fixes on the top display surface. Then I can stain and apply finish to it. Which completes the top. The base requires twelve mortises to be cut, and I want to use my table saw for the through and throughs. The rest get hand chiseled out. Which takes forever.
Plus the actual legs are Ash, so that’s a great hard splinter wood to work with. But sturdy as all get out. Measured the top box, and it is reliably 15 ” and 15/16ths tall. I was 1/16th from my goal of 16″. Not bad, not great. I think the noted thickness for my boards was approximate and not definite, which is where my discrepancy comes from. No matter. It’ll fit under the windowsill which is my main priority. The floor could dip, cup or bow, and I’ll be glad of the extra room to maneuver when I comes time to bring the thing indoors and really get moving on cleaning up the kids toys.
I’m not totally sold on painting the shelf unit white. I’d like to stain it dark, like Walnut, to match the rest of the furniture. We’ll see how it looks unfinished once totally assembled. I can make my decisions then. That’s future me’s problem to wrangle with. My reasoning is, as I can’t let this go right now, is that white paint will show dirty finger prints and scuffs, and hard wear, whereas the dark stain will just start to look more rustic and worn. Which will match the state of the house – ha. I know it’ll get beat up, so why try to draw attention to that by being a brilliant white?
As an aside : I really should put wheels on the toy box so it can get moved into the room to aid cleaning up too. Just a thought.
Today is Friday, and a warm hello to two of my older brothers whom both have birthdays today. If I recall it is #45 & #47! Happy birthday Amigos. Here we are last year on the hottest day of August playing Swamp Golf at the Thunderbird course in Kanata Ottawa. Our father melting in the background.
Every great show winds up having a clip episode where you get to revisit some of the funniest or most poignant portions of a television show. Usually it’s pretty deep into the later seasons when most of the story arcs are near completion, but they’ve been contractually obligated to provide 22 episodes per season and need to pad one out a bit. So, now I’m going to go through and update some current projects, rather than try to come up with anything new to say.
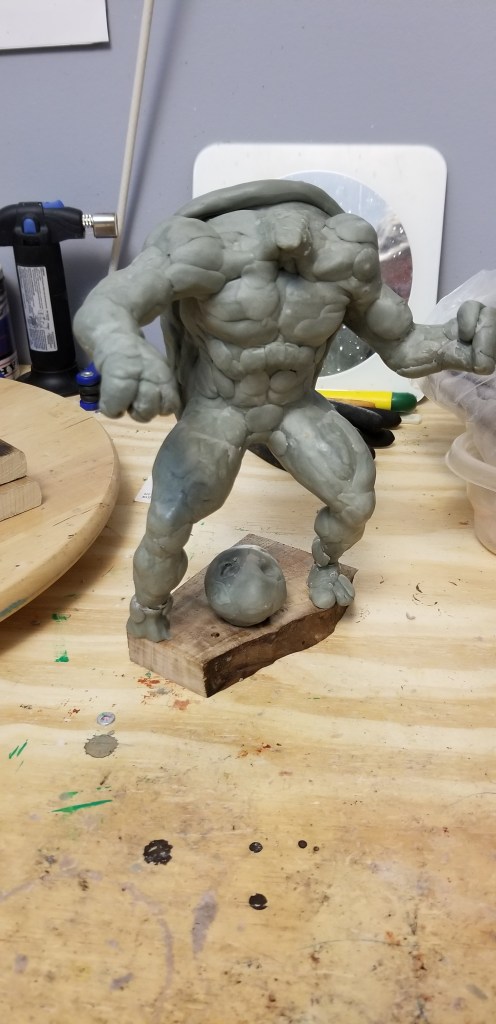
First off is the Ninja Turtle sculpt. One which I have worked up and torn back down three times so far. I’ve since decided to work the whole thing in Apoxy Sculpt rather than intermingle with Super Sculpey firm. The self drying, uber sticky substance is pretty wild. I’m not going to lie, I struggle with it. I don’t typically sculpt for hours on end, so staying with the apoxy as it gets slightly stiffer to rework it isn’t what I’m doing. I should change my working style to meet the medium, but I haven’t, so I may not. At least where this turtle is involved. It’s in very rough form, but it has a full body, arms and head. The feet are going to appear to be in standing water, so they are just lumps for the most part. Needs a lot of refining, smoothing and details yet. A work in progress that could take a few dedicated days to finish, or at my current pace, two more months in dribs and drabs.
The second project update is the shelving unit being built using dowel construction instead of my usual mitered box corners, or box joints. So a shit tonne of butt joints. Bland, but hopefully sturdy. So far so good. The plans I drew up call for eight inch high legs, and the outer most dimensions of the top box to be sixteen inches high and seventy two inches wide, by sixteen inches deep. All made with three quarter inch Pine. Except for the 1.75″ x 1.75″ x 8″ Ash legs or feet. It should stand twenty four inches tall, which gives me a quarter inch of room to slot in under the window sill. My true goal is to have the final build meet the pre-determined spec’s on the drawings, without having made any major edits on the fly. Not that that is a deal breaker, but if I can get better at building to plans that would make me happier. It’s pretty humid around here, so warped wood is something I really have to be aware of. Could funge the whole project if I leave it in the shop for too much longer. The top box is cut and dry fitted together, but needs to be sanded, glued, rounded over and stained, and have final finish put on it. I have a ways to go with the base portion. Cut my pieces, and did the round overs on the legs. But I have a lot of mortises to cut. Twelve of them to be exact. I probably need to round over the stretchers along the base too. More work! If I treat it with respect I hope to have a decent looking bit of furniture to have in the living room. Could be a fun reveal if all goes to plan.
The third project, is a doozy. It encompasses the whole house, mainly because it’s my fall clean up as the kids go back to school, and my wife off to work. I started with a bang, cleaned the appliances, counter tops, cabinets, both inside and out. The hall walls, door frames and doors, as well as the base boards. Washed the floors but did not polish them. In socks you’ll fall over and slip if I polish the floors. Lesson learned with bumped knees and one bruised tail bone. Ouch! I have a paper purge coming. I’ll sort the girls best artwork into a binder, and the rest can go to recycling. Between the two kids we have a seventeen inch tall stack of school work just sitting in the dining room. That’s gotta go. Plus I want to purge broken toys, and remove stuff to the cottage, which doesn’t get played with at home. My niece and nephew are both still small, and would love to play with that stuff still. Oh the memories. I got a jump on it, sure. But the real work will start once school starts again next week. I went through their closets, so that too is done, for now. Growing kids, so clothes and shoes will be a consistent issue for years to come. Ha. Lots to do around here.
Lastly is paid work. I have a solid line up of projects between now and November, so I am very happy about that. I have the room to slot in other projects inbetween my planned work, which is handy. And I’m ok if one or two drop off the map until next year. Next year? Yes. Only four months left of 2022, can you believe it!?! Every so often I think about going out and gathering up more clients, and then when I see what I actually have in the pipeline during the summer & fall, I’m glad I haven’t done so. Busy is great, run off my feet is no good. Creativity suffers when I’m too stressed. Have a solid work life balance right now. Love it!
So there it is. The clip show of what’s going on around here. I could mention, though it’s a bit late. That I also have a model kit I built more than a year ago on my desk that needs panel lining and it’s water slide decals placed on it. This thing has more than two hundred decals to place on a twelve inch tall 1/100 Gundam model kit. Going to be at that project for about eight hours or more. Will look great when done, but ugh. That’s a commitment I’m reticent to make right this second. Stuffed in a box in the closet is a much larger 1/60 scale resin kit that needs weeks worth of work. I lean into my model kits over the winter months when my garage is too cold to work in. Keeps me occupied when not working or cleaning, or shoveling snow.
Lastly is the childrens book I wrote and am currently illustrating (poorly I might add). That’s another item I’ll leave for the winter months when I can’t work outdoors. I have eight more background illustrations to complete, and then I need to tackle the two main characters. It fell off the radar, kind of on purpose, but still I’ll be glad when I get it done. Which reminds me. I’m not entirely certain if I will write a third novellas worth of short stories this winter. I never officially published book two on Kindle Unlimited. I probably should do it. Accompany book one so it doesn’t look so lonely. I sold one copy. In the UK. I believe it was to one of my cousins. It was great to write it all, edit it and then collect all those stories together into one unified thing. Felt amazing to have actually done a thing on my bucket list. Now with book two I’ve written more than 100,000 words worth of short fiction. I’m proud of that. Regardless of whether or not it sold any copies.
You knew it was coming, we all did, and it’s happening, right – now. Woah. All those weeks ago this felt miles away, and now that it’s here, we’re already on Tuesday. The youngest had transitional night terror episodes about doing something new, and last night was no different. The camp was full of smiling kids faces, so I knew that they’d have fun, dancing around to music, doing crafts and acting like pretend animals all day long. They even get outdoor time in the a.m. before it gets to swelteringly hot in the late August sunshine and humidity. They practically bolted from the car when they saw a field full of kids their own age, and hula hoops, and kids doing cartwheels and… yeah, they had a lot of fun on day one. Four more days to go until another long weekend. Then a random Tuesday at home, then school.
For as long as that lasts while York Region does nothing preventative about Covid or Monkey Pox. Could be a short lived return. But, this is all next weeks worry. I want the kids to enjoy camp right now, then focus on having one last great summer long weekend before we have to tackle the gods honest truth about the state of our school, school board and all the inherent bs contained within thanks to our MOE. Ugh.
Spirits up, smile on, keep this train a rollin’. The last vestiges of summer are shining that late day amber coloured glow. Trees are starting to turn, or just shed crumpled leaves due to the lack of rain in July & August. The sun sets earlier and earlier, and the evenings have grown rather chilled. You’ve got only four or five more weeks of comfortable sweater wearing evening patio drinking weather ahead of us, before coats will become a necessity. That was a mouthful.
I spent much of last night dreaming about the shelving unit I’m going to build for the front room. Asymmetrical to fit the space, yet maximize the utility. It has to be short to fit under the windowsills, but have playable surfaces for the kids toys. Stained dark and polished to a gloss, even though the kids will most likely scratch the surface immediately. Oh well. I’m using pine, so it’s not like $2000.00 worth of Walnut lumber. I have the pine here. It was to make HP Trunks, but I’d rather use the resources on the family room at the moment. I’ll still have all of the hinges, handles and coloured felt if I go back to making them again. I need to make a 2ft long trunk for my youngest. She only has a novelty box I made that’s 12x6x6″h. Looks the same, but significantly smaller.
I’m going to use lap joints, butt joints and dowels for the utility shelf unit. No dovetails or box joints or mitered corners of the boxes portion. Any kind of panache can be shown on the legs/base portion of the unit. The top box will be pretty straight forward. No funky angles, or design touches. Plain Jane! I need to check and see if my planer still runs, as that might be the defining factor for using my stock of pine, or buying pre laminated boards in a paint grade state. Will look into it later on this morning. Ciao Bella!
Plywood tongue and groove boards with a one ply hardwood face that is slightly thicker and can have that “hand scraped” texture. Not really hardwood, more of a fancy veneer on your laminate board flooring. People look down on laminate floors in favour of the exact same thing, but with a slightly nicer (and a whole lot more expensive) veneered top face. Ludicrous. Pure malarkey. The best con perpetrated by the flooring industry upon us all. Here have the same thing, but more expensive, just use a nicer more posh sounding moniker for it. Insanity. You want to know how I know that engineered hardwood isn’t real, nobody reclaims it to build furniture with it. We’ll scavenge pallet wood, boxes, other old furniture, rotten trees and old building materials like barn boards. But there’s no craze for building furniture with engineered hardwood, and that should tell you something. As us cheap wood workers will build out of just about anything we can get our hands on. Even 2×4’s. So, yeah. Think on that for a second or two.
So Friday, yeah? Yes it is. Week eight closing out with some loud cracks of thunder in the early a.m. Summer is most definitely drawing to a close. Sad to see it go, but bring on autumn and Halloween ! Decorations, costume building, lights, smoke machines, music and scary movies! It really is a whole thing if you lean into it hard enough, and have the funds to do so. I see how privileged it is to be able to go all out during any season or holiday that you really love. I hope to one day help my kids make elaborate costumes, like ring wraiths, or Master Chief, or Ironman or something like a Transformer or Gundam Robot. A chance to build all summer long, paint and fabricate parts in foam, cloth and cardboard. It could be awesome! I choose to believe it would be awesome.
Still a few weeks away from pumpkin carving. Can’t start too early or else they rot before the big night! Gotta time it just right, so you’re not rushed, but it doesn’t turn to mush with rounded soggy edges! Carving shows will be on tv very soon! I for one am very excited. Ciao Bella!


You must be logged in to post a comment.