Not of the intense inner ear pain, but a memory I had following a surgery to have tubes placed in my ears to shore up the collapsing inner walls of my ear canal. It was late in the evening, I was getting over the anesthesia from the surgery, in my own bed at home and I was crying because there were noises keeping me awake. And much to my surprise my mum told me I could hear the birds outside my window, and the rain on the glass. Two, usually too soft sounds I didn’t really take much notice of before, and were so new I couldn’t place them. Mind you I was drugged to the tits for a six year old or so, but it was still pretty startling. How can you live like this, hearing all this weird shit. How do you know what to pay attention to? If I can hear a fan, cars, mumbled talking, phone notifications, birds, and what not, odds are I can not hear you talking to me from several feet away. It’s all one jumbled mass of noise to me. Write that shit down. Text me!
Weird memory to have late last night as I was putting antibiotic drops in my ear. But a vivid one at that. Never can tell what you will remember about life. Happy Tuesday all.
Ps. Yes I did lose the airbrush compressor. It has died a death. I’m now on the lookout for a higher quality replacement that offers slightly more versatility. But which does not break the bank. I know the top of the line Iawata guns and compressors will cost over 1K. Too rich for my blood. I need a mid to lower mid tier set that will last five to ten years of intermitten, sparse use. Any recommendations from out there in internet land?
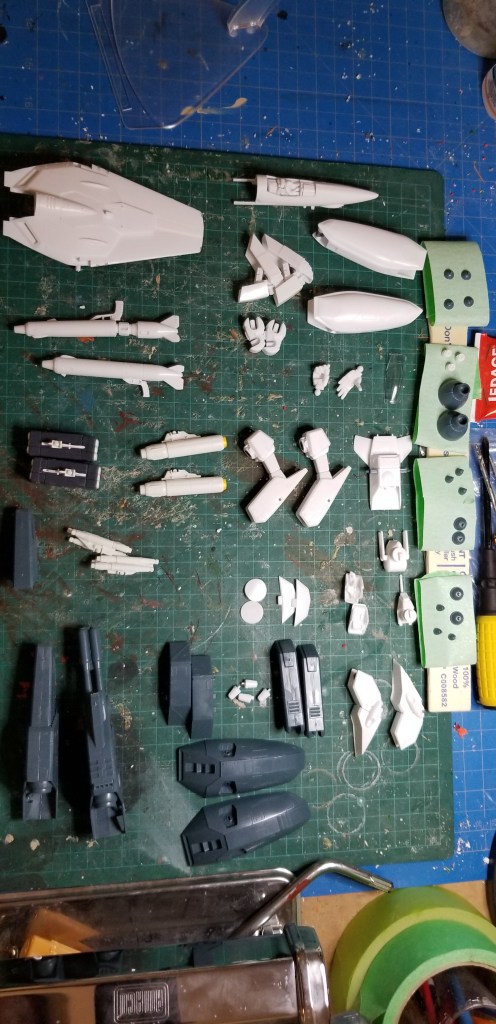
The last two weeks, whilst busy with work, have included some leaps and bounds forwards with my model kit build up. I finally have all of the individual components cut off their sprues, cleaned off the nub marks, sanded where required, and built into the appropriate sub section piece, (ie.) Elbow, knee, ankle, hip, hands, cockpit etc etc… Below is a picture of all the parts laid out ready for priming soon.
All parts laid out, with thruster cones separated onto painter’s tape for ease of painting, and keeping track of the smaller bells.
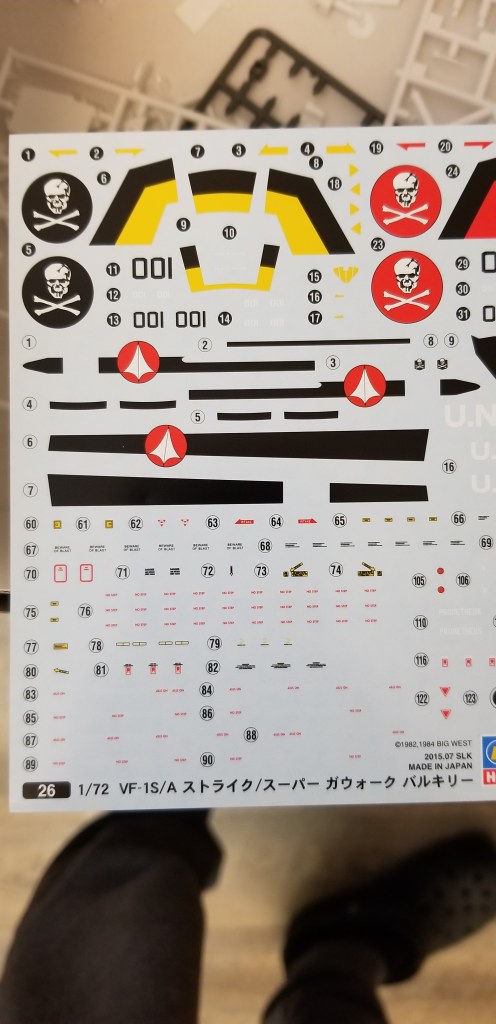
I am going to use the yellow & black version of the water slide decals, image below. To change up from the red/black version I already have.
Going for yellow accents this time around.
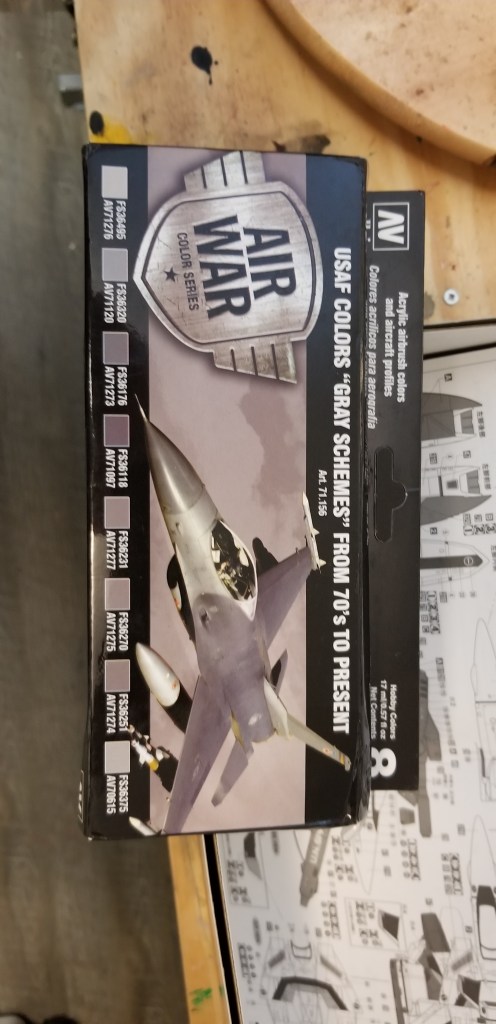
As far as a paint scheme is concerned, I’m going to use USAF colours to make this model look a little more custom. My airbrush nozzle is too large to accurately achieve individual panel coverage, so I’ll need to tape off sections to get colour variations from the paint set I have in hand. A mixture of light greys on top side & legs, and the dark greys & black for the laser canons, major weapons attachments (darker grey plastic elements shown above) feet, vents, and other odds and sods. Plus oil washes, panel lines, decals and rust effects. I ordered the Tamiya 10mm low tack tape to help me with masking after all the priming and base coating is done. My hope is, that by leaving everything in smaller parts I can do a far better job of masking, and eliminating overspray where I desperately don’t want it. Fingers crossed! Then a high gloss coat to round out the sprayed portion of the build up.
I will need to paint the cockpit & pilot separately, as there are lots of edges and bits to pick out & high light. I’m really trying to make this one look legit, so no real time limit, but I’d like to not still be doing it in March. If you catch my drift.
Vallejo USAF colour range. Variations on grey.
I’ll finish it off with prominent decals, and the clear plastic stand. I’d like to be done by the end of February, but that will depend on workload, my kids staying healthy, and all the PA Days, & Holidays, and weekends not interfering too much on my schedule. We’ll see how that pans out.
Paint & decal instructions.
Work has been steady throughout January, so I haven’t even had the chance to crack open my illustrated children’s book. To be totally honest I haven’t even given much thought to how I will depict my two main characters, Lemon or Smush. Which is kind of important. The story is written. I have done five or six drafts, and I’m happy with where it is. But, I do need to get those pesky illustrations done. I know I focused a great deal of my free time into reading half of this years book list up front, and meticulously picking through my VF-1 model kit build up, so I didn’t leave much time for the book. Nor did I feel as though I needed to. I haven’t sculpted yet so far this year, nor painted, nor done any wood working, so… gotta pace myself. Too many hobbies, and too little free time. Have managed to play my guitar a few times, which is really nice for a change. That is very relaxing. Loud, but relaxing. Let us not forget that both my kids do four extra curricular activities per week – each. So my evenings are spent playing chauffeur/ assistant coach/cheerleader and water boy. So evenings aren’t exactly free time for me either.
Hell, here I was thinking I’d start Book Three of collected short stories this winter, like immediately after Christmas break, but that hasn’t hit me yet either. Do I go a whole different route? Or stick with what I have developed and just find a new angle to explore? Not sure. Really need to think about it, and write up some outlines. Maybe later. I’m pooped.
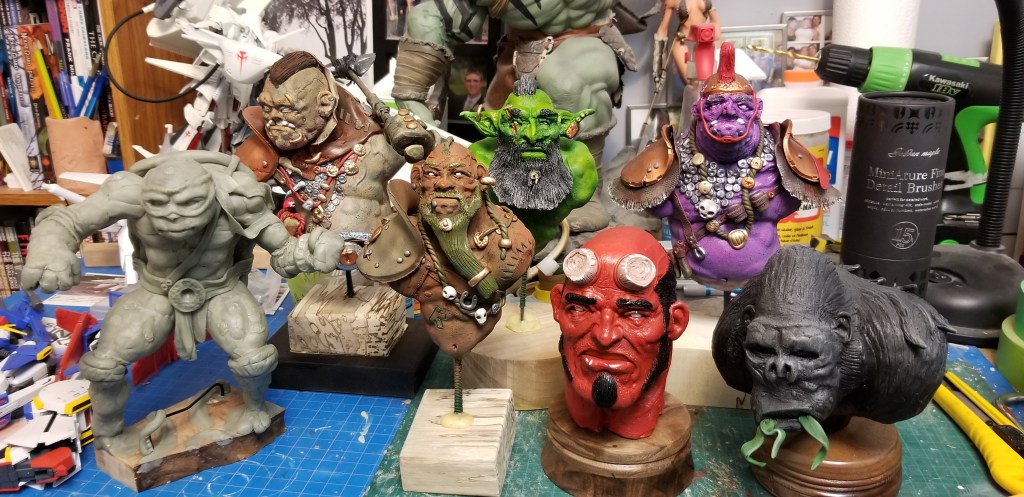
Striking projects from my list, left, right and centre. It’s been a busy and productive year, and I have used my quiet days to finish all my bust sculpt painting.
The old gang back together again.
I managed to do about three hundred water slide decals on the Double Zeta Gundam I got for Christmas several years ago, and gloss coated it, and did the final assembly.
Double Zeta looking crisp and shiny.
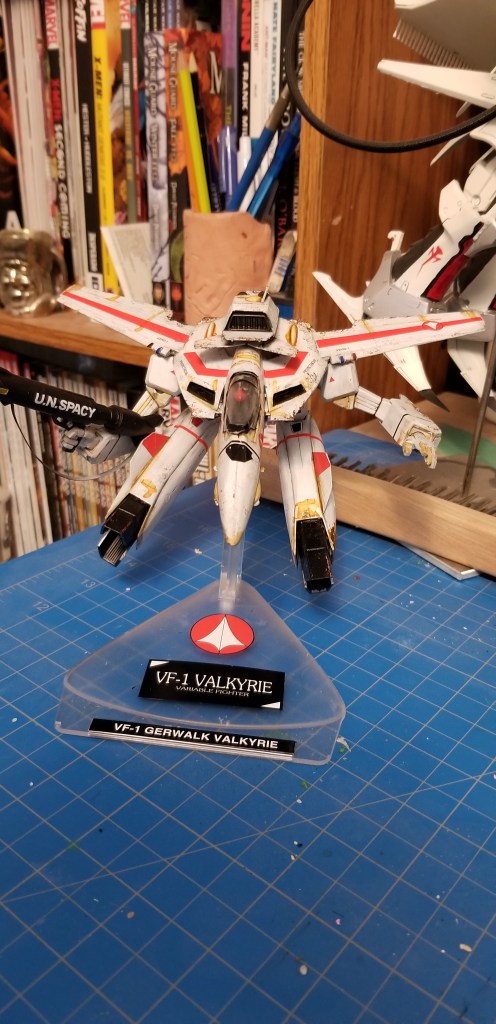
And most recently I finally got around to painting, adding the water slide decals, and then practice weathering my VF-1 Macross Gerwalk 1/72 scale model which has been built and left untouched for ages. I will readily admit I wanted a pristine, off the factory floor paint job, but I mucked it up, so a rusted beat up version is how I salvaged my work, and got a chance to practice some new weathering techniques and grime washes.
Last pass with grime, chipping, and rust effects.First pass with grime and muck.
** I’ve just realized I cheated a bit with the far away photo. So here is a closer view, top down, of some of that grime, chipping, rust, and dirt weathering i did. You can see just how askew some of my decals are. The gritty paint application made them far less easy to manoeuvre when placed incorrectly. Or not at all in some cases due to the friction from a lumpy/textured surface finish..
Top down view of weather attempt.
I have to come to terms with the fact that my one size fits all airbrush is great for broad surfaces, and gradients (think body of sculptures I make) and not so keen for panel lines and fine detail. The unit , or gun more specifically, isn’t built for fine detail and finesse work. Also my taping and masking could use some more practice. I also need to leave my mechanical models in pieces so that I can add all the details in without fighting the model physically to do so. I’ll have to keep all of that in mind when I finally tackle my massive resin chonker that currently resides, in pieces in my office closet. It’ll stand nearly 16 inches tall when done. I don’t want to rush, nor fuck it up. I bought it the year my eldest was born, and wanted to get good at the technical side of model building before I got into it. Not entirely there yet, but if i don’t start it, i never will. It’s going to be slow moving, because i have to wash all the mould release off of the resin. Sand it all, pull the pour spouts off the larger chunks, fill holes, straighten out warped bits, and then do more sanding, and panel line clean up. Could be 200 to 300 hours of work. Including masking, painting, ink washes, and decals. Magnets and pins. Oh my. This thing is a real under taking. Makes me nervous just to think about!
Tomorrow is supposed to be a massive storm day. So I am wrestling with whether or not to walk the kids to & from school tomorrow, or have them stay home. I don’t think I’ll have any new work tomorrow, so it’s just a matter of if they fight all morning, or look as though they can sit and watch a movie in peace. We can play in the snow too, but not if they are fighting and whiney. We gotta clean up if they want Santa to have any room to put gifts on the floor by the Christmas tree. I also need to buy them some Excedrin PM, to get them into bed at a reasonable hour come Christmas Eve! They’re too pumped up! So amped it! So. Much. Energy. All the time with them, it’s just go, go , go, and what have you done for me lately! Ha. My fault, I suppose. Too nice.
All the best to you and yours. Stay well out there. Be safe in the coming storm. Ciao Bella!
***Additional note: I meant to add that I also painted up the Aliens from my Nemesis board game from Awaken Realms. That was a fairly quick job, as I used the air brush for that. It involved priming the pieces black. Then using a grey primer to add a zenithal high light from the top down. Then one quick blast of a blue grey paint, with some blood red splotches for the carnage those aliens cause. Took me about an hour to paint up sixteen or so 75mm items on 50mm bases. I could always go back to pick out some finer details, but I think it’s great as is. I could do the Void Seeders next, but we will see. My kids are still too little to play a competitive board game like this. I have boxes of monsters from Tainted Grail, Fall of Avalon to give a once over too. I think I want to give them more than just a one colour splash with a sepia wash though. That could take weeks with how many there are. No matter. That’s a 2023 issue, or later. Cheers!
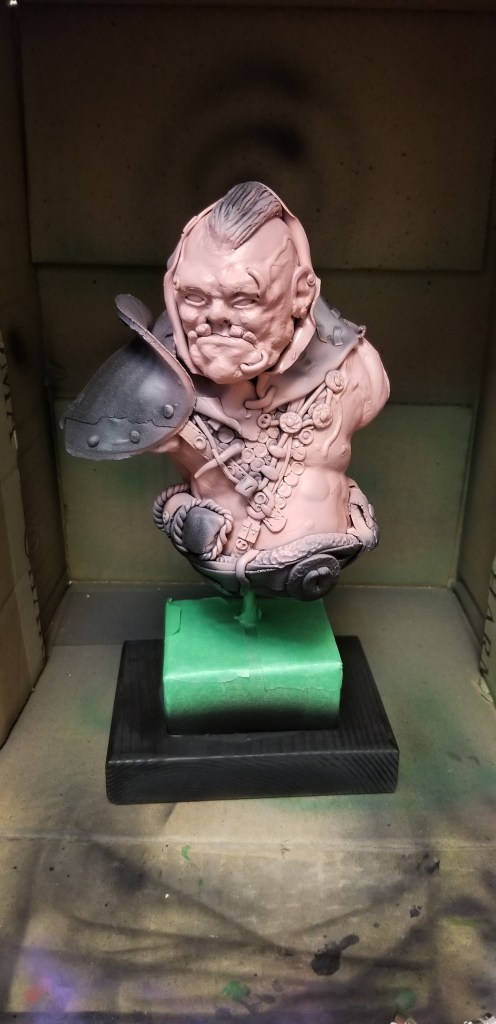
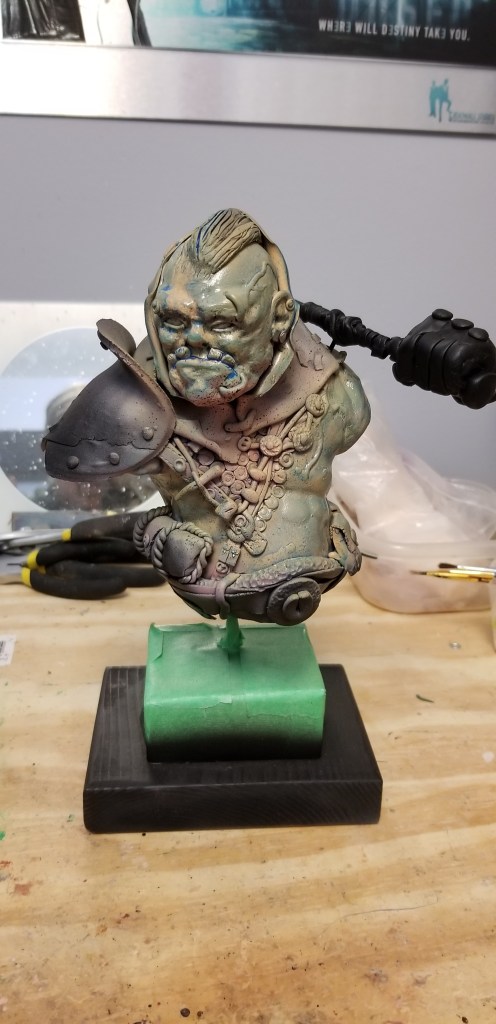
So in our last painting episode I attempted something which I had not done before, a realistic human skin tone. I had the appropriate paints, I was following along step by step, and I even added flecks of mahogany, green, blue and red for that authentic splotchy skin we all have. And then I got real heavy handed with the last two layers of high lights, and washed it all away. But not before I added the blue glaze to add some of that Ogre ‘otherness‘ to his look, and it all went to dog shit.
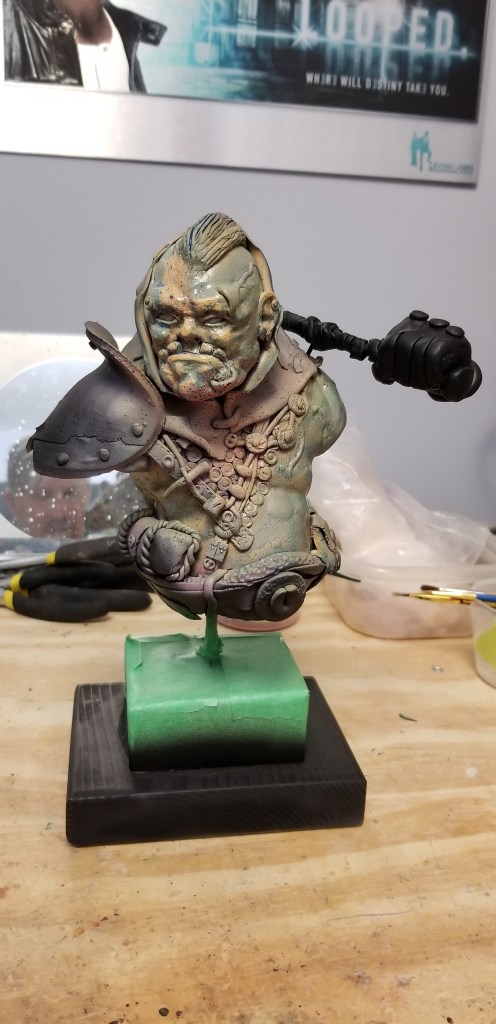
I had some thoughts regarding going right back to primer, and trying again from the start. I was all ready nearly three hours deep on the paint job at this point, so I instead opted for a quicker fix. It wouldn’t help with my over sprayed shading issue, being that I had mostly erased all of my layered shadows. But I pressed on. Adding a new round of flecked speckles. At this point I was happy enough (I guess?), and dug in to painting the rest of him. Chainmail, cowl, hair, teeth, eyes, belt, furs and trinkets. I tried to get a rusty feel to the pauldron, but as I started with a Copper look, a blue/green patina would have worked better, in retrospect. No matter. I put his crows beak/war hammer back on, and painted that a little. In all honesty the weapon requires a lot more work at this point, but I’m over it for now.
I had some EU labels come in, and the spectre of another report or three looming, and I don’t want to invest more time on the weapon right now, as the paid work can come in at any second. Gotta stay nimble as a freelancer. Hurry up & wait is real common round these parts.
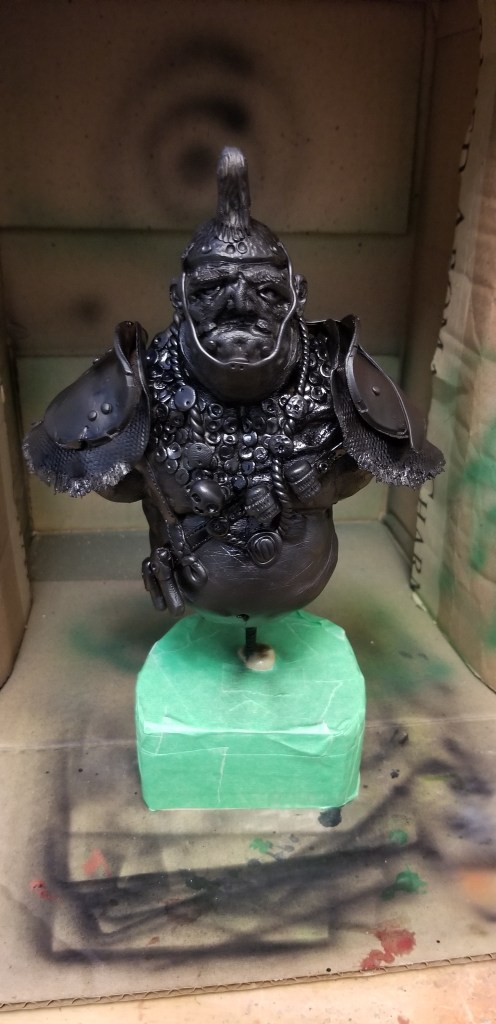
Anyway, here he is, and here is how it’ll stay for a while longer. Perhaps come January, in my down period I’ll pick him back up and polish some edges. Behold, the thing I have made.
95% complete Ogre Rogue bust I sculpted this year (2022).
It looks like a thing, so I have that going for me, which is nice. Otherwise all I have left is the no name brand Ninja Turtle character I have left to paint. Could just leave it as plain Apoxie sculpt though. That’s a thing that people do these days, just leave it in it’s original colour. I can get behind that I think.
The Rogues Gallery of 2022 sculpted items, and their paint jobs.
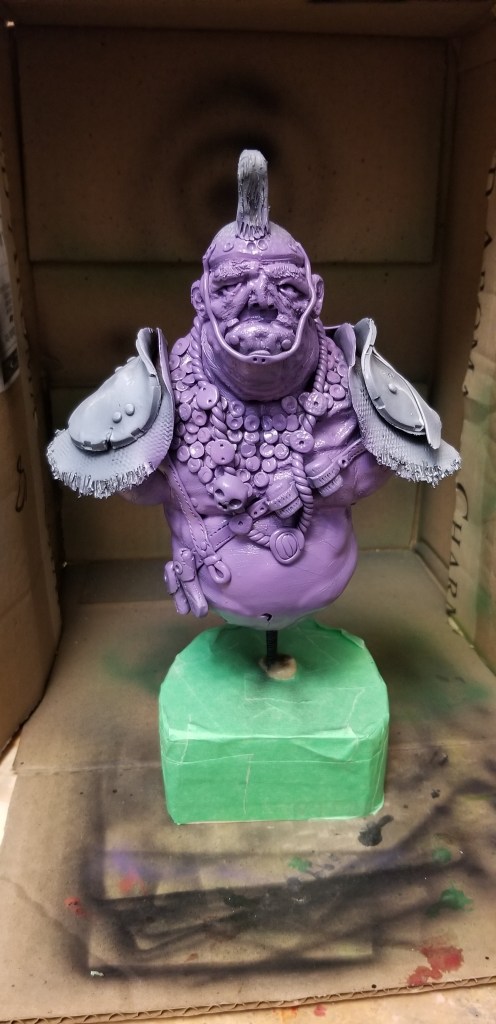
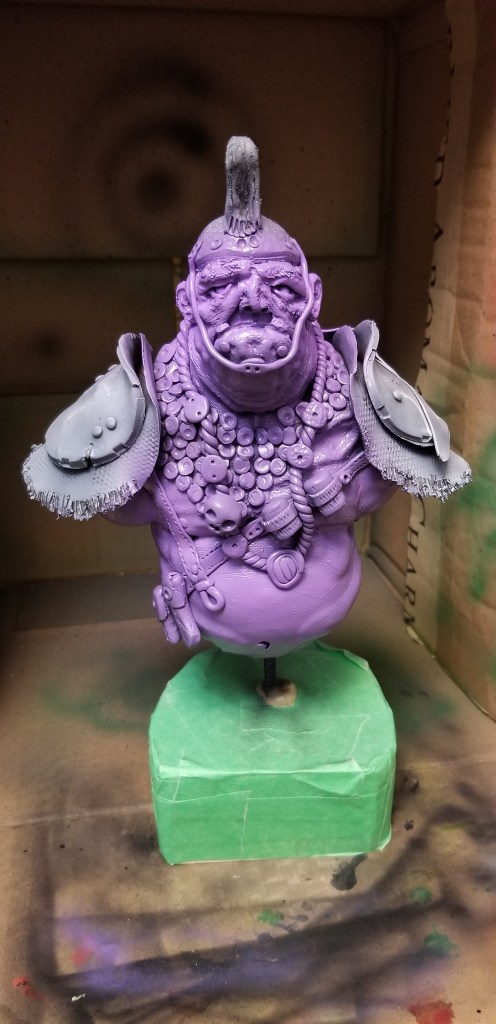
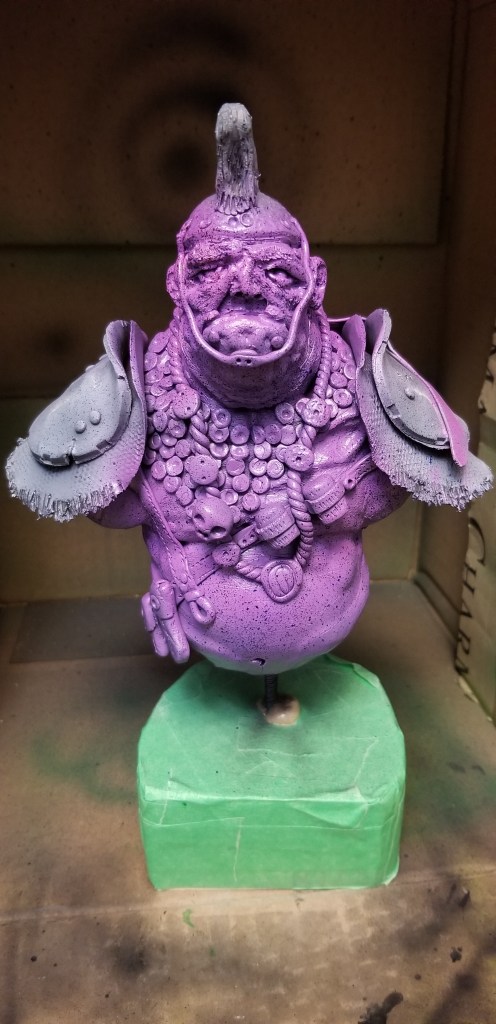
Started the Ogre Rogue paint up today. It was supposed to look mostly human, with a hint of a blue wash over top. But I washed out all of the skin tone variation flecking of Mahogany, Red, Green & Blue by spraying too heavy on the high lights. And then the very thin blue paint washed away much of what was beneath it, into one flat drab monotone. So there is 2.5 hours wasted. Now I need to have a think on whether to prime it all black again, and try once more from the start. Or. Here’s a big, ‘or’, add more flecks of colour over top ever so slightly, and just continue on. As I do have a ticking clock counting down with more reports coming on my heels. You know what. I think I can salvage it with some slight flecking of different colours. I won’t have the highlights I was hoping for, but it will at least look less flat.
See if you can spot where I bungled the whole thing.
Rose red brown base coat.50/50 Red and the next colour100% second colour. Then, flecks of mahogany, red, blue and green.1st high light. A tad bold.Second high light – can still see flecks- kind of.Too far. Got heavy handed with the paint.Blue washed out all details.Pooling starts to get really noticeable. Pulled colour off the face – tried “something”, it did not work.
Yeah – so… not impressed with myself right now. I was a bit heavy handed on applying the high lights, and I washed away all of the depth. And my thinned down blue ran, and puddled, and looks pretty bad. Oh well. Still lots to learn. I should have used a clear coat at some point, most likely just before the heavily thinned blues. Live and learn.
Experience is gained through stupid mistakes. So I’m pulling in XP like nobody’s business right now. I really should have stopped once my high lights had totally covered the flecks. I’m always rushing. Rush, rush, rush. For some reason a sense of urgency permeates through nearly everything I do as a hobby. I managed to quell it in my wood working, namely because table saws, and blades are waiting for a moment of inattention to take my fingers. And I know how to be calm when I work my day job. But man, do I ever get impatient when painting. Chill out my man. It’s not a paid commission. Take your time my dude.
Somehow it’s only Tuesday. American Thanksgiving is coming up on Thursday, so there must be football, and parades and such coming up soon. I need to eat some breakfast, and think about this painting mistake. Airbrush compressor is now making a different sound than usual. Not sure what to do about this. Excuse to buy a better one should it crap out entirely? Or is it finally breaking itself in. I have no idea whatsoever.
I have recently been revisiting my old no name air brush. I picked up a wide variety of Vallejo paints, primers, thinners, and washes so that I could paint my latest round of bust sculpts. It has been a trying time, to say the least. But as I progress through my eight recent builds I am finding a stable, and repeatable method to getting half way decent results.
I am working off of the following methodology. A flat black primer over the whole bust, followed by a grey primer that I spray top down for stark contrast high lights. Then I use a mid tone, straight from the bottle to cover the whole sculpture. I use a darker colour to then paint from the underside only. Then I use a 50/50 mix of mid tone to first highlight, spraying top down all over. Then the high light colour at 100%, top down only. Focus primarily on head shoulders, and ear tips, and maybe belly if my character is fat/barrel chested.
At this point I pick up a tooth brush and then fleck a deep red, blue and green paint all over the bust, avoiding armor if at all possible. Once dried, I go to my last 100% colour and knock those flecks back a tad. And then use my final highlight colour to brighten up the face and very tops of the shoulders only.
After this point it’s all brush painting for metallics, leather straps, skulls, and anything else that wasn’t skin tones.
1.) Flat black primer.2.) Grey primer, top down only spraying3.) Mid tone all over.4.) Darker under colour that is sprayed bottom up. 5.) First highlight sprayed top down and all over.6.) Second highlight colour top down. More focus on head, neck & shoulders.7.) Flecked red, blue & green paints for skin variations.8.) Knock down flecks, and add next highlights for face, and shoulders only. 9.) Begin brush work for metallics and all other elements.
I’m not actually finished with my Ogre royal guard yet, so I’ll have to cut it here. I should note I’m using craft paints that I have thinned with a Vallejo acrylic thinner. I wanted something a bit different to my regular green, brown, red or blue palettes. Looks nifty. I think. Still has a long way to go. Catch you around.
Not gonna lie, big shock to see the amount of traffic that came by here yesterday. Nice to see, but just goes to show I have no idea what anybody likes, or enjoys about my blog posts. Though: I will say this, anything to do with wood working will get at least a handful of views. Maybe not the day of, but eventually it will. That much I know. So, there is that.
I don’t have any immediate wood shop plans, except to make myself a smallish air brush painting cowl, that I can wrap in plastic, and run a vacuum out the back to trap any overspray. I don’t think the build will be very interesting, or complicated, so I don’t, as of yet, plan to document it. The reason for the build is that I finally broke down and ordered specific air brush paints. So instead of painting into a cardboard box, like I used to do, I’ll make a sturdier wooden box, lined in plastic, and with a plastic hose adapter embedded in it to contain the mists. It’ll be covered by an open cell foam pad to soak up particles, that can be replaced. But I don’t forsee myself suddenly becoming a painter of many things. I have my busts to do, and a few miniatures laying around to finish up, and then it’ll sit in the closet for a long while. Actually I bought Fantasy Series Two from a kickstarter that hasn’t released yet, so when those 200 models show up, the air brush & cowl will get some serious use. I call it a cowl because it’s so small, and not quite a full booth. Semantics I suppose. Cowl sounds cooler than spray booth to my ears.
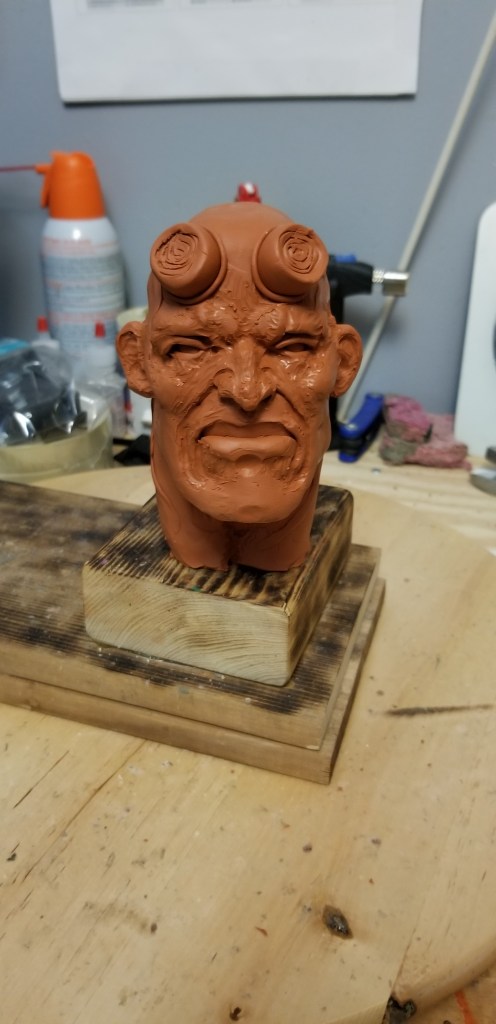
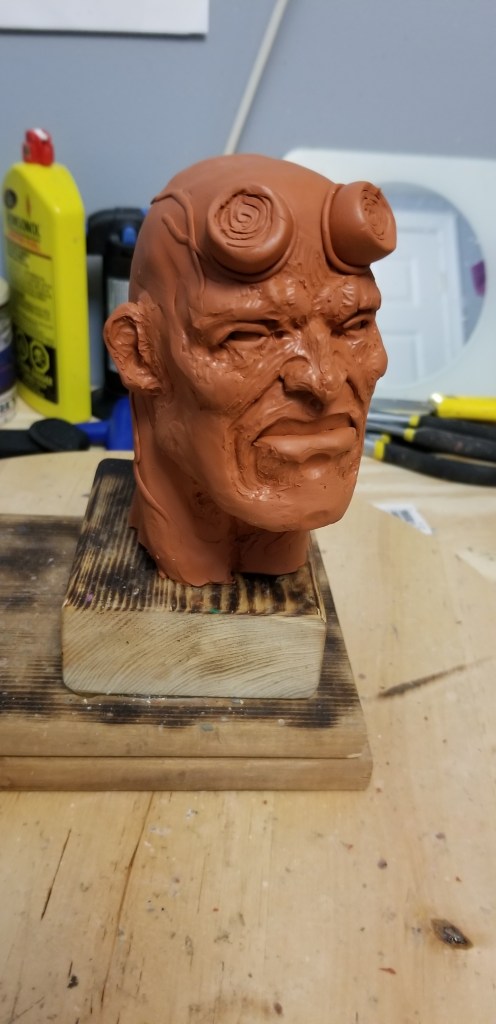
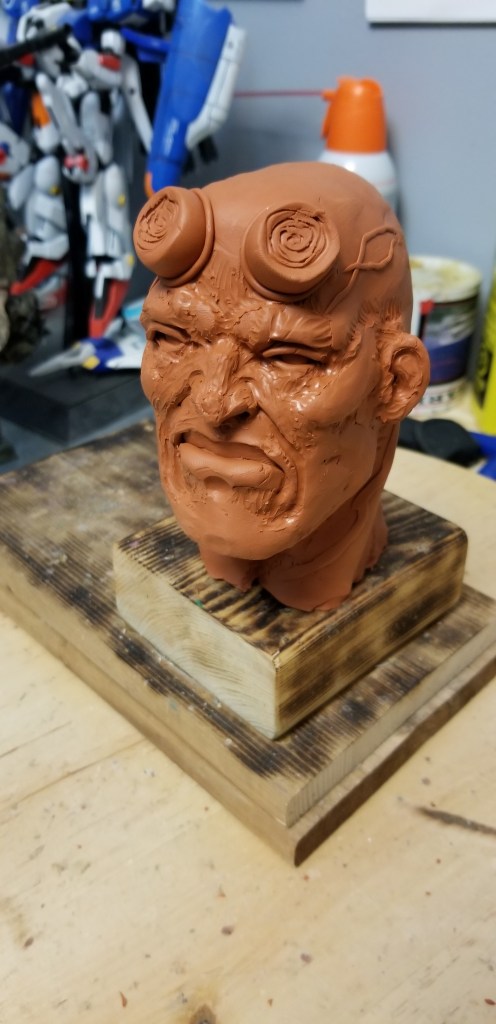
On the sculpted bust front my Hellboy is coming along. Trying to take my time with this one. I had done an interesting bust of him several years ago, which I was hoping to recreate, but the armature was incorrect, so now I’m doing just a head and neck version. It’s a work in progress, and still needs a fair amount of work. Like reshaping the planes of the face, smoothing, texturing, adding hair and a pony tail. Pores and veins, and whatever else that can make this as high quality as I can manage right now.
It still seems oddly flat in the face, so I think the planes are off. Probably needs to be drawn more front to back, from nose to mandible. I need to consult my physiology reference books to see where I went wrong. But it looks like an angry guy with horn nubs on his forehead, so I have that going for me. The red Sculpey feels more like oil clay, which while icky, feels like a return to Chavant. I dig it. Now I wish I had bought more of it. It was like $10 cheaper than any kind of Super Sculpey. And that’s something that I can really get behind.
Already have some work lined up for this week, which is always good to know. That’s it for now. Take care out there. Ciao Bella!
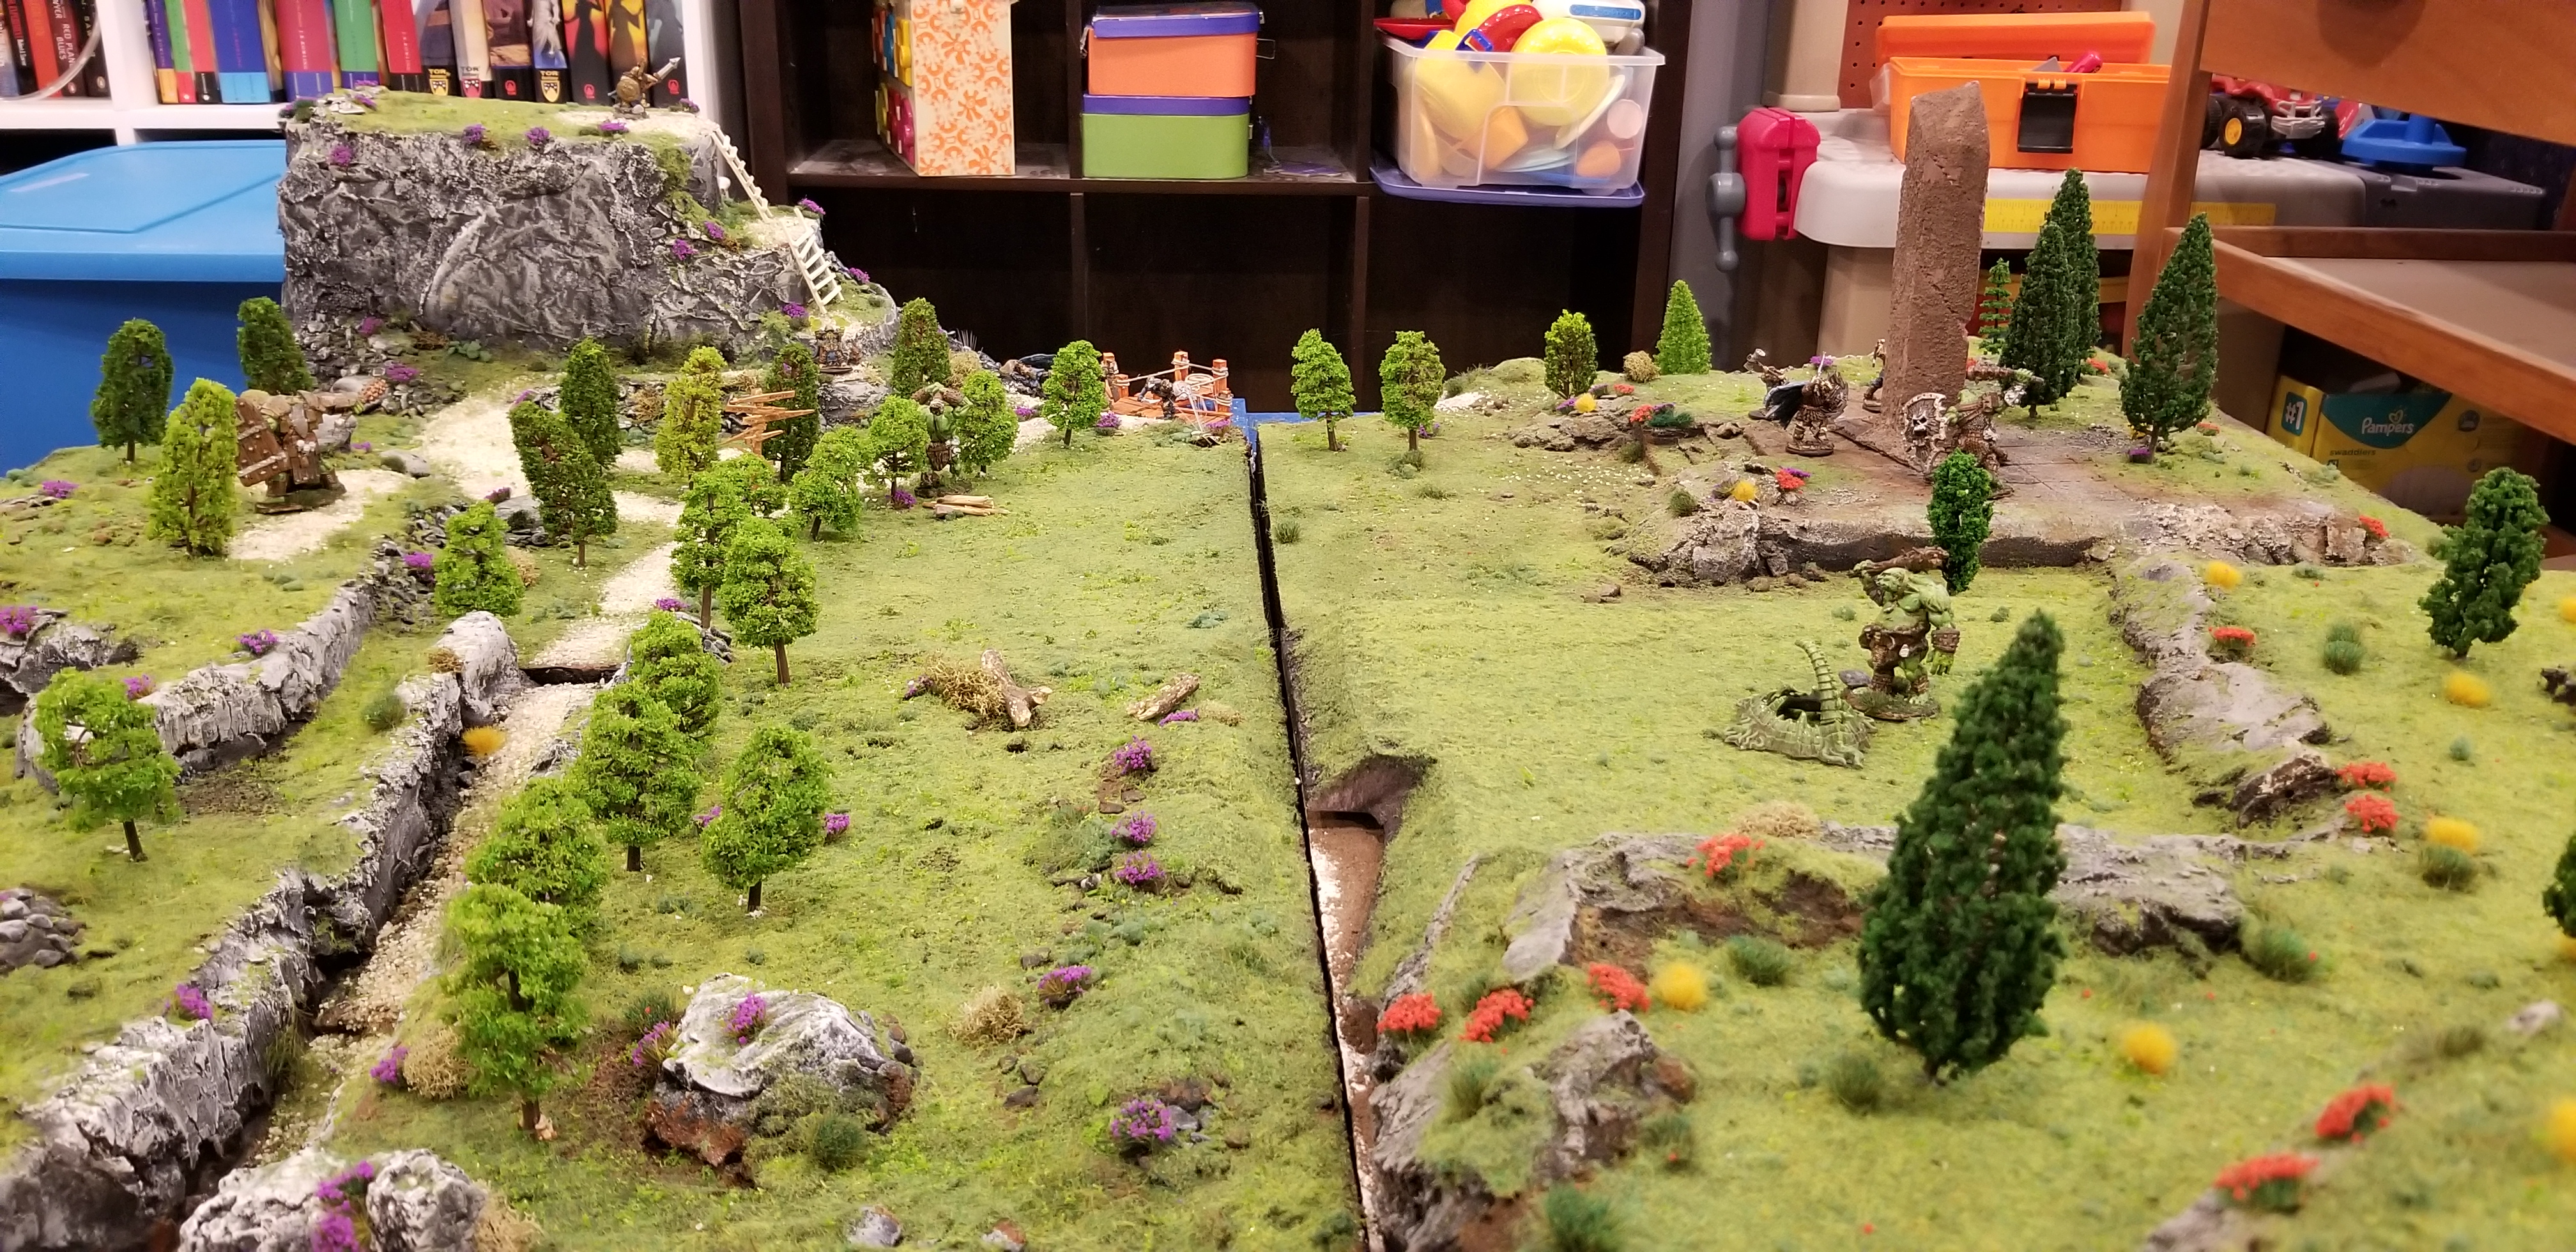
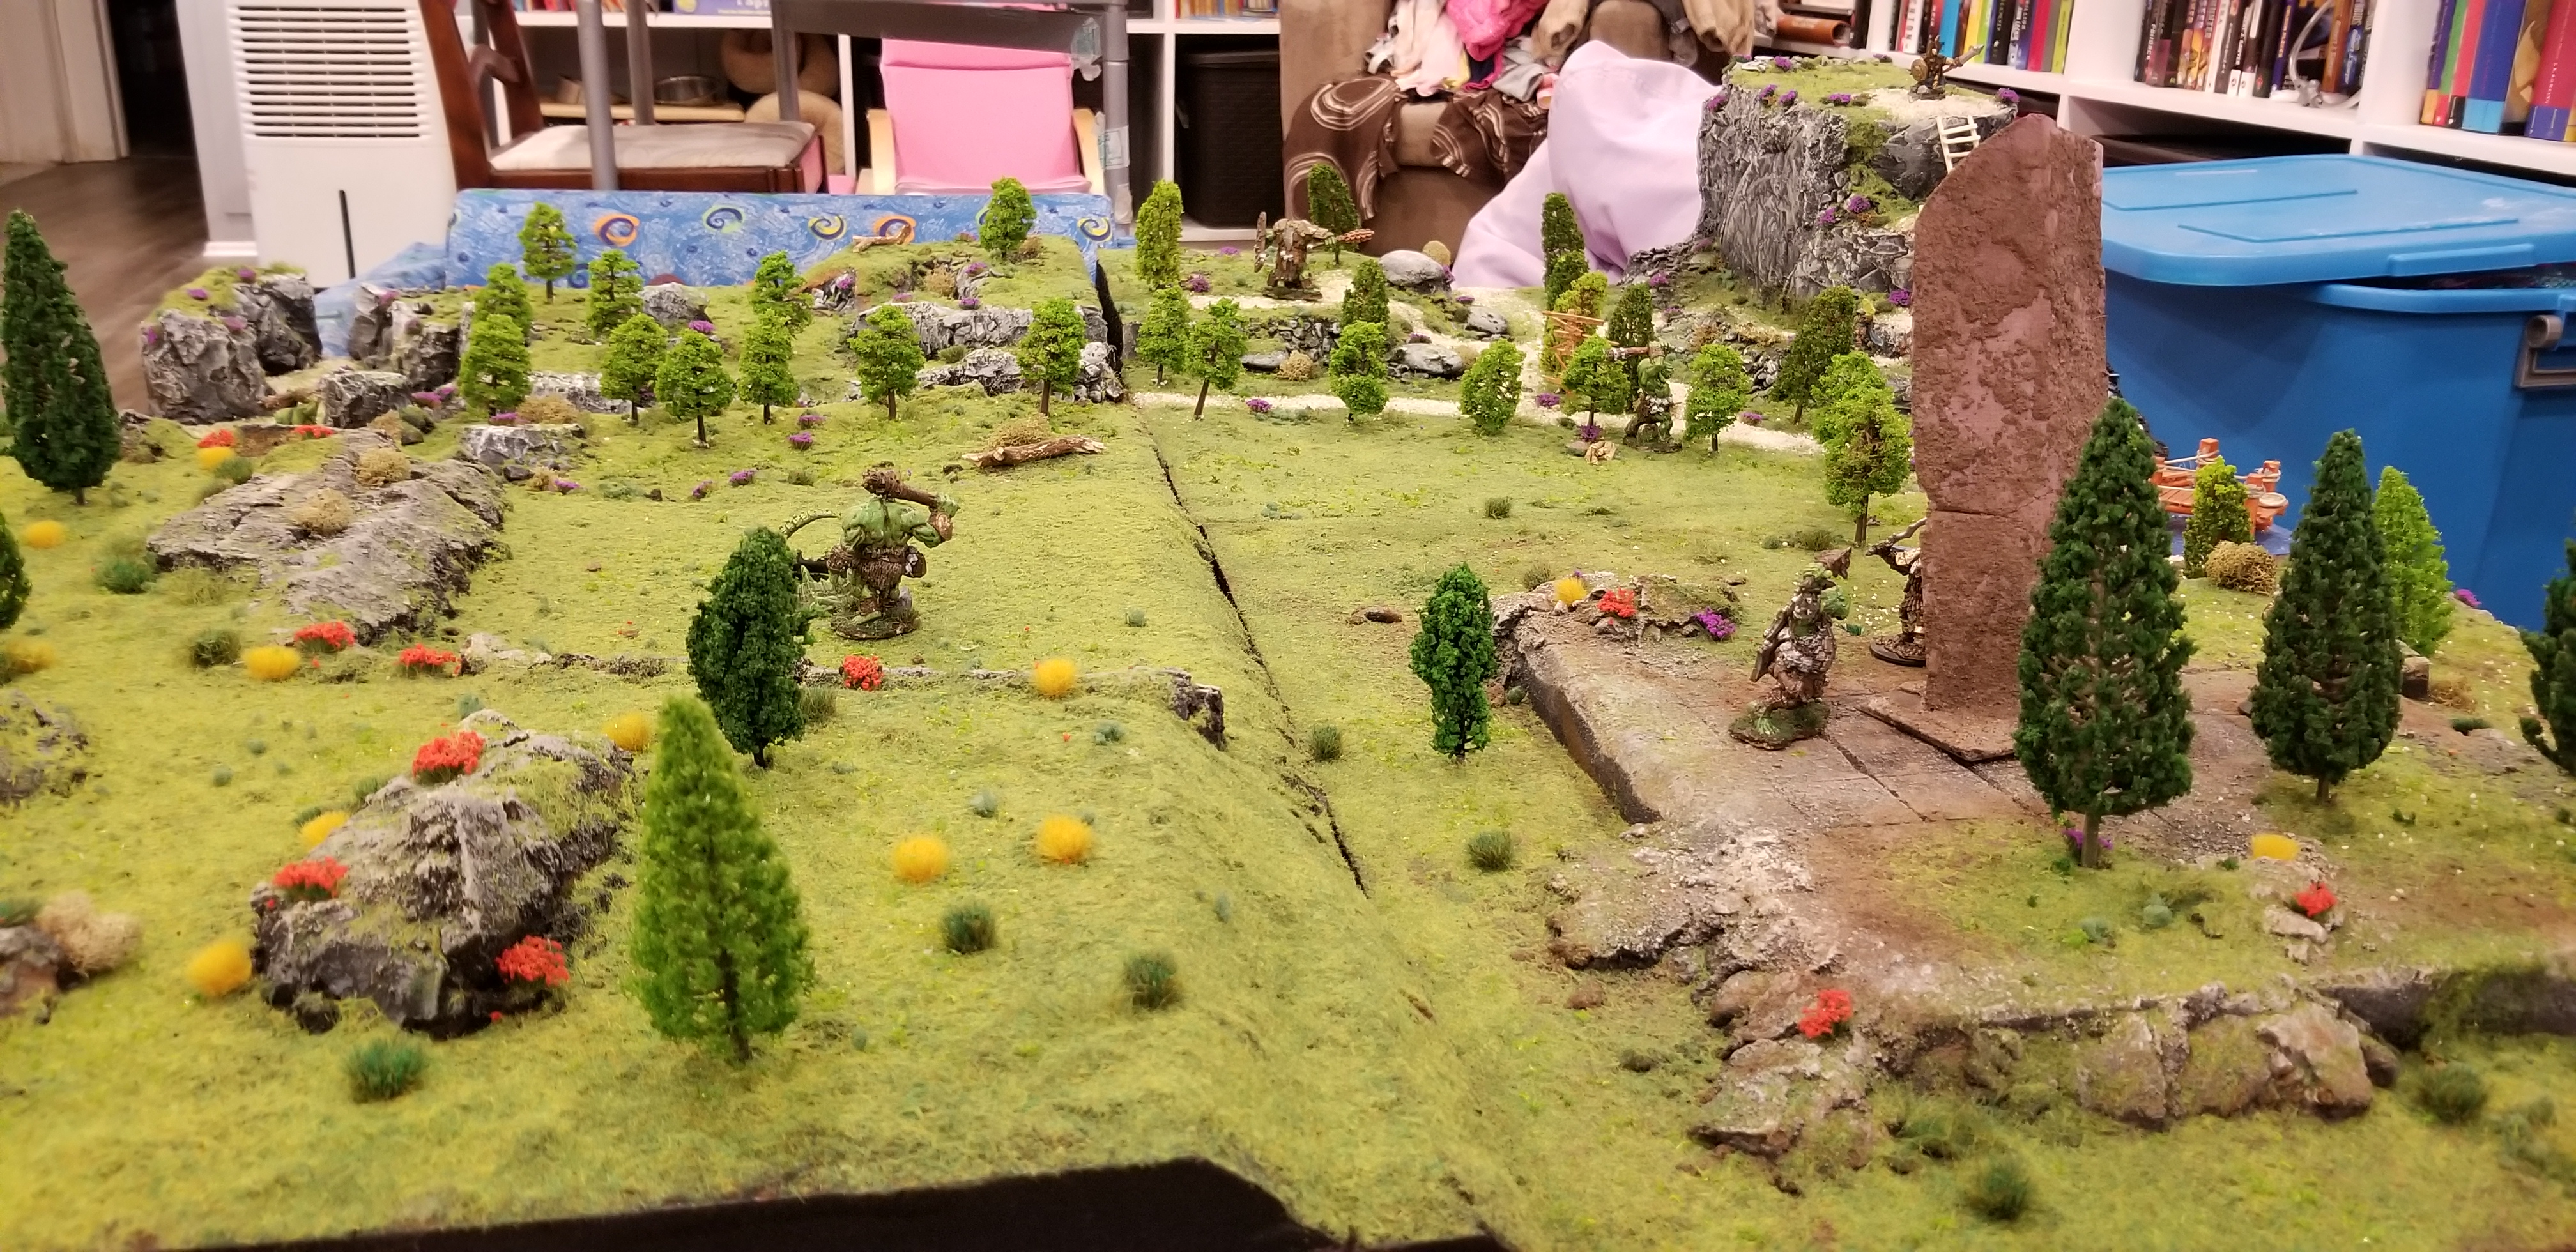
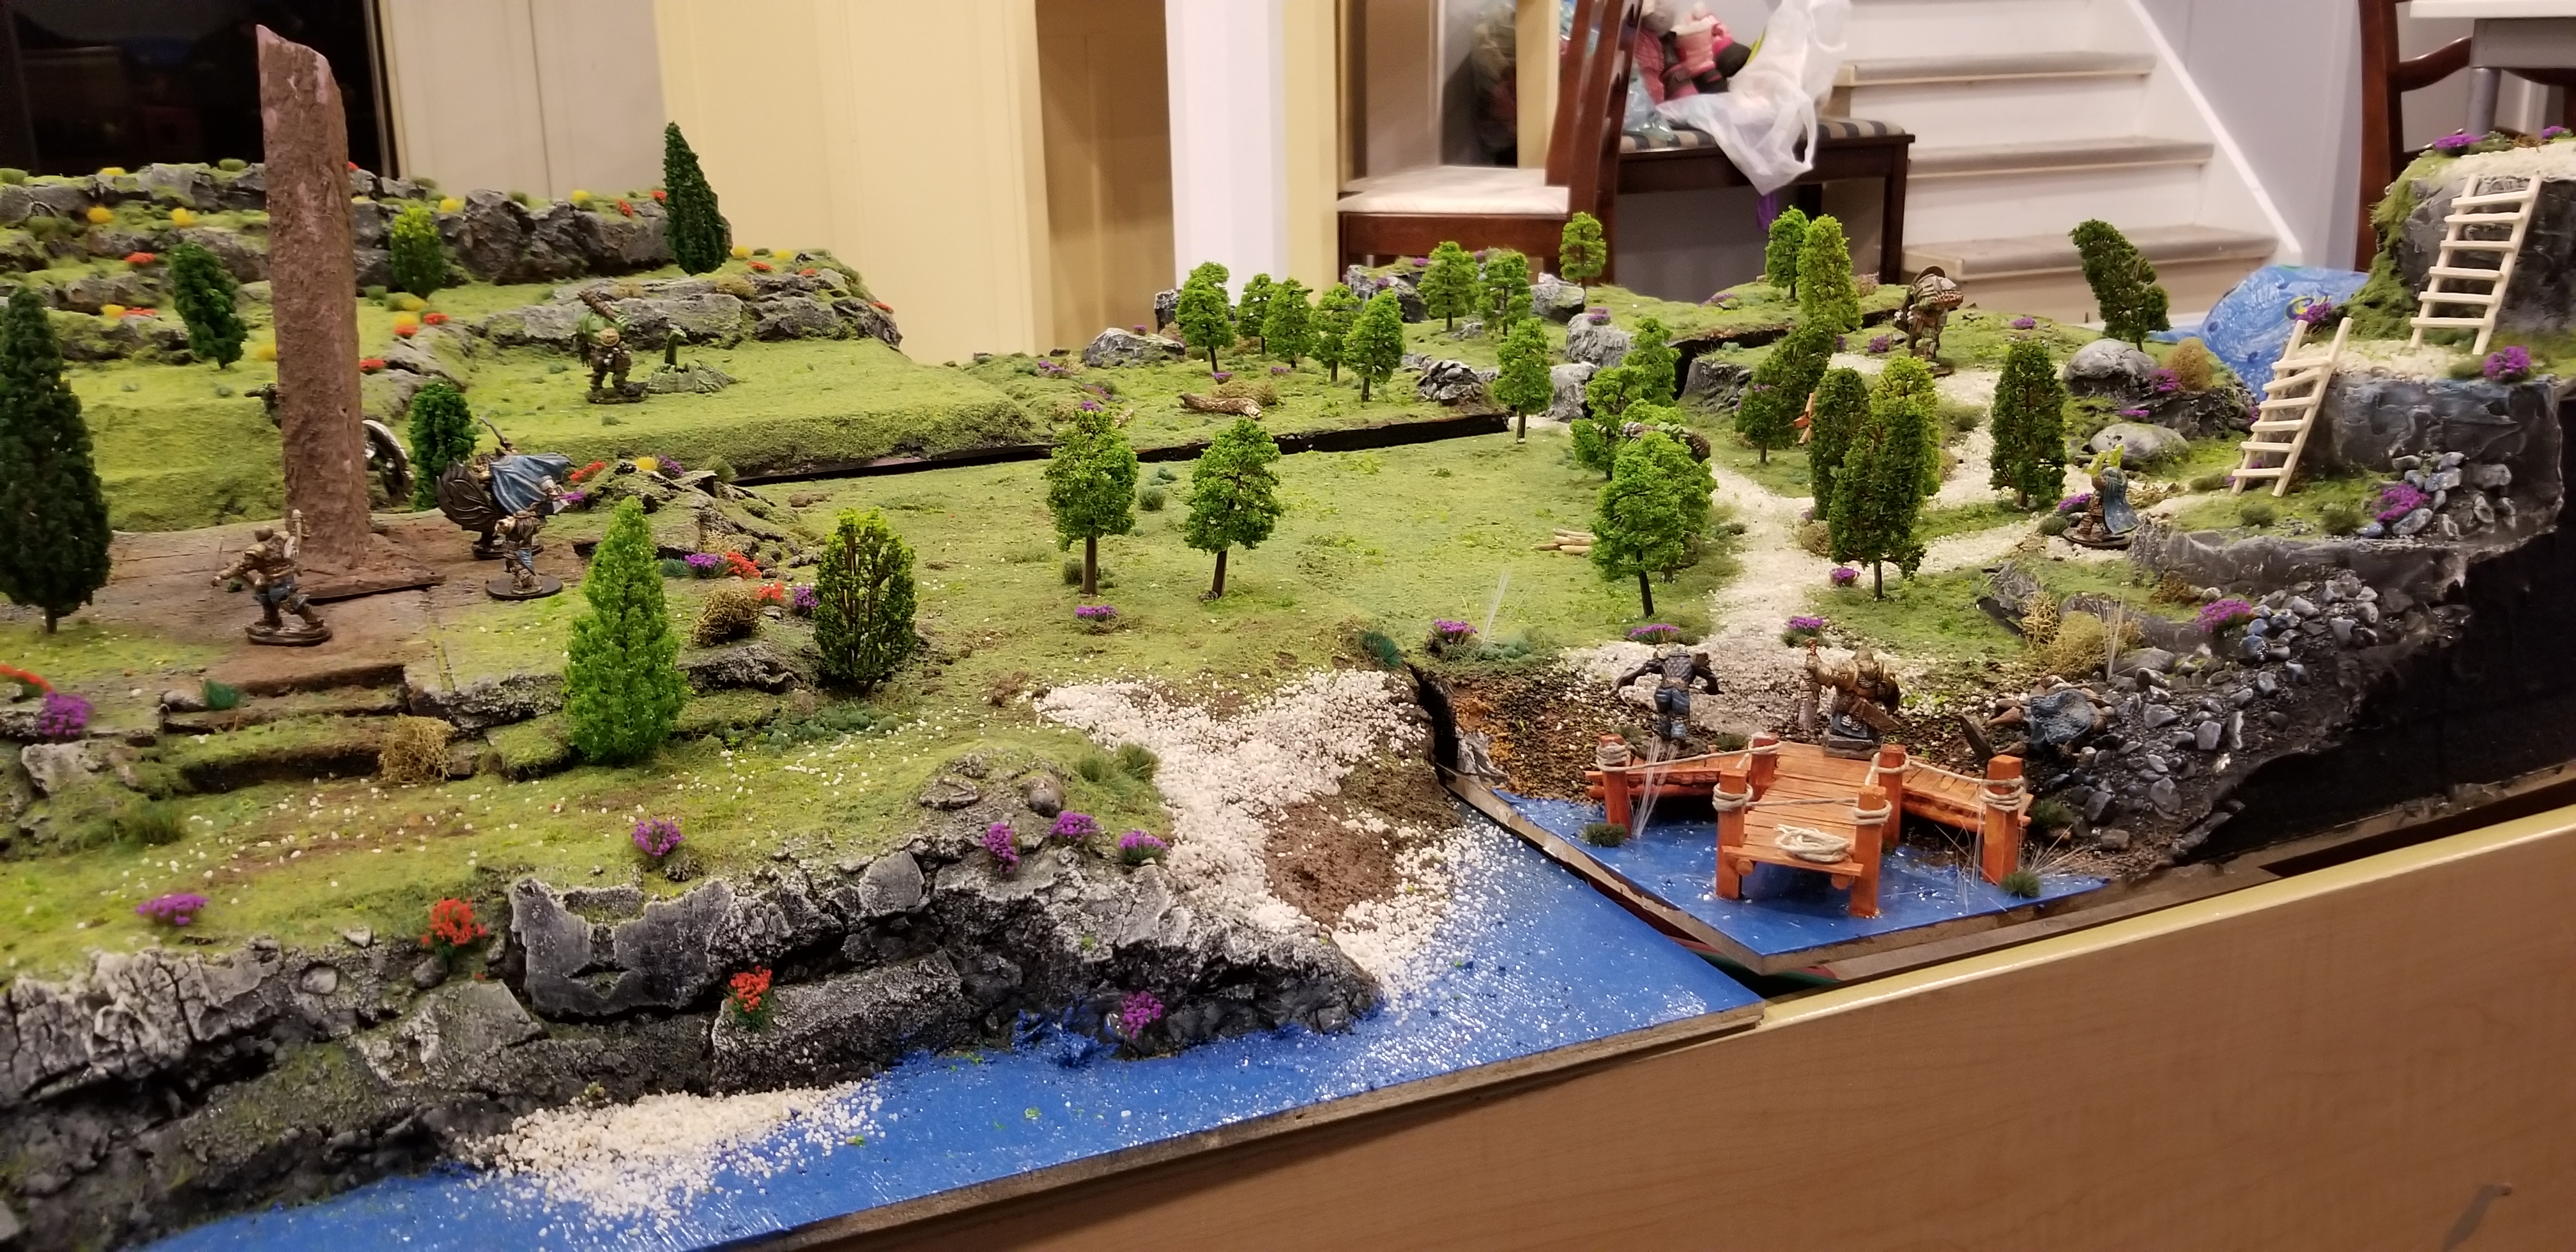
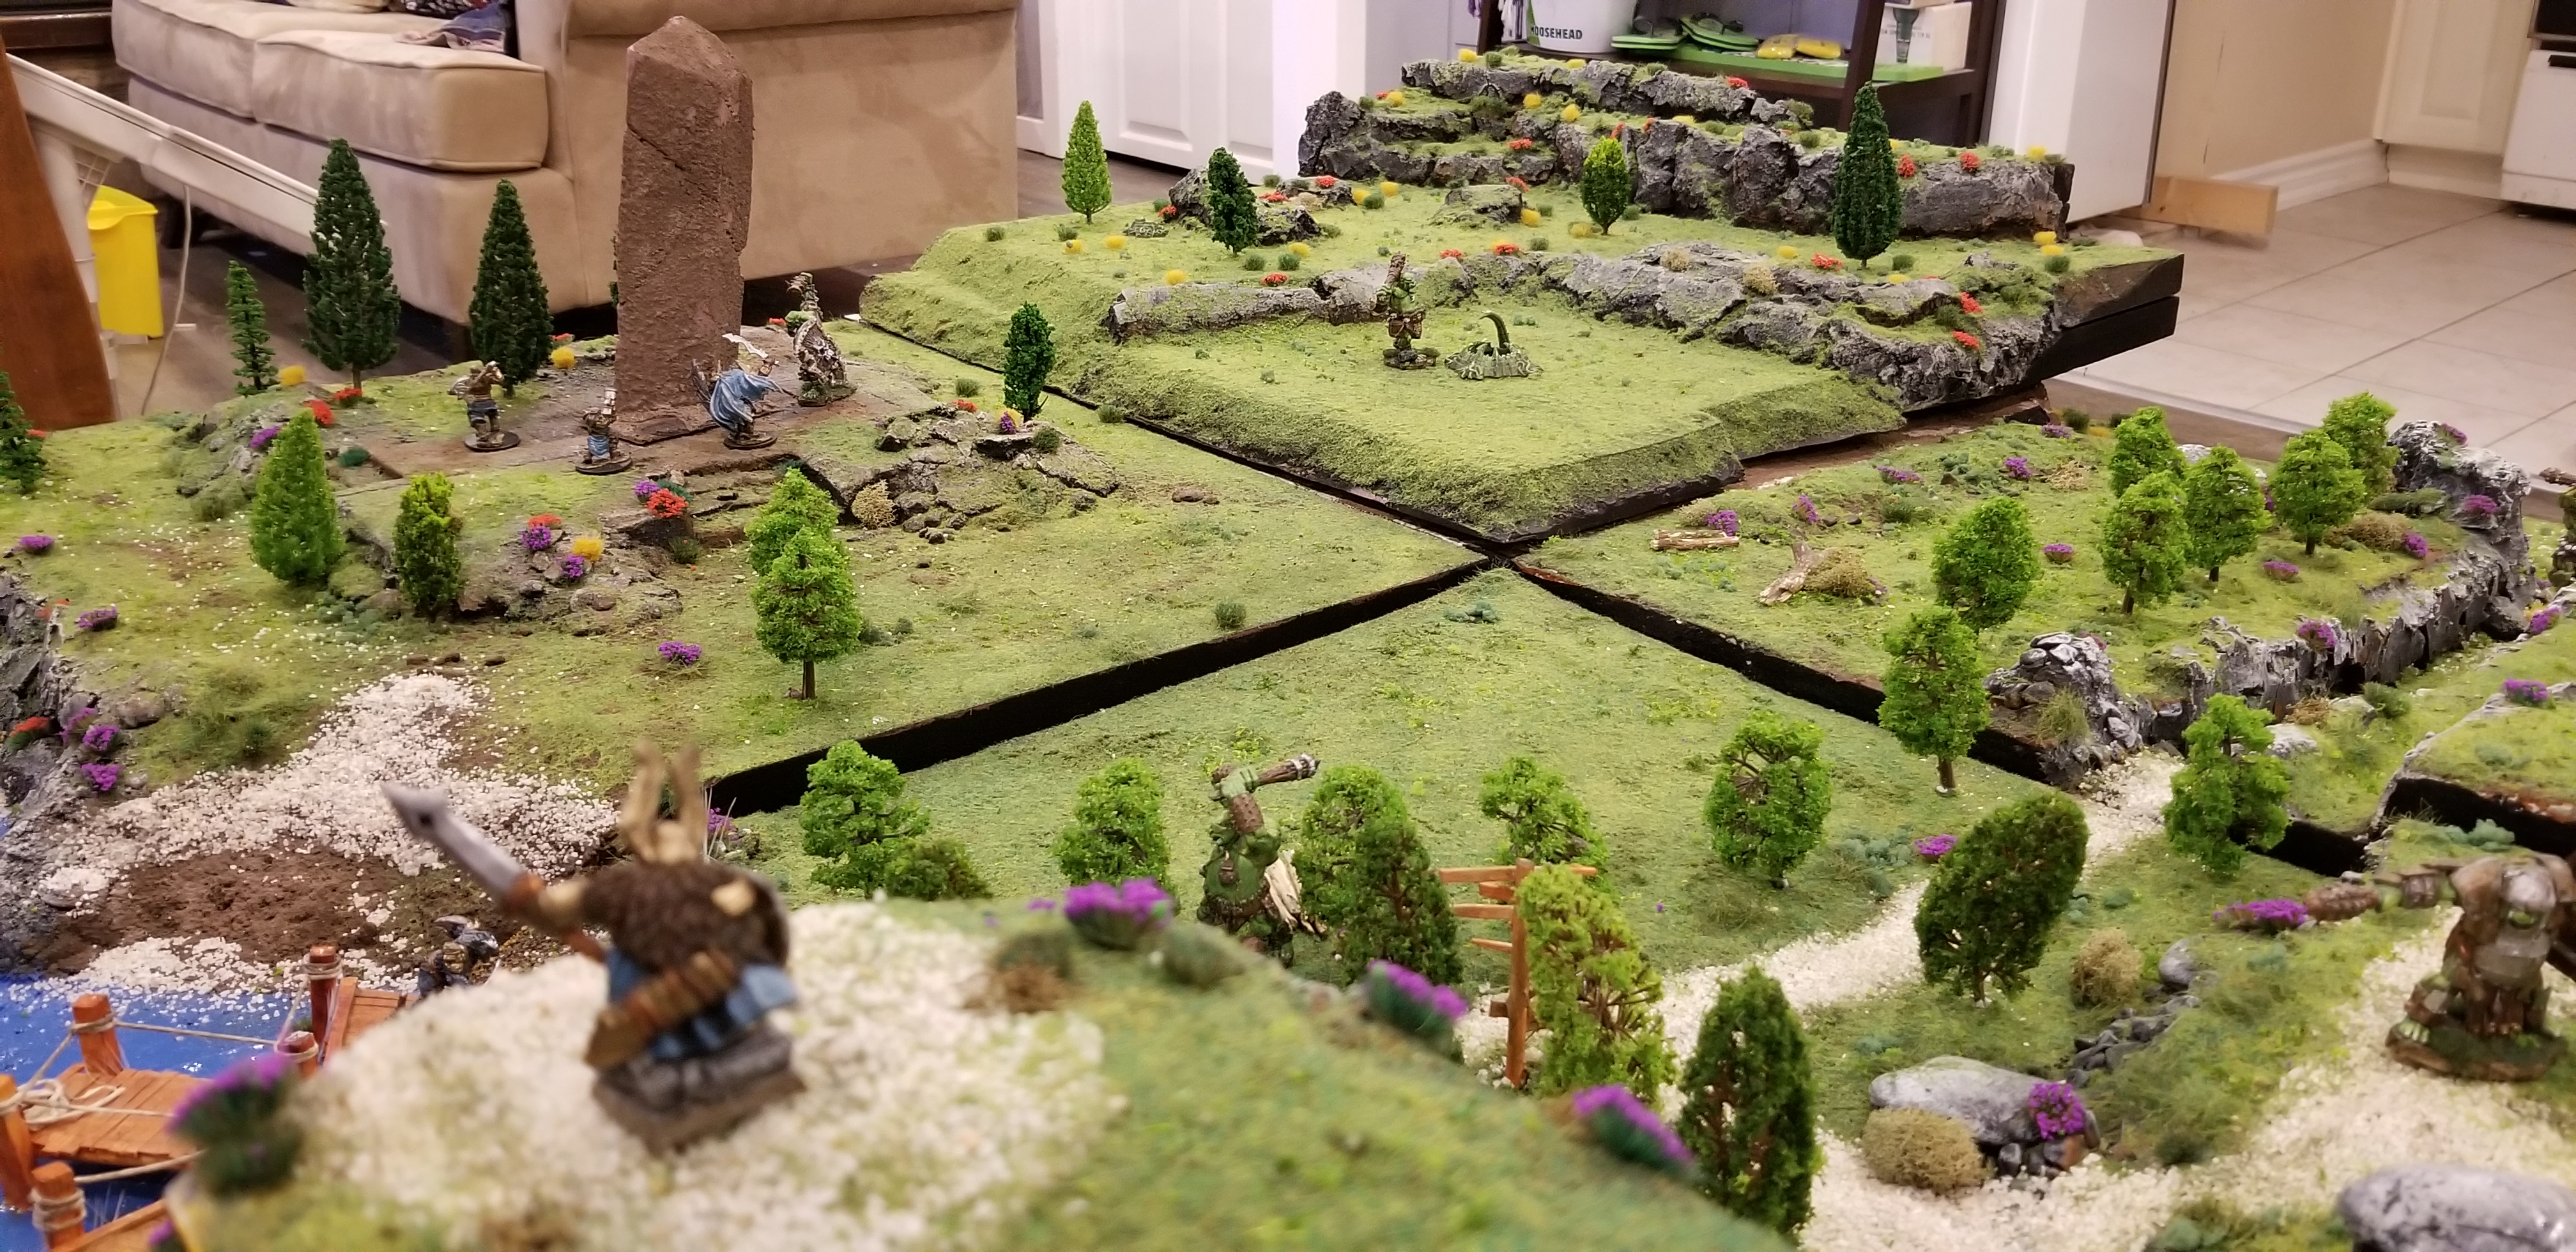
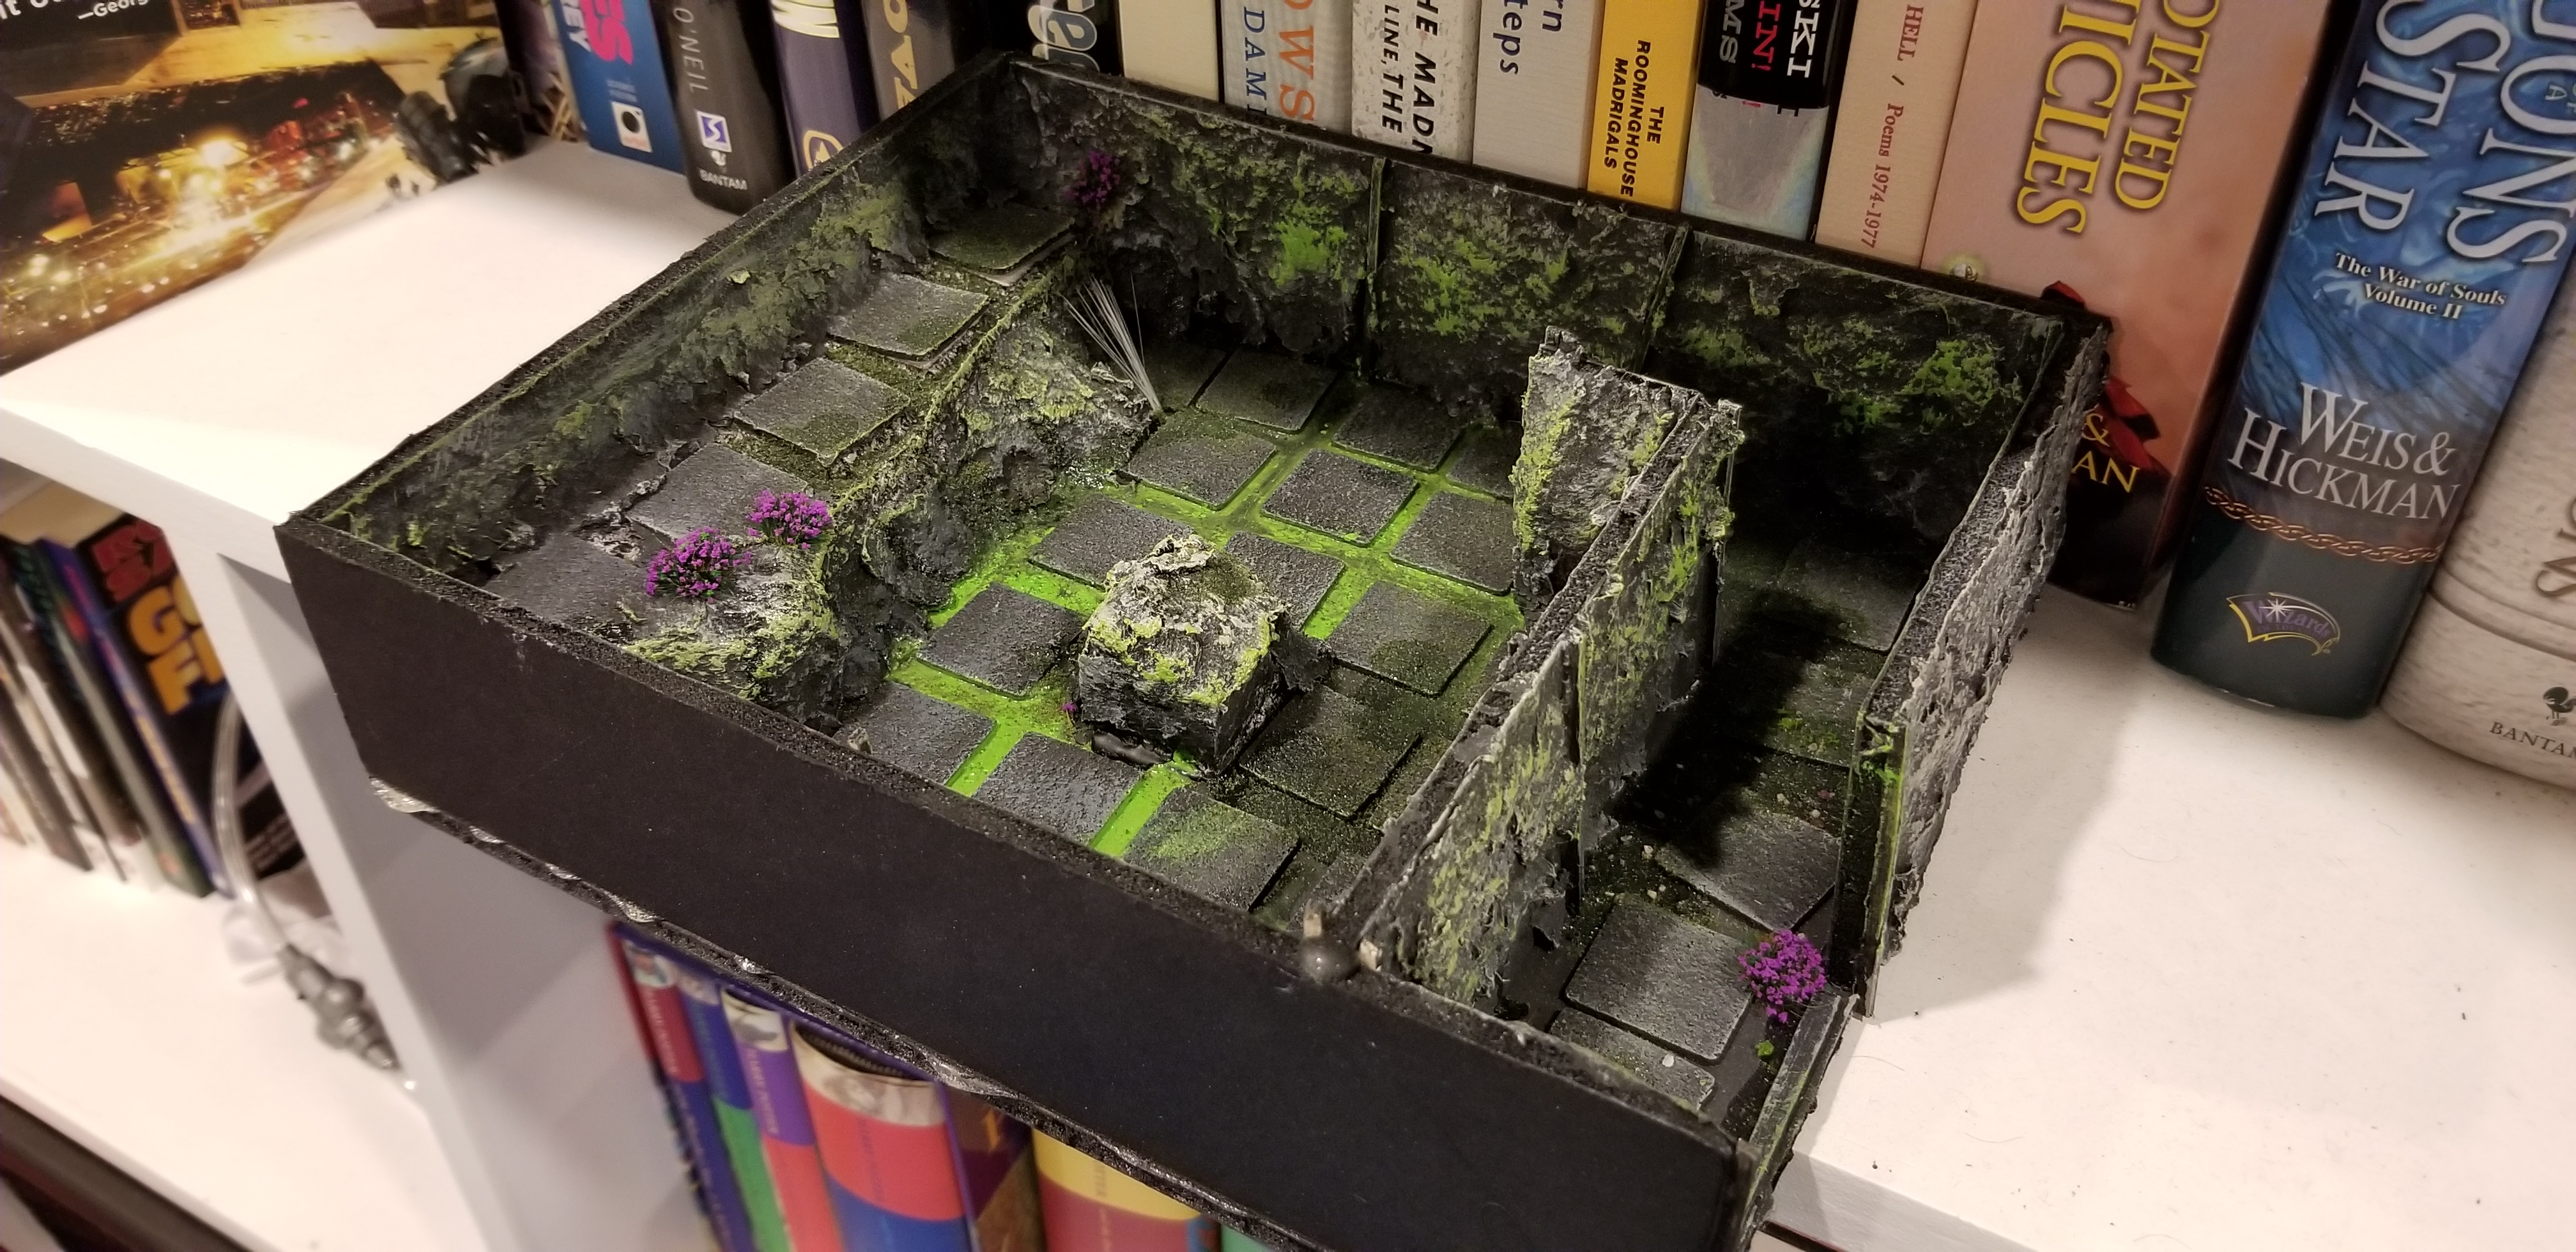
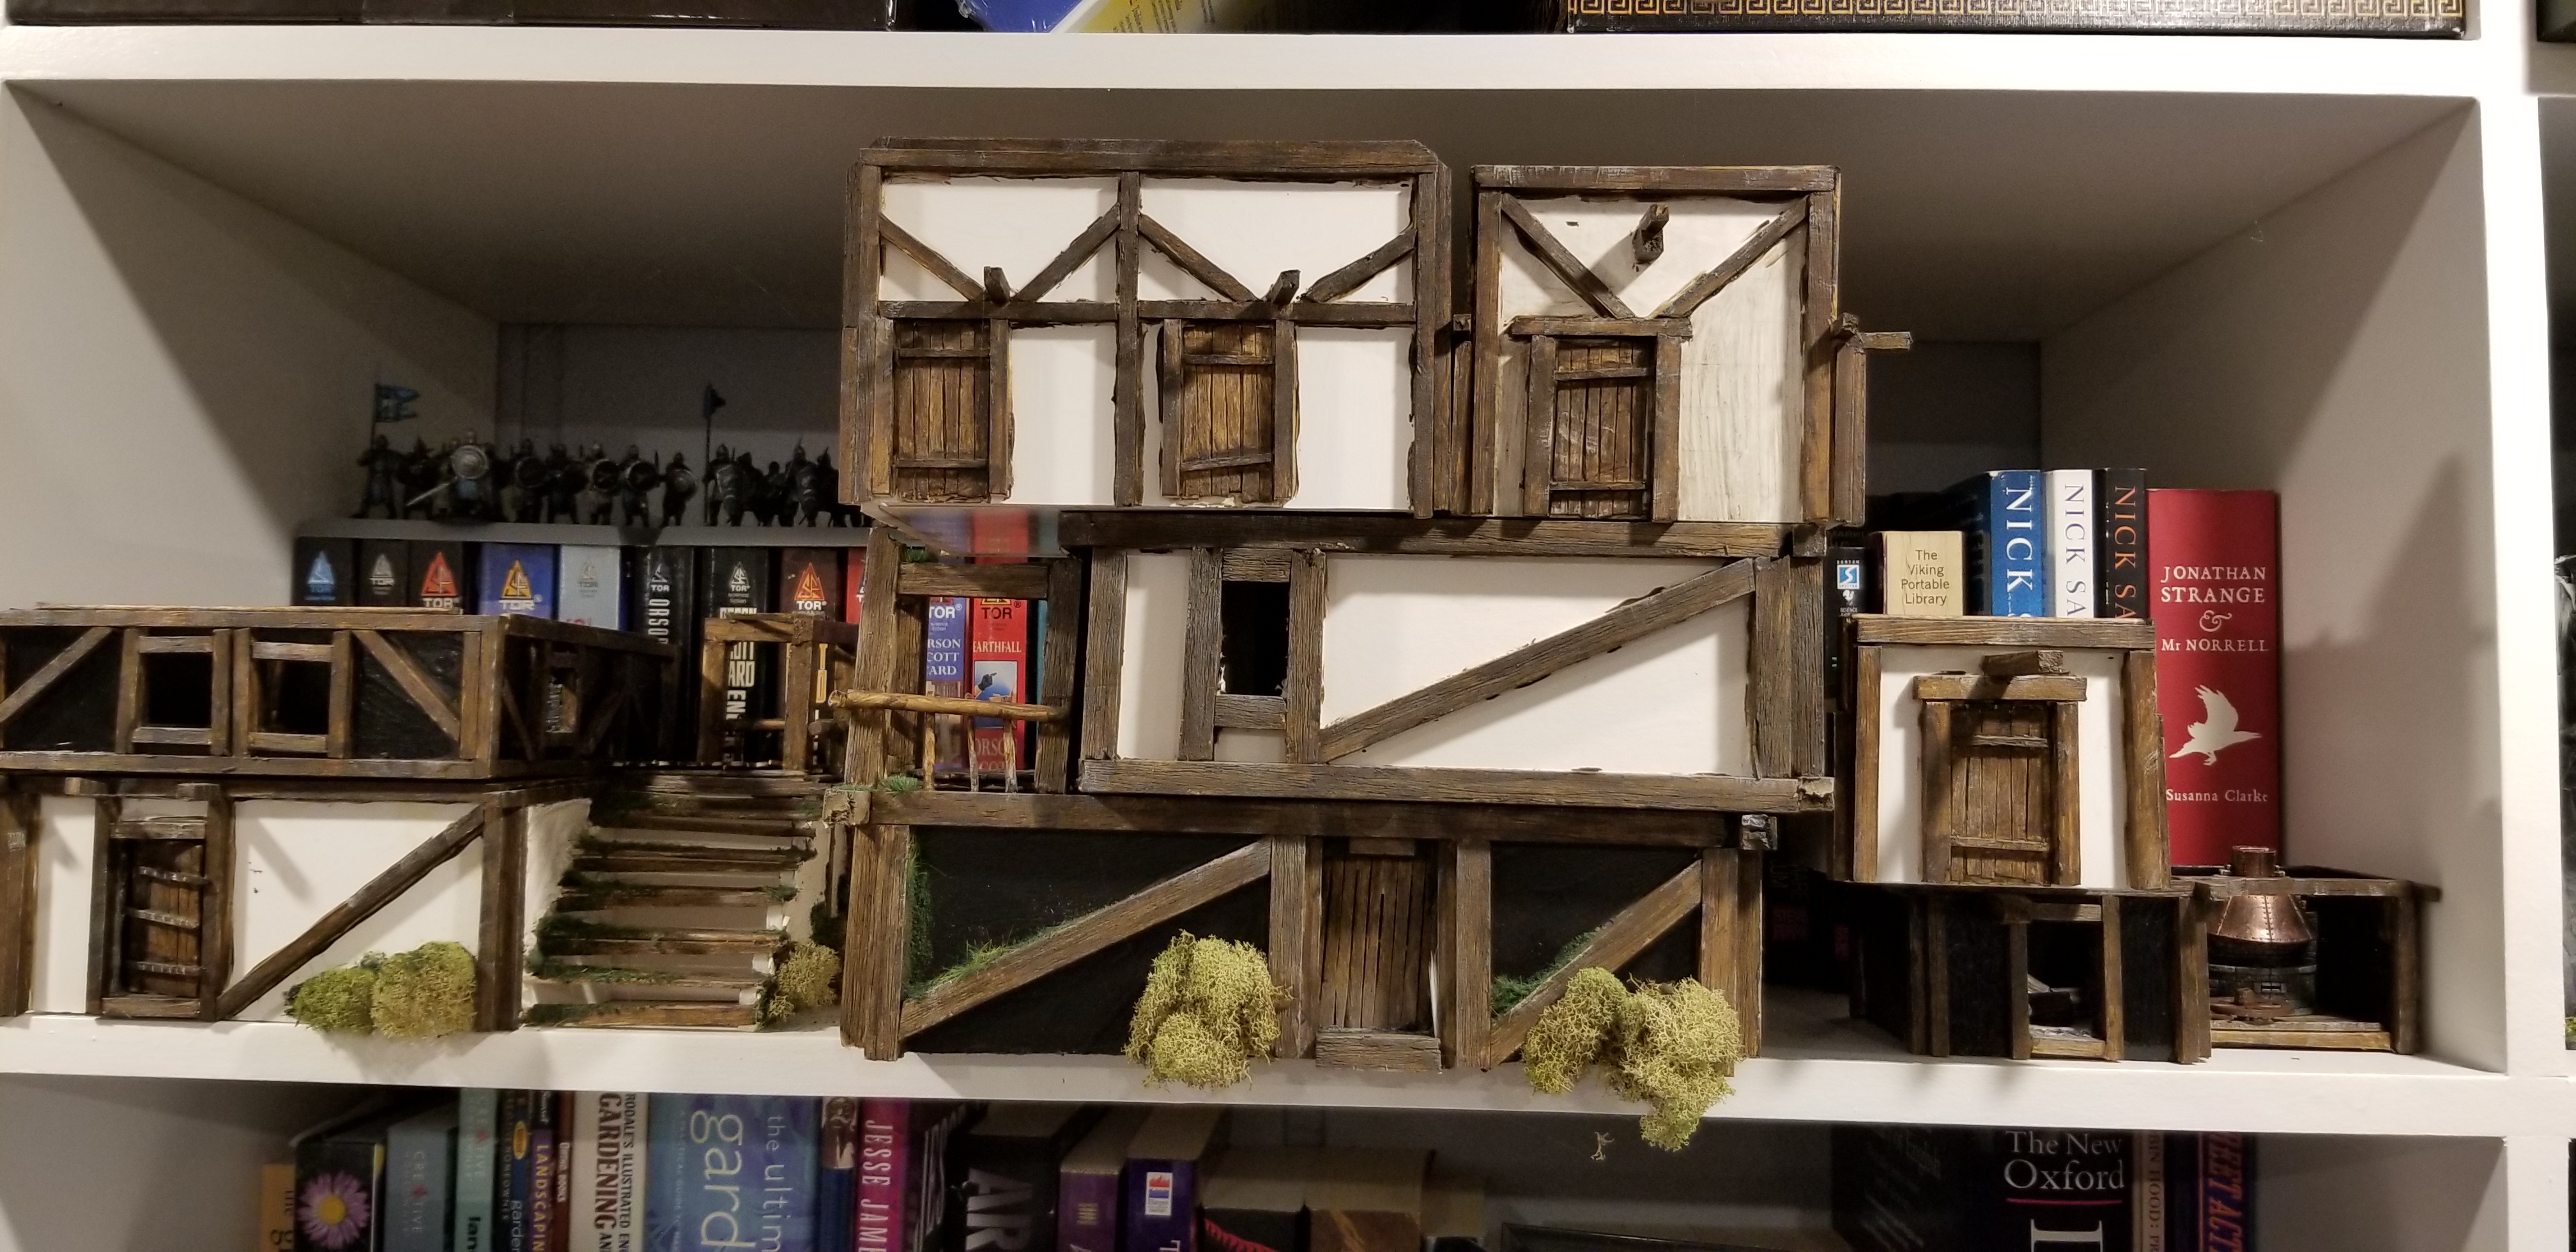
Earlier this year I built a series of four terrain panels, each measuring two feet by two feet, and almost ten inches tall on the highest elevation. I was originally going to build just one, but I had such a good time making the first that I decided to go ahead and all three more to it to make a larger gaming table for D&D or war gaming. It’s not something I have done before, but it sure was a lot of fun. I can see why people get addicted to terrain building and 3d printing and such. It was a wonderful creative outlet, and I wish I had the room to use and store an eight foot gaming table with modular mix and match panels. I would love to build a proper wharf, a seaside fishing town, a mountain pass, ancient ruins, a meandering river bed, a proper cliff face and waterfall, try water effects, real rock moulds with plaster of paris etc… a hot wire cutter, a grass applicator and those uber swanky high class model train trees too. There are just so many things you could do with the time and resources to tackle them. My only hope is to help my kids build dioramas for elementary school projects! Or try to build a bunch of much smaller and more compact elements, like castle walls, or ruins or individual hovels & town houses. I’d love to see any of your work if you have images handy!.
The terrain boards.The smaller obstacles and scatter terrain, as well as the earliest buildings I have attempted.


You must be logged in to post a comment.