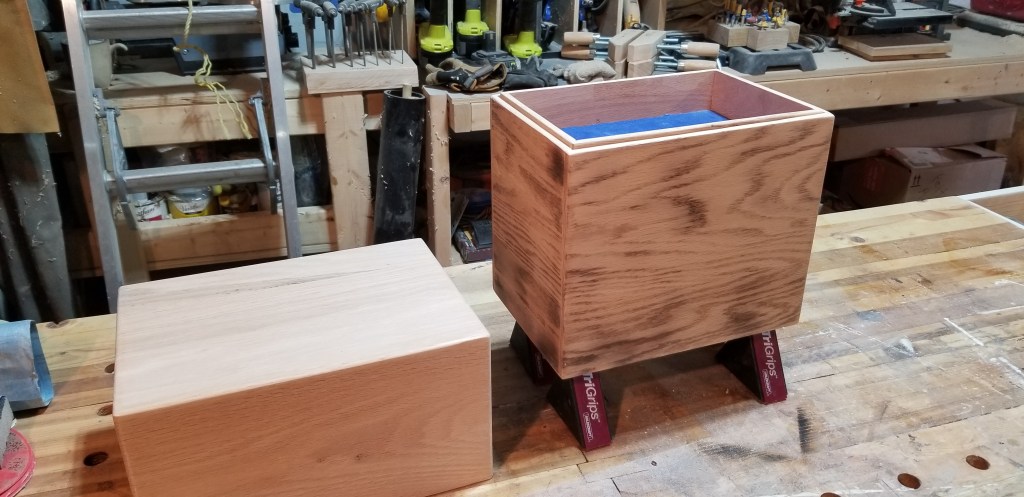
I have finally managed to get all three pieces built, sanded up to 800 grit, and now it has one coat of clear coat on it that has been buffed to a higher than usual (for me) sheen. I have it drying in the garage, where it can spend the next 36 hours off gassing before I hand it off. All that is left to add are the tiny rubber feet for the bottom, so as not to scuff the surface where it will reside.
I added one tiny step, by using a blow torch to add some colour, and visual texture to the central column. I am glad I did a test burn on some scrap red Oak, so that I could change my plan up a bit mid stream to work on the central column and not the cap/case topper. A darker base makes it feel more grounded, and less visually monotone. The grain pops with the Osmo finish I used, so it looks pretty sharp. I do like how the blue felt looks against the red/tan tones of the red oak. I could have gone a bit more fancy, by using dove tails or a box joint for the central column, but the butt joints are sturdy. So C’est la vie.
I will need to blow off the felt with my compressor to get rid of the dust, and add four feet, then it’s off to the future resident. Tick that one off the to-do list!
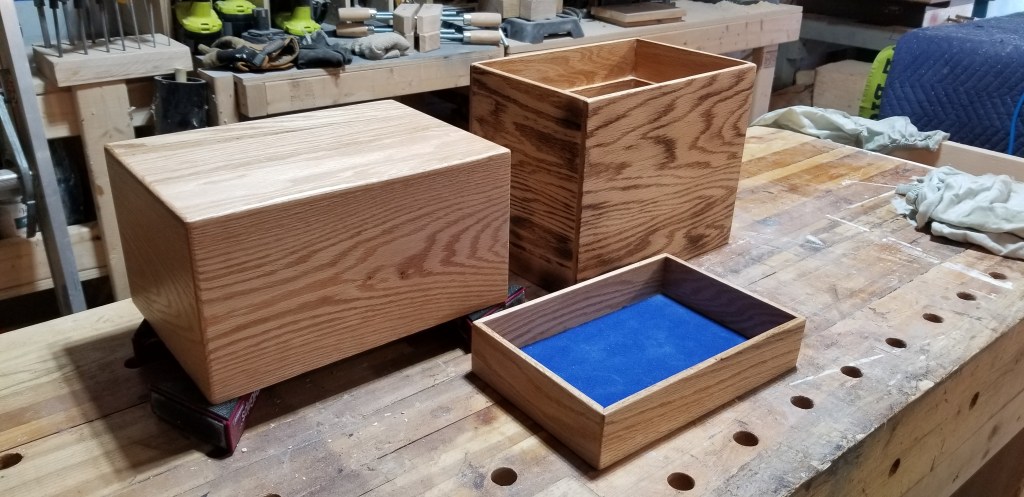
No finish, but assembled.Lid off central column with tray still inside.Lid, central column and removable tray.All three pieces with clear coat finish applied.
Needs a touch more clean up, and out the door it goes! Happy Easter weekend everybody!
It started with a quick trip to pick up some pre-cut bits of Red Oak wood, hopefully eight (8″) inches in width, a quarter inch thick and around four feet long. Couldn’t find any, so I bought additional five and a half inch (5.5″) boards so I could join them to get the height I was after. I chose the straightest boards I could find after digging through a pile of about twenty or so pieces. I then grabbed a two inch wide, by three quarter inch thick piece to become the trim for my plywood core base. And then I also grabbed some two inch by quarter inch, by four foot strips that will eventually become a tray that sits inside the top of the urn’s central column.
So first off, I rounded over one edge of my two inch wide by three quarter Red Oak strip. Then I cut it down the middle to be one inch wide. Two inches, after further reflection was just too much. Too over powering. Too chunky. Then I flipped that strip rounded edge up against the fence of my table saw and cut out a quarter inch channel for the plywood core to Nestle into. I then spent a considerable about of time measuring and cutting and sneaking up on the mitred corners for my base. I got three that were perfect and one that was off. Seems as though, when I cut the two inch strip down to one inch I released a bunch of tension in the board and it went catywompus on me right from the get go. Not enough to be visible, but enough that with matching lengths and cuts, one corner was out by nearly an eighth of an inch. Very frustrating. Once I had this cut and roughed together I was able to cut down the plywood core that will be ensconced within the red oak chunky trim pieces. After gluing it up, and then spot patching the one sides gap (I managed to get it down below a 16th, but just barely. I was able to sand it, and clean it up to look as though I know what I’m doing.
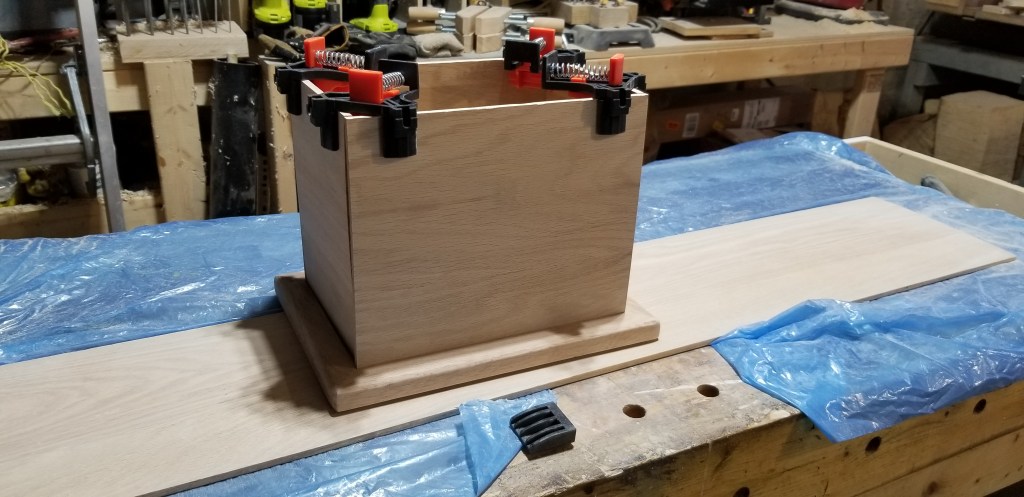
The Red Oak Urn, loosely held together with clamps so I can measure & fit what’s in front of me, and not what I had on the plans I mocked up.
With the base glued up, I can begin to cut down one of my 5.5″ boards and do a couple glue ups to get my eight linear feet of 8.25″ wide boards for the inner column of the Urn. After the glue up, I extracted them from the assembly table, and the myriad sets of clamps I had used. I used a paint scraper, and then a card scraper to clean off the surface, and then tackled what was left of a visible glue seam with some higher grit sand papers to make it mostly disappear. Next, using the hard measurements from my newly constructed base I began to cut down the outer walls of the urn. At this juncture I decided against more mitred, and went for butt joints. Simple, yes, but effective. I had, at this point, decided that I wanted two layers of wall for the column. The exterior being the full 8.25″h, and the interior two inches shorter, all the way around, so that my tray, once built, would have a partial shelf to sit on, and thus, not potentially fall all the way through into the ashes below. You know, because it’s an urn.
Next steps are the glue up the outer, and inner walls of the central column, pin them in place discretely, but not fully attach it to the base just yet, so that I can sand more unencumbered. Then I can build the tray itself, which will get lined in a 2mm thick felt (Green, Yellow, Burgundy or Blue), i haven’t decided yet. The red oak will dictate what looks best at this point. And once all that is done i can build the decorative outer display cap. This i want to sand and polish up to a very high sheen. It will require hours of sanding, up to about 600 or 800 grit. Then the use of my polisher and wood polish to get that majestic final finished look to it.
The weather is cold and miserable once more, it is February in southern Ontario, so no surprise there. This is the middle of winter, and we’re having the strangest winter I can ever recall. So it might need to wait a bit until I can go back to do more. I have it all documented, and labeled, so I can go back at any time and not be lost. I have no heat, nor moisture control in the garage shop, so let us hope it doesn’t all go ape shit if left for a week. Fingers crossed.
Some of you may know that I had intended to build this out of Walnut, Ash or Spalted Maple which I had lying around the shop. After a good think about how long it would take to mill all of that up into useable lumber pieces, and given the (potential) time constraints of the Urns requester, I felt starting from wood that was already 4s was a smarter choice. My planer, and bandsaw hate to work in the freezing cold. And they make a nasty racket too at the best of times. Oh well. Now I can make one for me with my own materials later on, and it won’t cost me much beyond my time.


You must be logged in to post a comment.