Things that I accomplished yesterday.

Can’t be resting on those laurels for long, so today we acknowledge what we’ve finished, and then we turn to face the front and keep on truckin’. I managed to finish book number eleven (11) of my twelve books in a calendar year challenge. Mo Hayder’s “Ritual”, which was… anticlimactic at best? A 400 plus page book about two or more adults who are unable to deal with loss, whether it was recent or from their childhood. And a sub plot about ghastly mutilation & murder. I thought there was going to be a bigger build up to pay off, but, eh! Not bad, not awful. I mean I finished it, and we all know I have no problem giving up on books part way in. But… a bit of a let down in the end. I think that is the third or fourth Mo Hayder book I’ve read. The others were far superior. This one was more melancholy than suspenseful. Tick it off the list. Book eleven is in the can! So I turn to another Richard Morgan book to complete the twelve. His 2008 novel “The Steel Remains”. More light hearted and humorous than “Black Man” or any of the Altered Carbon series. Let us hope it stays good so that I can complete my 12 book challenge. Although if I get enough pages between multiple unfinished books, I’d take the page count of what was read, add it up, and if it crosses 250, I’d call my challenge done. If I’m being honest. Cover to cover is the goal, but I’ll take partial credit for pages read in a pinch.

Second item on the list was to finally sit down and watch Sony Studios’ “Morbius”. Which felt much like “Venom”, in that it was ok. Obviously lower budget than standard MCU fare, but not horrendous. It wasn’t a Uli Boll film, so it wasn’t unwatchable. Slightly better than Venom 2, the Carnage one with Woody Harrelson. It even had one of the actors from Andor in it. I’ve had that dvd in my possession since Christmas, so I’m glad to finally take that off of my personal to do list. The kids had dance last night, and costume fittings, and dinner with Grandma, so I had an additional 90 minutes on my hands. Nearly three hours of free time to watch a movie, eat, finish my book, and shower in peace.

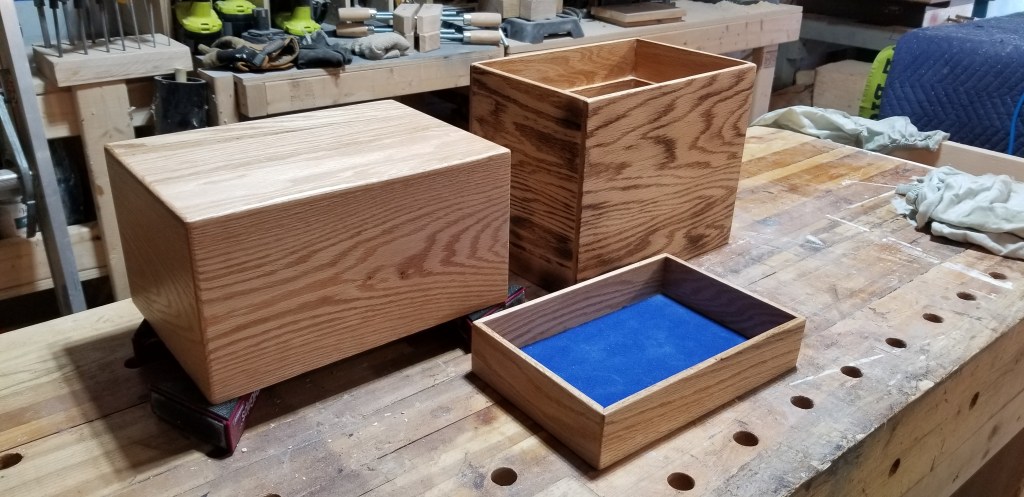
Also, I finished all the sanding on the Urn. Up to 800 grit with hand sanding using a rubber hand block. Buttery smooth. I used a torch to make the grain pop, and then needed to move through the grits again back up to 800 grit. No matter. Looks good. I’m happy with it. I even managed to get some Osmo finish on it, and buff it off with my polisher. Very nice! Today I want to add feet, and perhaps some spacers to stop the lid sliding around. We’ll see how we feel later on. But I can see the end of the tunnel on this one. Glad to put it behind me. I have since learned that the recipient is not sure if they want it anymore, so I may keep it for myself, for future use. I’m not afraid of that kind of preparation. Live and learn.

I have burgundy, yellow, emerald green, and this blue felt to choose from. Think HP House colours.

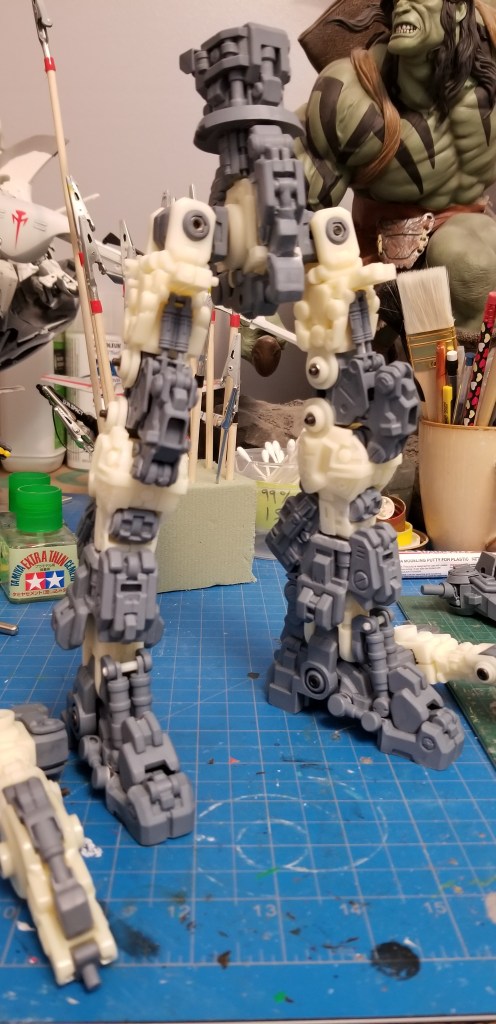
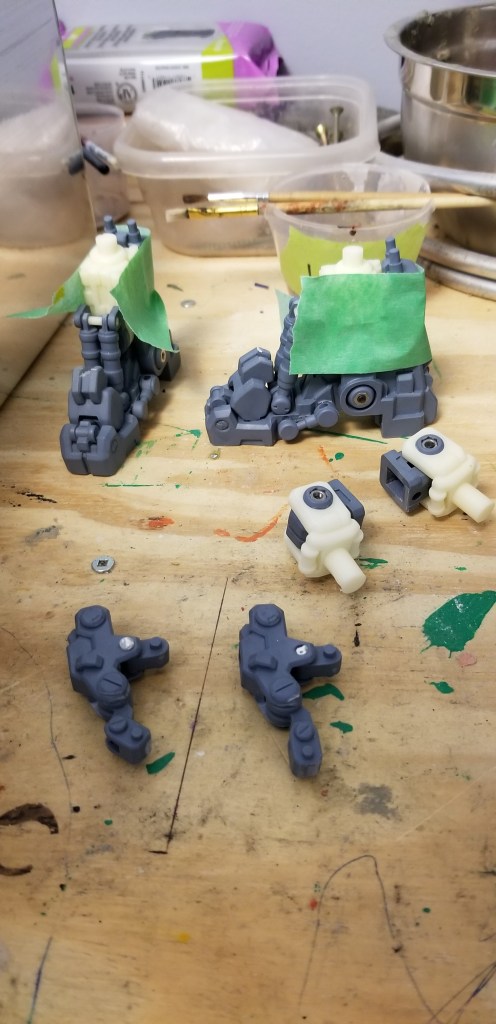
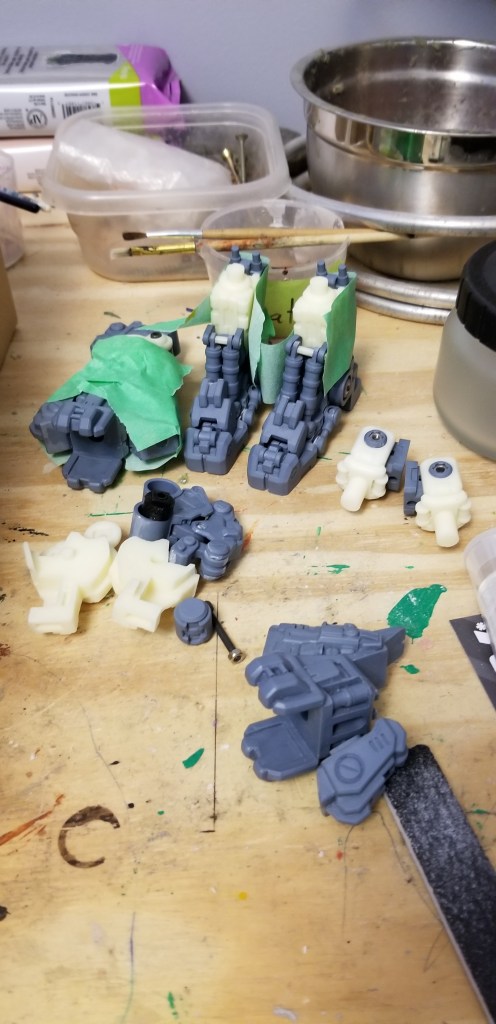
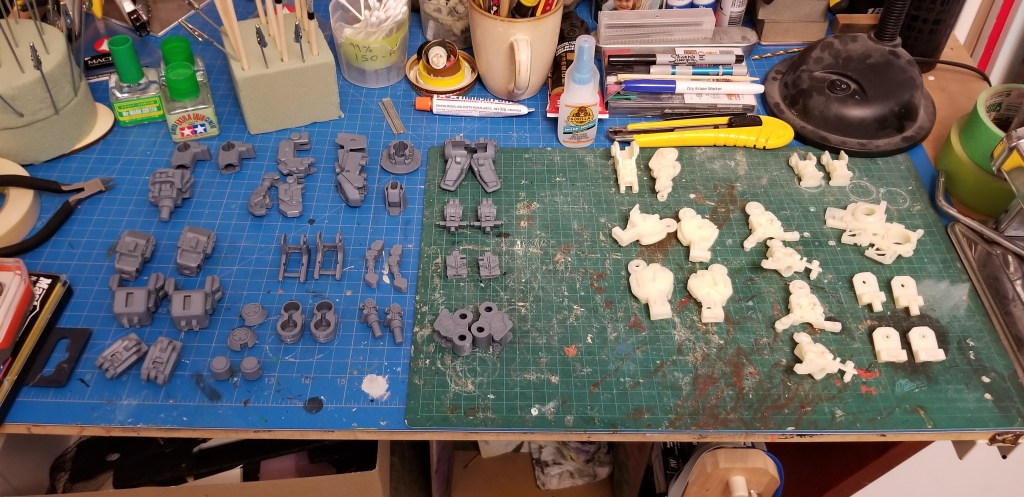
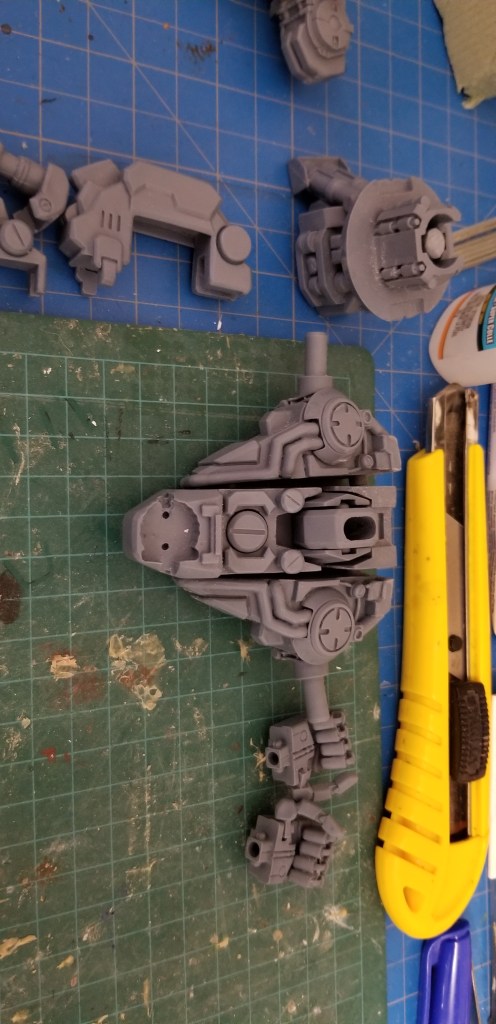
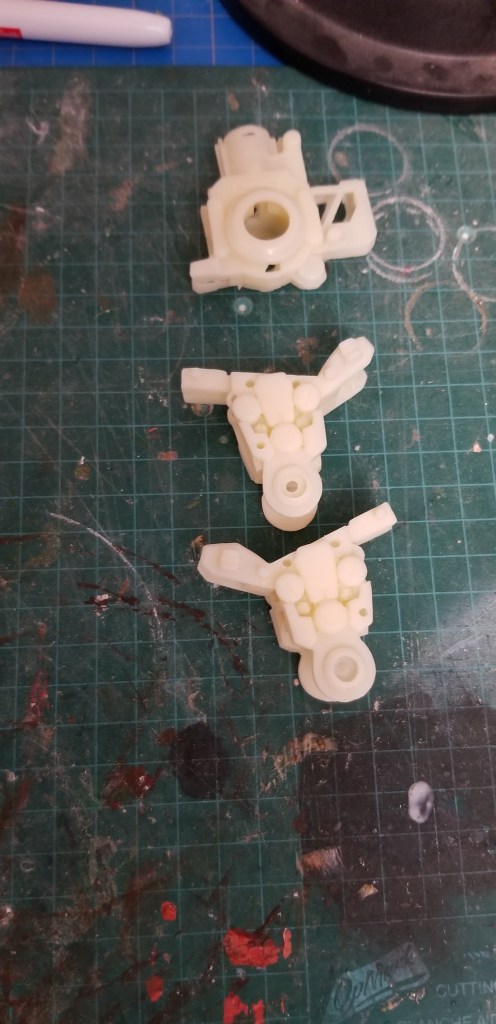
I’m also just about ready to rewash my resin kit in warm soapy water, to make sure all of the mould release is gone. I don’t want any part of this thing to peel or puckers or wear off prematurely. Given how much time and effort it takes to test fit, sand, and scribe lines, and fill holes, and pin together, and find work around for misshapen joints, I don’t fancy my expensive paints peeling off of it just hours after laying it down because I missed a spot.

So here we are, Thursday. Looking at the four day long weekend for Easter. By next Wednesday the temperatures supposed to reach above 20°C. That’s wild. I’d settle for three to five weeks at the 14°C range, and rains over night, and storms while we’re all sound asleep. As I understand Ottawa had an ice storm recently, with parts of the city without power. Yikes.

Oh in work related news, we managed to get just about all items off to the printers. Some items that require a third parties input were held up, but that’s honestly to be expected at this point. So yeah! Fantastic news. Ciao Bella!

RESIN KIT: Part two, the one where things go awry.

Something to keep in mind when you choose to work with resin, and resin based kits. The material is brittle, doesn’t handle torque particularly well, and warps like a mother fucker. Nothing a bit of hot water, clamps and a flat surface can’t handle, but expect delays, and lots, and lots of additional work that you wouldn’t find with a Bandai quality plastic snap fit model.

Also, rule #2, for anybody keeping track, casting quality. Pay the premium for high quality casts from the original developer, don’t chince out and buy a recasting, as the quality will suffer, and add considerable time to your build. That’s IF you can over come the casting deficiencies you encounter. I can sculpt, but I don’t do hard edged mechanical stuff, so my best hope is that the outer armor has better casting quality that will hide much of the misshapen, or poorly defined details of the internal structure. Round holes are oblong, octagonal holes for nuts, are off centre and warped, details are lumpy masses, so… yeah. Don’t get suckered into buying the 1/3 priced stuff, as it’s going to cost you in the end anyway.

But, having said that I have managed, over the last five or six days, to build up roughly 80% of the internal structure for this massive (comparatively) model kit. I have the feet, legs, waist, lower torso, arms & shoulders built. I just need to figure out the upper torso and electronic wiring harness portion, and then I can wash (again – to remove all of the mould release agent) and begin to prime the internal bits. I’m ok if test fitting armor panels rubs off the primer, it will help me achieve a better fit. Plus painting won’t start for a while, beyond the priming stage. I may get this to a point where I can leave it for a good stretch, for a rainy day, or the cold weather again.

I started late because I was intimidated by all the resin (And Covid), and just how much fixing, and rejiggering I knew I was going to need to do. But now that I’m in it, and not in a rush, I am not too overwhelmed by it anymore. Funny how that works. Also for one thing the pour spouts on every single piece of armor need to be cut off, and sanded, which is several weeks worth of work. I can do that when I stop going outdoors due to the cold. I now, as the temperatures rise, want to work outside, or in my garage shop. I’ve made considerable headway on my Urn build, and I need to sand, test fit, pilot hole drill, and paint the Moose fence topper for my parents. Then figure out shipping across Canada to Campbell River BC.

So I promised some pictures, here they are in no particular order.

The feet, legs, groin, waist portion loosely assembled as a cohesive unit. With the arms and shoulders set on the table, elbows facing up.
A closer look at the messy details of the resin castings on the internal frame. Yikes!
A size comparison of the legs & waist to a finished MG Gundam ZZ. This thing should be between 16-18 inches tall when all is said and done. A real chonker.

I spent some time on Saturday while it was warm working through the Urn build. I used wood filler to plug the pin head nail holes. I also touched up one mitered corner on the tray, and assembled the cover that goes over the main chamber & nesting tray. I have an obscene amount of sanding to do, and then a wipe on, polish off wax finish that I hope makes it all look cohesive, and wonderful. No stain for this one, just clear coat. I am toying with the idea of using a bit of trim around the base, but we’ll see how it all turns out after sanding, and rounding over some edges with a router. Easter weekend quickly approaches. I wanted to hand it off then. So I best get cracking! Ciao Bella!

RESIN: The journey begins. Part 1 of 20.

I took my second tentative stab at working 9n my resin project yesterday. I’m not sure how much I should count the first attempt from several years ago. I guess since I started to clip off the resin pour gates it should count for something, I suppose. Yesterday I put some time & effort into sanding, gluing, and assembly of the inner structure. After the few hours I put in to the feet, calves, and shin portions, I think this is going to take me several weeks to complete. And that may not even include priming, painting, and the final metal detail bits, nor the massive water slide decal sheets. But, I have started and made considerable progress! Yahoo!

The other thing I have come to realize is I must have bought a recasting, mainly because the box doesn’t have the hologram  stickers on it, and the multi colour cast resin, is not the appropriate red, yellow, grey, and white as mentioned in the instructions, but 90% beige, and 10% grey. Plus the castings aren’t very crisp, and lots of the holes are plugged and need to be drilled out. But! He says, but… I’m only working through the internal structure right now, and I don’t intend to make the armor removable, so I think, with a high chance of certainty, that much of the blemishes and such will be covered up by the big chunky armor plates. Now if those suffer from the same quality issues, I might have a problem. But battle damage, and weathering could potentially cover that up if need be. I probably shouldn’t have been so worried about building it, as it has some quality issues that I can’t do much about, besides work around it all. Although truth be told, I am glad I did those two Macross Valkyrie VF-1’s recently, that has given me more confidence to tackle what looks to be a 16 inch tall model, possibly taller with antennas, and metal spiky bits. I’d love to use my USAF colour scheme on this item too. I really like the cool blue greys I used on my latest Macross Gerwalk model. I will need to source a high quality yellow paint, as the yellow ink doesn’t cut it. To Amazon then! Or I’ll find a very light brown that I can tint with the yellow ink. We’ll see what the budget is like after tax time.

It all started with the hips. Then putting the gigantic feet together.
The calves enter the conversation.
Parts break down for removal of gates, pour spouts, and some rough sanding.
Dry fit parts for subsections of the build. Shoulders, forearms, elbow joints, chest, waist etc etc…
The chest in its chunky glory.
Upper thighs and groin (which has a tonne of flashing, and miss moulded parts).
The box with all the other parts still bagged up waiting for my attention. Hours, days, weeks worth of work without any painting included.

So that’s where I am right now. I will soon get the second leg as far along as the first one, then I’ll tackle the arms and torso. Wish me luck!