Did I Manage to Salvage the Ogre Rogue… You Tell Me. The Painting Episode: Take Two.

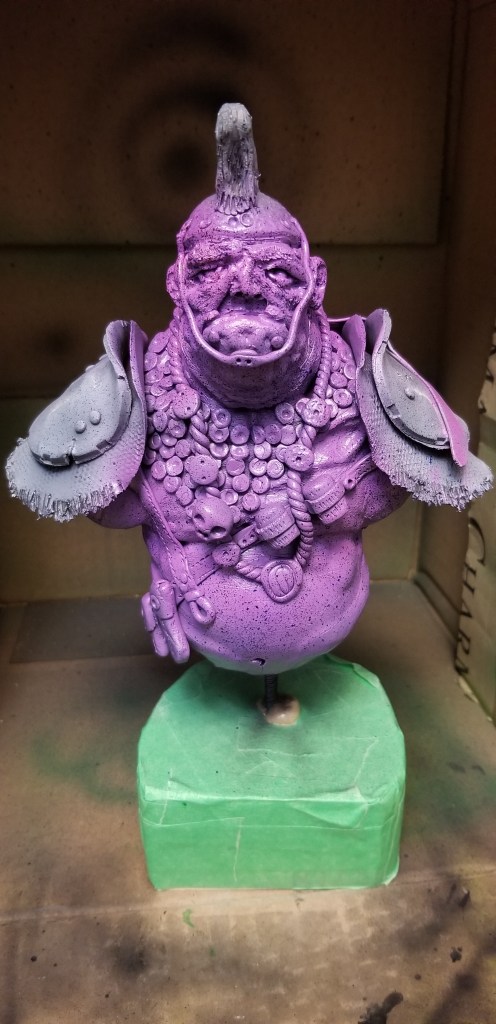
So in our last painting episode I attempted something which I had not done before, a realistic human skin tone. I had the appropriate paints, I was following along step by step, and I even added flecks of mahogany, green, blue and red for that authentic splotchy skin we all have. And then I got real heavy handed with the last two layers of high lights, and washed it all away. But not before I added the blue glaze to add some of that Ogre ‘otherness‘ to his look, and it all went to dog shit.

I had some thoughts regarding going right back to primer, and trying again from the start. I was all ready nearly three hours deep on the paint job at this point, so I instead opted for a quicker fix. It wouldn’t help with my over sprayed shading issue, being that I had mostly erased all of my layered shadows. But I pressed on. Adding a new round of flecked speckles. At this point I was happy enough (I guess?), and dug in to painting the rest of him. Chainmail, cowl, hair, teeth, eyes, belt, furs and trinkets. I tried to get a rusty feel to the pauldron, but as I started with a Copper look, a blue/green patina would have worked better, in retrospect. No matter. I put his crows beak/war hammer back on, and painted that a little. In all honesty the weapon requires a lot more work at this point, but I’m over it for now.

I had some EU labels come in, and the spectre of another report or three looming, and I don’t want to invest more time on the weapon right now, as the paid work can come in at any second. Gotta stay nimble as a freelancer. Hurry up & wait is real common round these parts.

Anyway, here he is, and here is how it’ll stay for a while longer. Perhaps come January, in my down period I’ll pick him back up and polish some edges. Behold, the thing I have made.

95% complete Ogre Rogue bust I sculpted this year (2022).

It looks like a thing, so I have that going for me, which is nice. Otherwise all I have left is the no name brand Ninja Turtle character I have left to paint. Could just leave it as plain Apoxie sculpt though. That’s a thing that people do these days, just leave it in it’s original colour. I can get behind that I think.

The Rogues Gallery of 2022 sculpted items, and their paint jobs.

The SlapDash Painting Episode, No° 108.

I have recently been revisiting my old no name air brush. I picked up a wide variety of Vallejo paints, primers, thinners, and washes so that I could paint my latest round of bust sculpts. It has been a trying time, to say the least. But as I progress through my eight recent builds I am finding a stable, and repeatable method to getting half way decent results.

I am working off of the following methodology. A flat black primer over the whole bust, followed by a grey primer that I spray top down for stark contrast high lights. Then I use a mid tone, straight from the bottle to cover the whole sculpture. I use a darker colour to then paint from the underside only. Then I use a 50/50 mix of mid tone to first highlight, spraying top down all over. Then the high light colour at 100%, top down only. Focus primarily on head shoulders, and ear tips, and maybe belly if my character is fat/barrel chested.

At this point I pick up a tooth brush and then fleck a deep red, blue and green paint all over the bust, avoiding armor if at all possible. Once dried, I go to my last 100% colour and knock those flecks back a tad. And then use my final highlight colour to brighten up the face and very tops of the shoulders only.

After this point it’s all brush painting for metallics, leather straps, skulls, and anything else that wasn’t skin tones.

1.) Flat black primer.
2.) Grey primer, top down only spraying
3.) Mid tone all over.
4.) Darker under colour that is sprayed bottom up. 5.) First highlight sprayed top down and all over.
6.) Second highlight colour top down. More focus on head, neck & shoulders.
7.) Flecked red, blue & green paints for skin variations.
8.) Knock down flecks, and add next highlights for face, and shoulders only. 9.) Begin brush work for metallics and all other elements.

I’m not actually finished with my Ogre royal guard yet, so I’ll have to cut it here. I should note I’m using craft paints that I have thinned with a Vallejo acrylic thinner. I wanted something a bit different to my regular green, brown, red or blue palettes. Looks nifty. I think. Still has a long way to go. Catch you around.

Love what you’re doing, but I have a few notes…

In regards to your performance recently… in that it sucks. When you work, it’s all great, but then you break down, clog, jam, hell we even lost an integral part of you recently in the u bend of a drain (more on that later). So yes, as a no name air brush, you do what it says on the tin, in brief spurts, and do fine work, but ultimately you are a major failing and we don’t want to work with you after you finish all seven parts of this major project. Oh ok? Hmm. Yes, no you can not leave early. We’re under staffed, and you’re the only equipment we have on hand. Budget constraints and all that jazz. Please and thank you. I’ll dock this meeting from your time sheet today. Bye-bye. But don’t leave. You’re not fired – yet. You are fired, but not until all seven items are finished ok? We clear? Great. Uh-huh. Toodles.

So yeah, the no name cheap air brush is solid when it works, but needs to be torn down and cleaned to the Nth degree after every single solitary brief use. The air brush cleaner, and hot water treatment don’t seem to cut it. And all I’m working on right now is priming stuff black. Haven’t done a zenithal high light on anything yet, nor have I laid on any actual colour. So maybe in the new year I will break down and purchase a higher quality air brush.

On the other hand, the caddy works great. The Vallejo ready out the bottle paint primer is fantastic. The iawata air brush cleaner feels like it should work. Smells nice. And my make shift card board box over spray protection booth, while lacklustre is perfectly fine. Can be set up in seconds, and torn down to store under my drafting table just as quickly. I do want to build a better one, but I need to know what I really, desperately need out of it first. Do I need extraction, filters, lights, a turn table or flat static bottom. Do I want to be able to tear it down, or is it a new permanent fixture in my office/studio from here on out. Do I need to build it to fit inside a closet? Or store it under a work table. I don’t know. I do know that eventually a box of more than 100 miniatures will come my way in mid 2023, and I want to hit the ground running when those finally arrive from a kickstarter I backed a while ago. I should have done the Reaper Bones kickstarter, but I opted for a less expensive one, and it might take me for the $100 bucks. Oh well. Nothing I can do about it now.

In other news, the U bend I busted yesterday has been fixed. I went to Schell Lumber and bought a suitable replacement. I put that back in place, and tested the taps. No leaks – as of yet. It threaded properly, and fit the current existing piping. So a win! Yeah. Also I stopped off for groceries and bought a present for the birthday party this weekend, so that’s taken care of too. Came in and worked on some sample labels, and sent them off too. Had a request for some French Language items and got that put together, and am waiting on any additional instructions. So Bully for me. Ciao Bella!

Dream a little dream of – Paint? Damn it!

Spent a little time yesterday tweaking my air brush paint caddy to properly house my mini air brush compressor and air gun unit & hose. Added some dowels to one side so that it can hang comfortably off the side, or wrap around the handle for transport. Nothing major. I also added a tiny tray which screws to the side where the compressor will sit, and the strapped cord can be stored side by side with the unit too. All neat and tidy like. It’s no grand masterpiece, but it is functional, and with one last element to arrive it’ll be complete. A small bottle of Vallejo airbrush paint thinner medium. Don’t leave home without it. I am toying with the idea of added another tray go the back side to house the massive bottle of jet black airbrush paint I have had, and been using for years, as a nice wet, spreadable black on any canvas I’ve painted on in the last decade or more. I think the bottle is still half to one third full. It’s a big god damned bottle, believe you me. We’ll see. It’s lived up on a shelf for ten or more years, so I don’t much see the need to move it now. Except to keep my newly acquired supplies as a self contained unit. I feel the need to do this. Not sure why. An obsessive compulsion if you will. A fixation of the moment. Bah.

Slightly updated caddy.

I even spent much of the night dreaming about the paints, their order in the caddy, and how I’ve set up the compressor and air gun accessories. It just wormed its way deep into my brain, and I got to spend nine or so hours dreaming the same forty seconds over and over, and over again. Oh joy. Such fun.

In other news the project I was waiting on will likely come next week. Which is fine by me. I figure I will now have booked work right up until nearly Christmas, which is amazing. I love when I know I have work coming, and roughly what that will pay. Makes budgeting for Christmas, and the dreaded lull of winter that much easier to deal with.

Today is Saturday, and the town will have a Halloween trick or treating event on down on Main Street, so I best get to eating, and finding warm clothes & comfortable shoes! Going to be a hell of a lot of walking later on today. Plus one more inflatable to erect on the front lawn! Let’s get spooky! Ciao Bella