How do you feel about making up new words to suit the world you’ve built (should you write Science Fiction and/or Fantasy). Do you ever get push back from your editors to try an use existing words instead? Does it depend on your fame level/readership base, just how much they would let that sort of thing slide? For example – should George R R Martin decide to create a bunch of new words, (being a very successfully selling author) would he have an easier time of it with his editors/publishers, than say a new body on the scene with their first ever book to be published & no copies sold as of yet. I would be most interested to know.
Also – how connected do you get/feel to the characters, places, events that you create. Potentially applicable to historical researchers and biographers too, as they expend tremendous amounts of energy and time researching all facets of a time period/event/people. Like, do you cry when you kill them off, or they die, because that makes the story better, or is the basis for another event. I’m getting wordy here. Veering off track. I could pull a full tangent right now! How attached are you to characters, reoccurring or otherwise? Conversely, do you chuckle when you do heinous shit to those characters you made that you don’t like – especially if based off of people in your own life – like a former bully, or ex of some sort. I’d love to know!
I’m nearing another full calendar year in between writing a full book of short stories – again. Not that I intend to go for a round three, but…. maybe? Hard to say. Work has been busier this year. Lids are older now. Wife has the year off. Kids are enrolled in way too many extracurriculars that require driving to & from locations. So unlikely I’d write much any time soon. But I get flashes of story lines I’d like to tackle every now & again. I feel like the Covid brain fog from March added some hard breaking to my desire to write a cohesive narrative. I just couldn’t hold it all in my head with enough clarity to put pen to paper. Brain damage on a vascular level, it be like that sometimes. Bet.
I think I’m going to aim for 400 days of blogging, creative writing, and a general sense of nonsense and then reassess. I didn’t really have a plan beyond wanting to do a little writing every day for a year, and well…. now I am beyond that by a slight margin. I don’t have any goals for writing beyond the mere act of doing it. I try to get more concise. To limit run on sentences. To be more coherent in general. I’d actually need to reread a portion of last years posts to see if I managed to achieve any of those things. So, I’ll go out on a limb and I will say, sorta, kinda, maybe?
I do use this medium to moan, and lament about daily struggles and annoyances. But believe you me, I don’t have it too bad. I’m doing just fine. I could do with slightly better gut health, but otherwise, we’re all good. I just love to narrate a good gripe, every now and again. For those at home keeping score, I have Domestic Duties Monday’s, which sometimes gets bumped to Tuesday. I occasionally do movie reviews. Mostly if they are awful, or evoke some type of emotional response from me. Rage being a perfectly reasonable response to write about.
Rarely, I will cover retro gaming with my kids. As I have access to a Sega Master System, PS1, Nintendo 64, Super NES, Atari game system, Xbox , and an Xbox 360. So for older games we got you covered! I had kids so the PS4 & PS5 sailed right by me without waving. So nothing more recent than late stage 360 games get reviewed here.
I sometimes cover wood working projects, home DIY items, and my own spin on sculpting monster/creature busts and figures. I don’t recall ever discussing my music tastes, or instruments, but I can if I felt like it. I have taken to assembling an instrument stock pile, so that my kids have access should the mood take them. Key board, guitars, possibly drums, a violin, and a clarinet. Maybe we’ll form a family band just for kicks to keep ourselves occupied in the future. Who knows.
I just feel like I want to quit dreaming about things, and just go do them, regardless of being an awful noob and all. I don’t need to be any good, I just want to do the things, and experience them first hand, instead of watching others do the thing on YouTube. Perhaps building a new skill, or just preparing the way for my kids to learn, and do new things too. No point being miserable doing only what others expect of you. That way lies madness, depression and misery.
So in short, I don’t know how much longer I plan to keep going on a daily basis, but whatever I do, it’ll be more of the same. With the caveat that I might stumble upon a good short story theme or character, and then light up this phone with new installments. Fingers crossed. Ciao Bella!
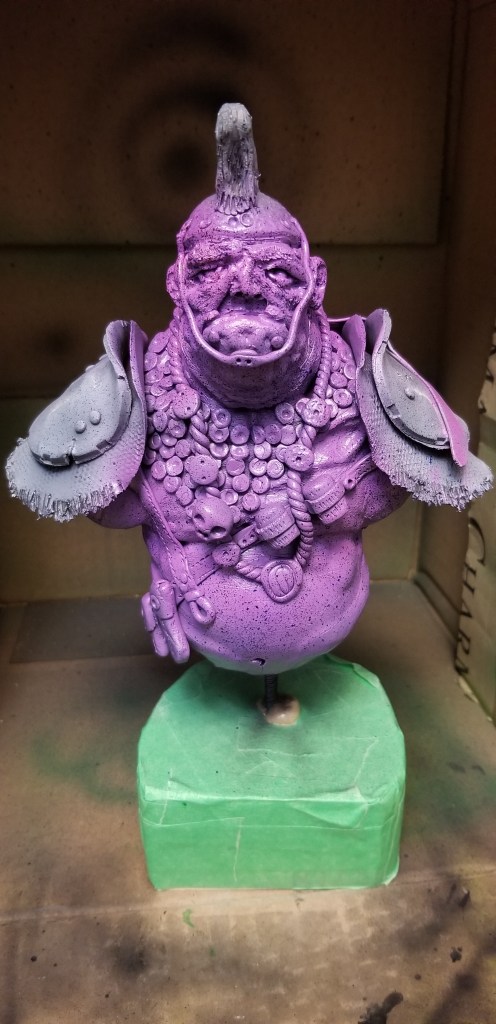
So in our last painting episode I attempted something which I had not done before, a realistic human skin tone. I had the appropriate paints, I was following along step by step, and I even added flecks of mahogany, green, blue and red for that authentic splotchy skin we all have. And then I got real heavy handed with the last two layers of high lights, and washed it all away. But not before I added the blue glaze to add some of that Ogre ‘otherness‘ to his look, and it all went to dog shit.
I had some thoughts regarding going right back to primer, and trying again from the start. I was all ready nearly three hours deep on the paint job at this point, so I instead opted for a quicker fix. It wouldn’t help with my over sprayed shading issue, being that I had mostly erased all of my layered shadows. But I pressed on. Adding a new round of flecked speckles. At this point I was happy enough (I guess?), and dug in to painting the rest of him. Chainmail, cowl, hair, teeth, eyes, belt, furs and trinkets. I tried to get a rusty feel to the pauldron, but as I started with a Copper look, a blue/green patina would have worked better, in retrospect. No matter. I put his crows beak/war hammer back on, and painted that a little. In all honesty the weapon requires a lot more work at this point, but I’m over it for now.
I had some EU labels come in, and the spectre of another report or three looming, and I don’t want to invest more time on the weapon right now, as the paid work can come in at any second. Gotta stay nimble as a freelancer. Hurry up & wait is real common round these parts.
Anyway, here he is, and here is how it’ll stay for a while longer. Perhaps come January, in my down period I’ll pick him back up and polish some edges. Behold, the thing I have made.
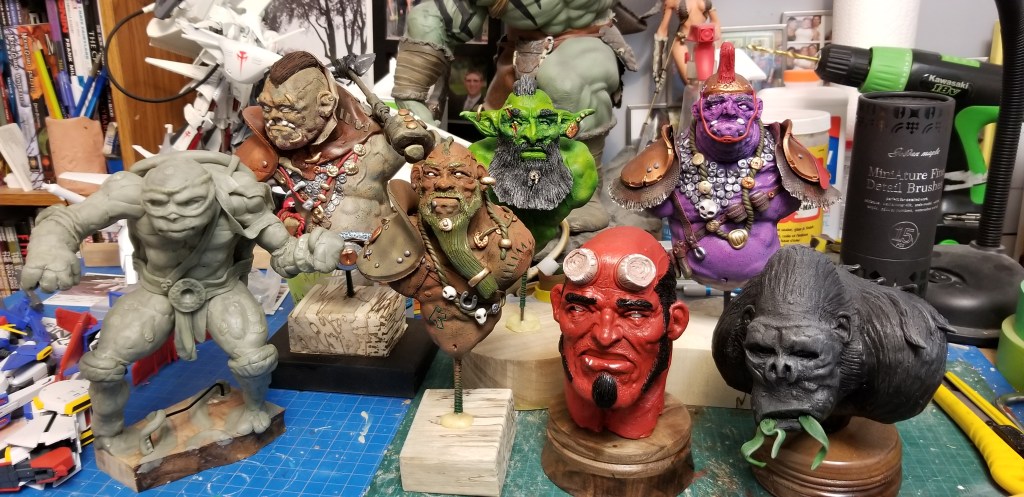
95% complete Ogre Rogue bust I sculpted this year (2022).
It looks like a thing, so I have that going for me, which is nice. Otherwise all I have left is the no name brand Ninja Turtle character I have left to paint. Could just leave it as plain Apoxie sculpt though. That’s a thing that people do these days, just leave it in it’s original colour. I can get behind that I think.
The Rogues Gallery of 2022 sculpted items, and their paint jobs.
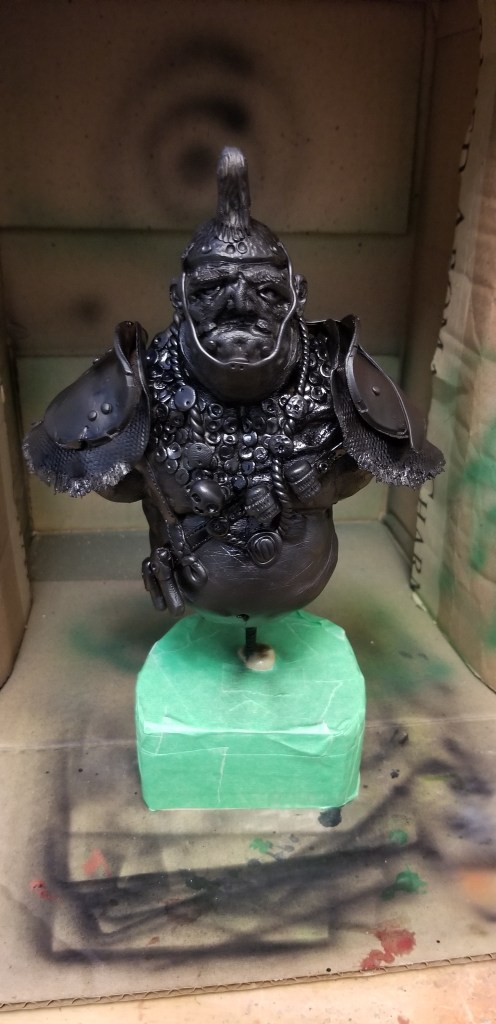
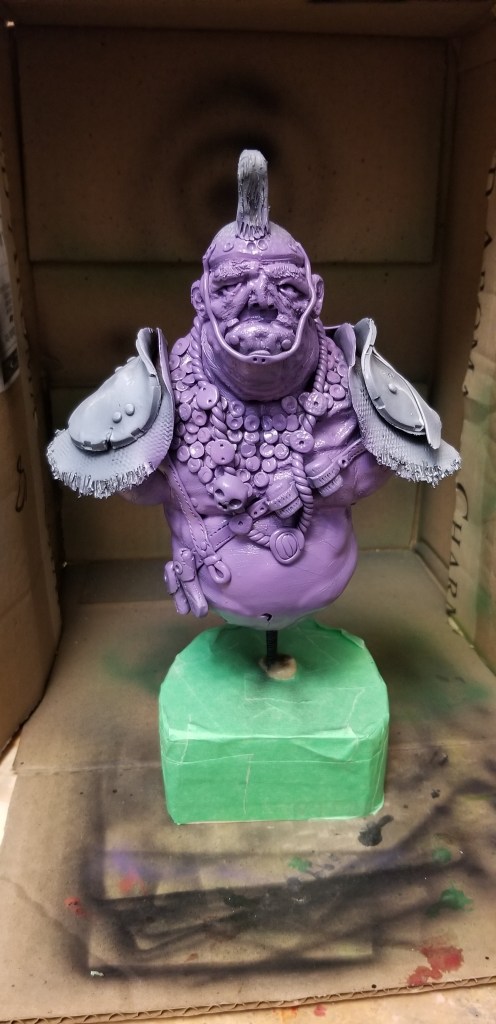
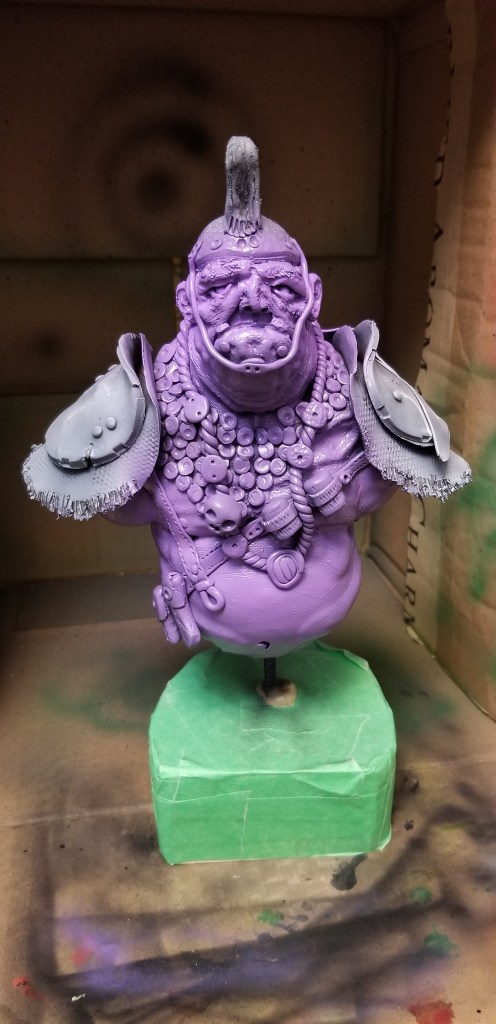
I have recently been revisiting my old no name air brush. I picked up a wide variety of Vallejo paints, primers, thinners, and washes so that I could paint my latest round of bust sculpts. It has been a trying time, to say the least. But as I progress through my eight recent builds I am finding a stable, and repeatable method to getting half way decent results.
I am working off of the following methodology. A flat black primer over the whole bust, followed by a grey primer that I spray top down for stark contrast high lights. Then I use a mid tone, straight from the bottle to cover the whole sculpture. I use a darker colour to then paint from the underside only. Then I use a 50/50 mix of mid tone to first highlight, spraying top down all over. Then the high light colour at 100%, top down only. Focus primarily on head shoulders, and ear tips, and maybe belly if my character is fat/barrel chested.
At this point I pick up a tooth brush and then fleck a deep red, blue and green paint all over the bust, avoiding armor if at all possible. Once dried, I go to my last 100% colour and knock those flecks back a tad. And then use my final highlight colour to brighten up the face and very tops of the shoulders only.
After this point it’s all brush painting for metallics, leather straps, skulls, and anything else that wasn’t skin tones.
1.) Flat black primer.2.) Grey primer, top down only spraying3.) Mid tone all over.4.) Darker under colour that is sprayed bottom up. 5.) First highlight sprayed top down and all over.6.) Second highlight colour top down. More focus on head, neck & shoulders.7.) Flecked red, blue & green paints for skin variations.8.) Knock down flecks, and add next highlights for face, and shoulders only. 9.) Begin brush work for metallics and all other elements.
I’m not actually finished with my Ogre royal guard yet, so I’ll have to cut it here. I should note I’m using craft paints that I have thinned with a Vallejo acrylic thinner. I wanted something a bit different to my regular green, brown, red or blue palettes. Looks nifty. I think. Still has a long way to go. Catch you around.
Have you ever felt like you used up one of your best ideas too early, for something or someone you later felt didn’t warrant such an epic idea? And as a result feel as though the idea you used didn’t get to reach its potential, and was otherwise stifled? Yeah – I feel that way an awful lot, and it’s most likely not really what’s going on. An idea in your noggin’ is one thing, the execution of said idea to bring it to life in the real world is another. If you don’t execute it with any kind of precision or skill it will feel wasted. But you have to know where that failure lies. Most likely it is with yourself. Rushing to meet a deadline, or procrastination about starting because you later realize the scope of the idea at 100% is well beyond you. That’s your fault. Gotta figure that kind of stuff out with pen & paper before you end up cutting corners, or justifying major changes to suit your available time & skill.
I don’t want to say that I’ve Dunning Kroeger’ed myself in the past, but I surely have. Thinking I’m better than how I actually accomplished a story arc, or character driven story vehicle. Frustrating. Although sometimes I’m in such a rush (read that as panic) to create content to accomplish my writing every day challenge I’ll write whatever is in my head that second, only to realize afterwards, I should have held that thought back to explore it in greater depth. But two or more posts back to back on the same thing seems… lack luster.
But then the Fair comes to town and I write about that four plus days in a row, so maybe I’m just over thinking things again. This isn’t a nationally syndicated column with gravitas and cultural weight attached to it. I’m just some schmoe who tried to write anything he could once a day, for a whole 365 days. That hardly makes me the pinnacle of anything, so the feelings of wasted ideas are silly. Foolish even. Get a god damn grip my boy!
So that is how I woke up feeling at 6:54 am today. Also, had an upset stomach, so that is what really woke me up, and as I laid back down in my toasty bed, I thought about what I wrote late last night, and how I should have saved that post for today. Not to get out of needing to write even more today, but so i could go over it, and expand on points i now feel i should talk about in more depth. But does it need it? Most likely no. It was just a feeling i had. Humans are weird.
I wonder if we’ve secretly had Covid in the last three years, because i feel, ever so slightly, around the edges that I’m getting dumber. Or something akin to that effect. I can’t quite pin point it, but there’s some obscured thing there. Like the boundaries of what i used to know a lot about are fuzzy now, like has my knowledge turned from things i know, into things i ‘think’ that I know? My memory of some things has gotten fuzzy, in the softest sense. Very strange. Forgetful. Losing a word in the middle of a sentence. Or no clue why I came into a room. Misremembered events from a book or movie. It’s not major, but it’s a softly misting haze at the outer edges. Weird. Could it be that I am merely experiencing the regular effects of aging like every body else? Or is it more. Don’t know.
Last quiet days of school are upon us, and I have some hobby stuff to finish prior to my next report coming in. Decided to recut my cross braces, as I sanded them too vigorously and the snap fit became too loose. So I recut those four pieces and sanded the two faces only that don’t affect their fit. I have it all broken down and am just waiting for the danish oil to soak in and dry. Then a quick glue up and this project is done! The oil really makes it pop. The Osmo I ordered came in, so maybe I’ll polish this up with some later on? Not certain. I’ll be holding off on furniture building until September anyway. So now rush now it’s just about built, and I can keep it inside where it is temperature controlled and the humidity is under wraps.
Not even ten am yet. What a great day. Glad I had enough material laying around to recut those braces, as i was pretty mad at myself for the overzealous sanding. The Walnut stain really does bring it all together though. Love it.
I’m going to close down for a bit, give this a chance to dry without interference from me. Glue up next! Weeee!
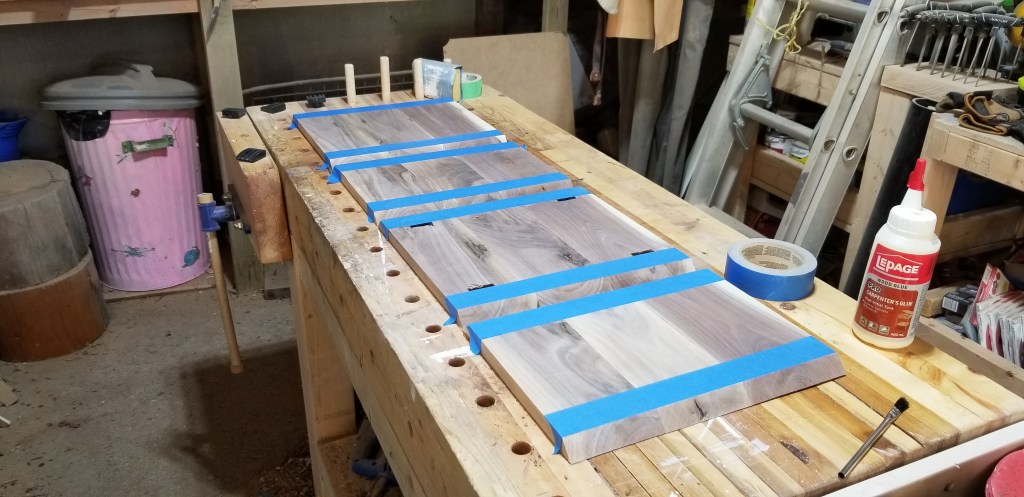
As much as I love the look of Walnut, it comes with a fair few issues to work through. Namely gouges and tear out during milling, and chunks coming loose when hand chiseling. I will have quite a few places to patch when it comes time to do a final sanding. I need to glue it all up first, then make a Walnut dust paste to patch all of the imperfections. I hope it doesn’t ruin the overall project.
I used packing tape on the outside mitered corners, and painter’s tape on the inside edges of each glue up. See fig 1. And fig 2.
Fig 1. & fig 2.
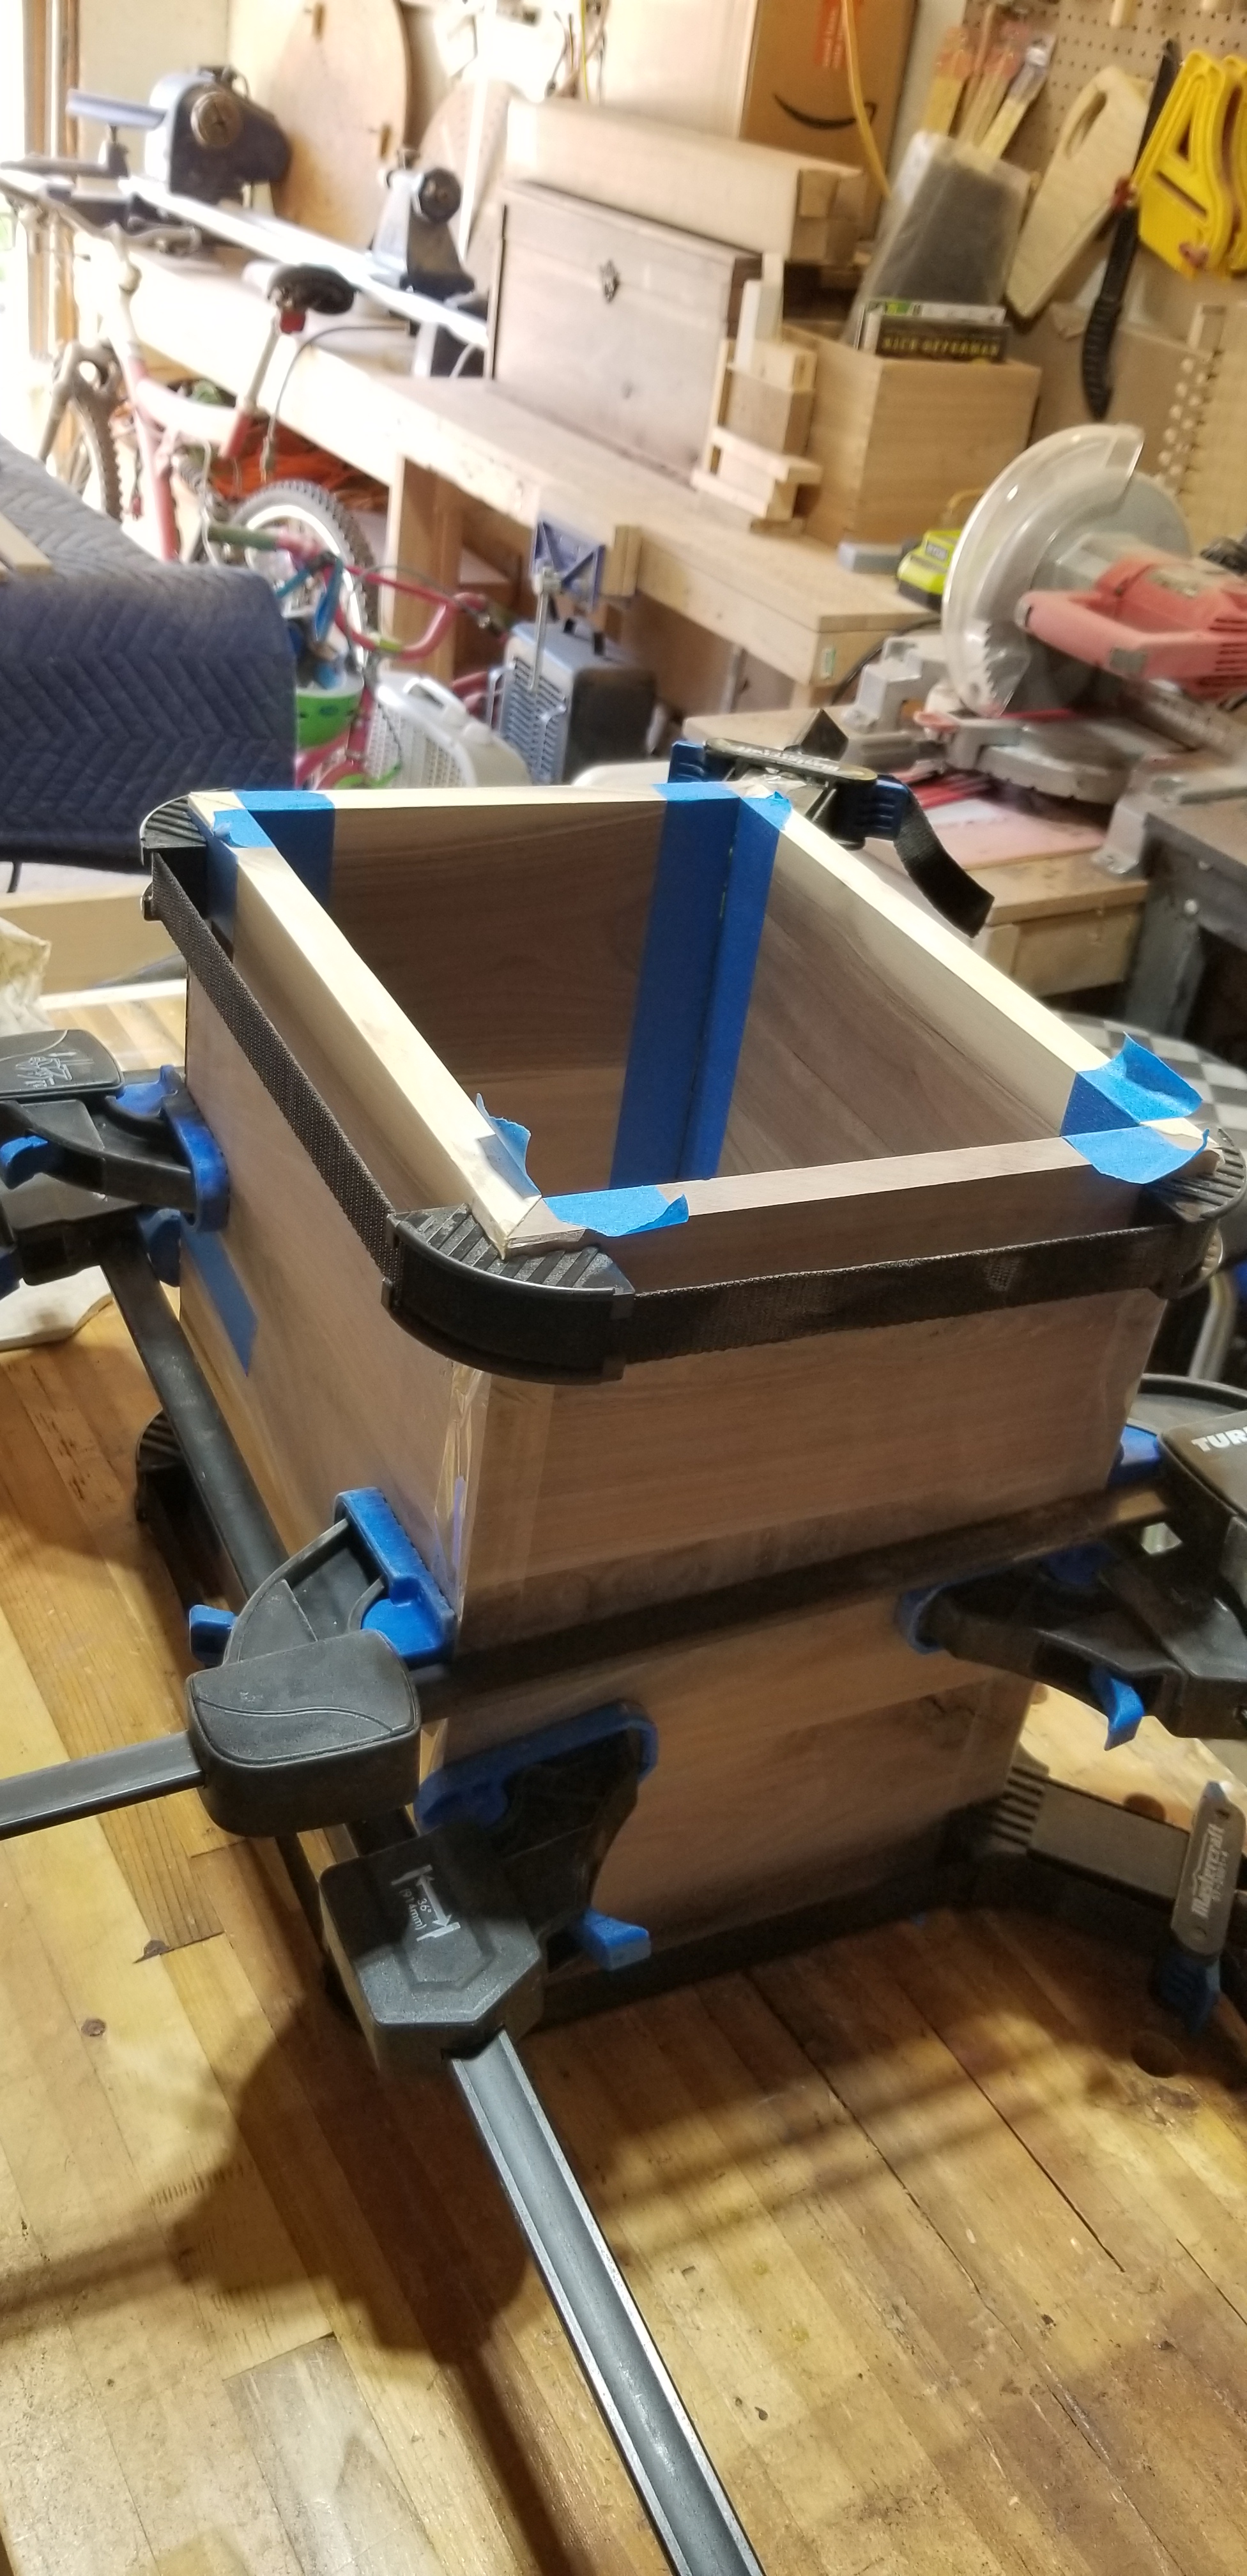
I used a good amount of LePage glue in the joints, which I spread with an acid brush. I folded it all up into a box, and added additional painter’s tape to the final corner. I used two box clamps and a set square to keep the hollow Walnut box as square as I can get it. See fig 3. And fig 4.
Fig 3. & fig 4.
I also clamped around the middle of the box to make sure it didn’t bulge or have the seams pop open or slide around.
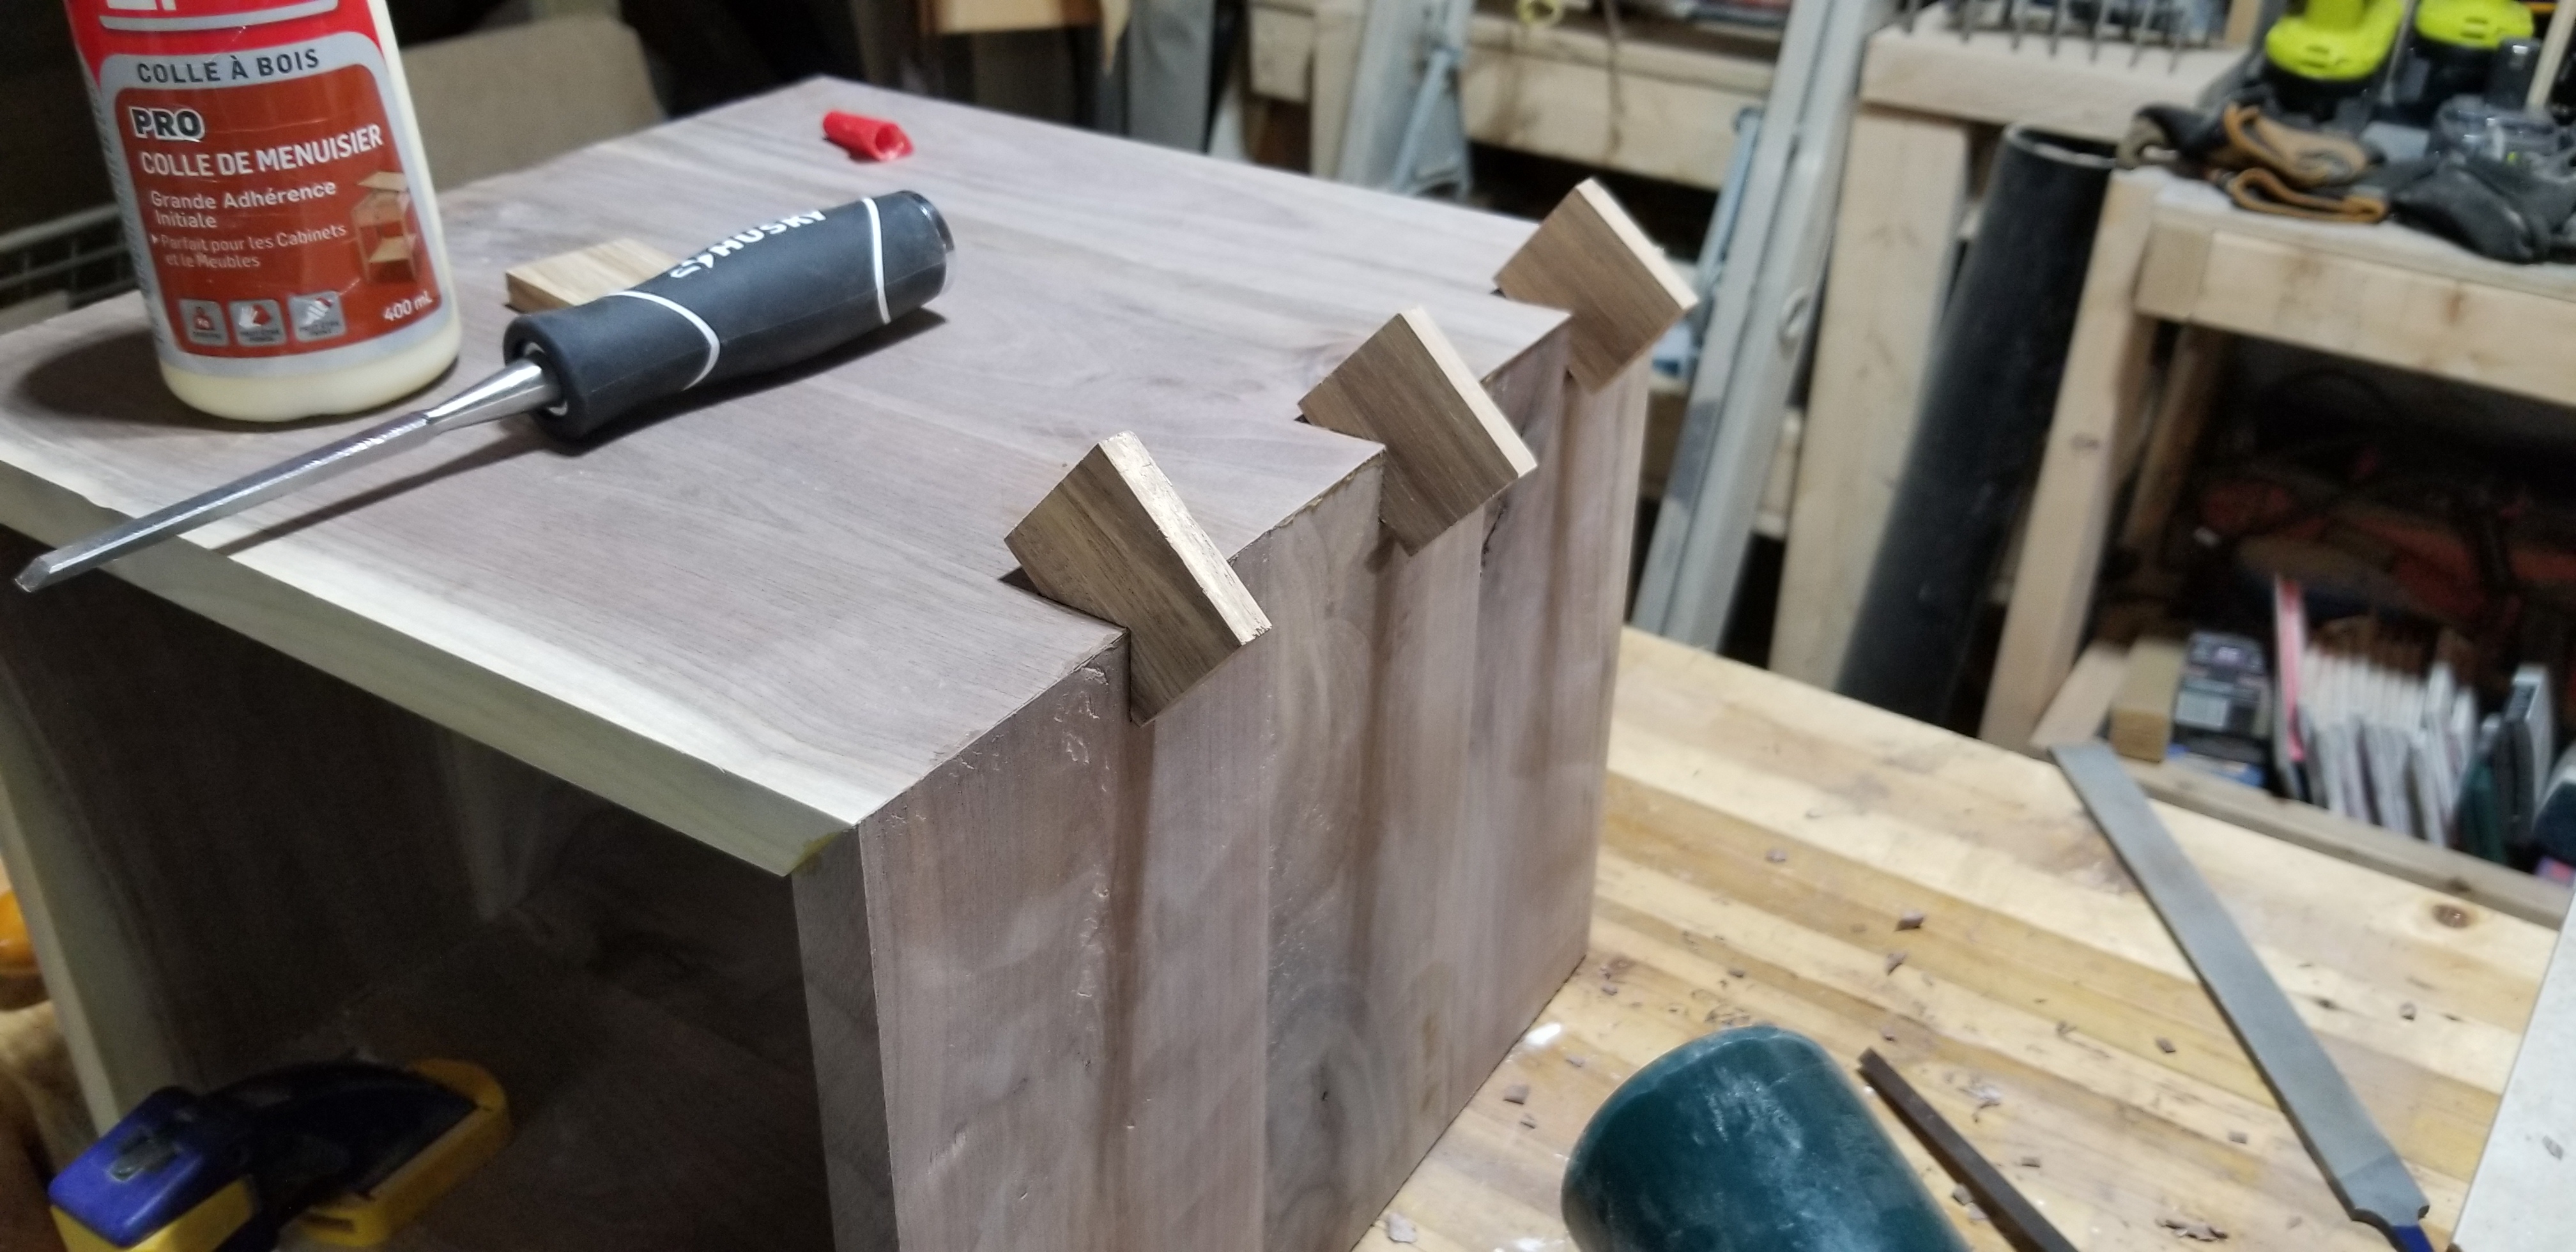
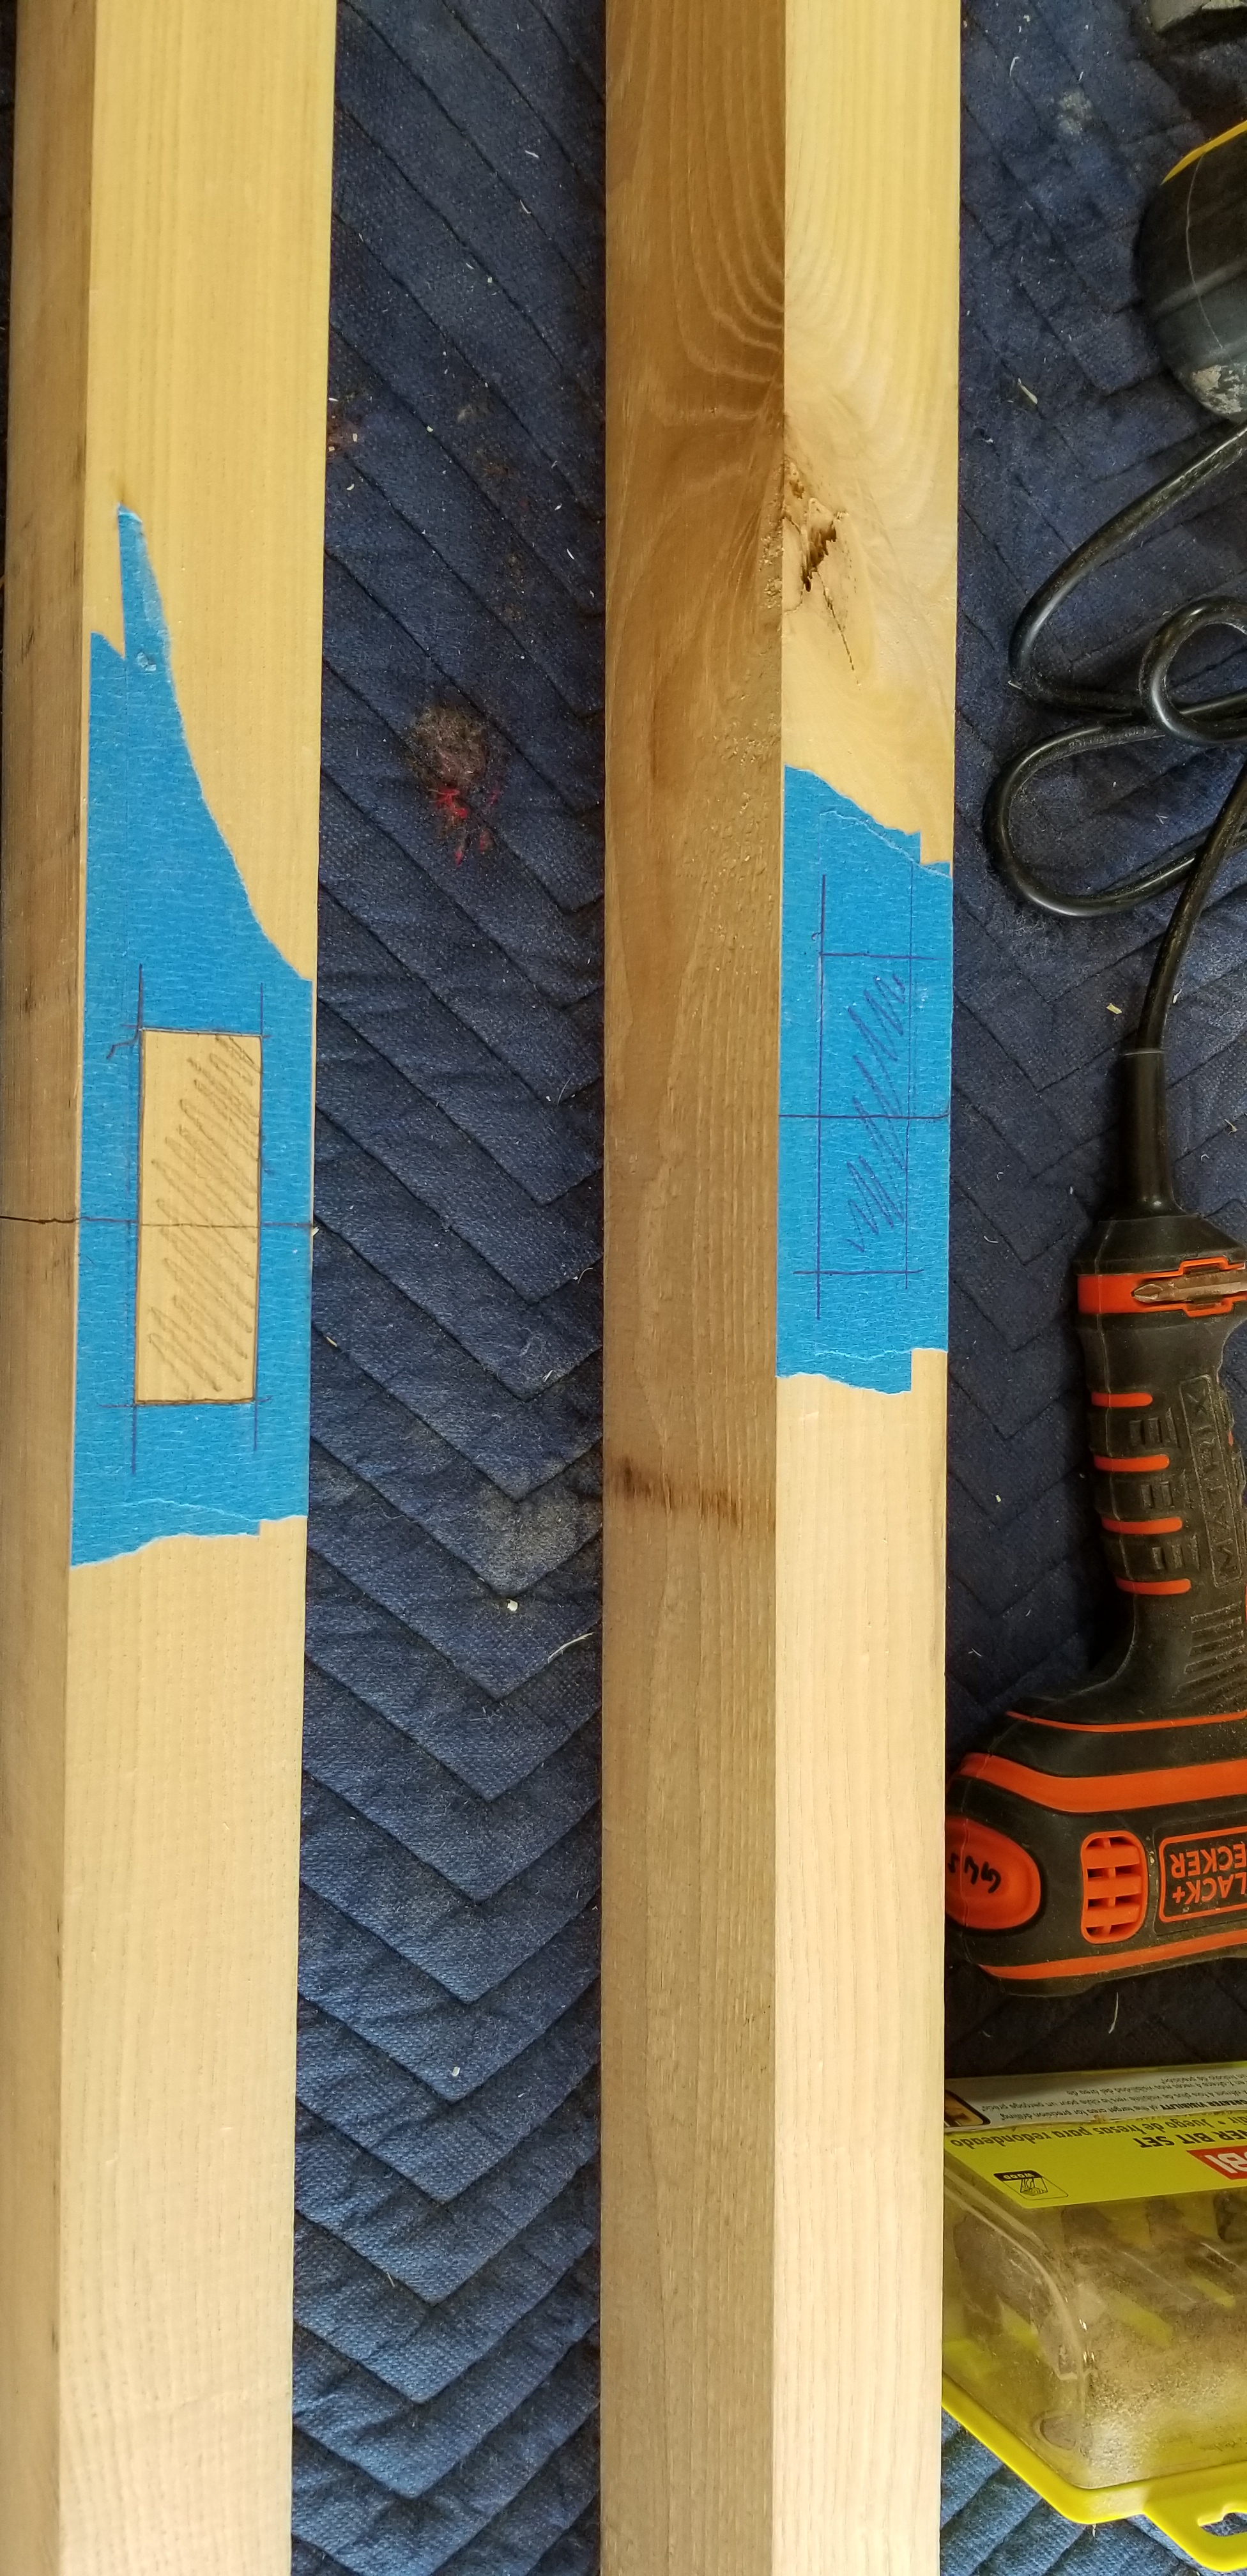
After the box had dried in the 27°C heat of the day for several hours I unclamped the hollow Walnut box and began to cut in my Hickory splines. I chose to do three per corner edge on the top. And depending on how the experience goes, I might add two more on both bottom edges too. I started with a Crown Dovetail saw, cutting just inside my marked lines, and then used a .25″ chisel, cutting along a 45° angle from both the top & bottom to remove the gap where my Hickory splines will rest. If you’re legit, you’d take note of grain orientations and how your boards were sawn, and grain patterns, but I’m just trying to get something done here. Two of the three had good pressure fits, but a possible gap situation might have occured from a too deep of a run with the Dovetail saw. More Walnut dust paste will be needed. See Fig 5 & fig 6.
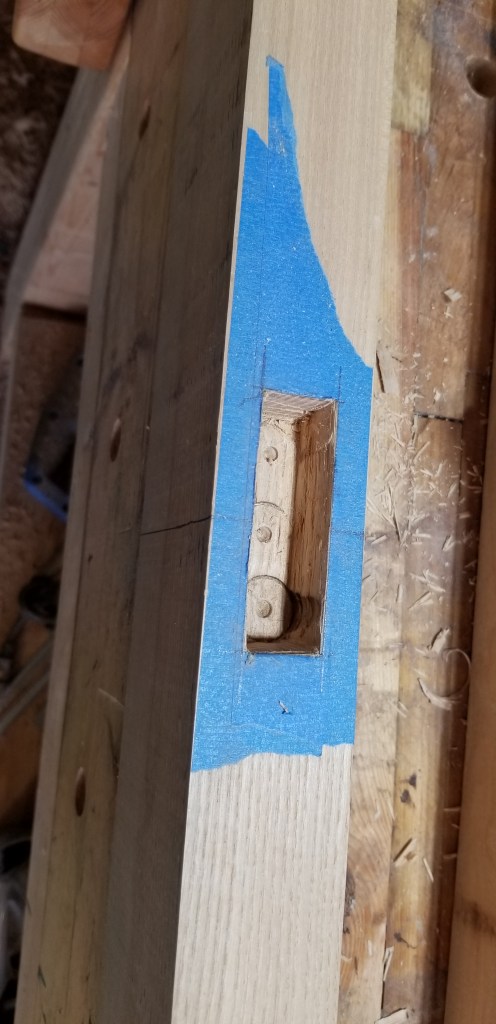
Fig 7 shows the glued in splines.
I only managed to cut in three splines on one side and glue them in yesterday evening. See fig 7. Once the top panel has three more glued in I can flush cut them off. I added them purely for visual interest and not for strength. Though, they may help in that respect.
I had managed to complete a dry fit test and have it all stand up on its own. I will take that as a win at this point. I know I have several hours of touch ups to do after the build up and assembly is done.
Parts layout. Still so much sanding left to do!
Once I complete the top portion I will shift focus back to the legs and skirting braces. Lots of sanding to do here. I think I will finish it off with some Danish Oil to tie the whole thing together. Ciao Bella!
It all started when I was gifted some Ash boards from the family farm, that were rough sawn, and stored in a shed for twenty plus years. I gladly took them home after sawing the sixteen footers in half by hand, and tossing those heavy suckers in my van.
I planed them for what felt like hours, and then had to man handle them across my jointer. Which took forever to do. This was back when I had my tiny 10″ Ryobi table saw, which kicked on full tilt, and scared me to death. Cutting 2 inch thick ash boards that were 80 plus inches in length took some doing, and set my heart to pounding. I settled on four inch wide boards by roughly eighty inches long, and two inches thick.
I then cut down four cross members, two in Ash, and two in a douglas fir that was pretty heavily knotted. It was at this point that I began to run out of warm season, and all my flat, square milled lumber got shut away in the garage for seven months.
The following spring I dug out my lumber, which was still square and decided to hand cut some mortises for the top and bottom of the door uprights. I first used a circular saw to cut two slices through the end grain about four inches deep. This was super sketchy, and my super old school, under powered Kawasaki circular saw died after a cut & a half – twice. So I finished it off with a Stanley hand saw. You know the old kind that weirdos play with a violin bow to make high pitched whiney muzak. I had to climb up on my work bench in order to get this to work.
I gathered up my chisels and a hammer and got dug in cutting away the channel where the cross members would rest. This would prove a difficult and arduous task. It took several days, and my channel was not straight, nor were they even. I took a file to them, and worked that for a few days too. It was at this point that I started to refinish a rocking chair for my very pregnant sister in law, and that took my whole season.
The following year ( this year 2022) I took some rasps to my channels, and evened them out a fair bit. I then used a brand new Dado blade to cut some even tenons for the cross members. It was an endless cycle of dry fit testing, rasping, filing, and planing until I had a suitable snug fit. Then I measured out my center line, and cut out two mortises for the third, and final center cross member. I hugged it out with a forstner bit, then used a multi tool to cut through the rest, and then hand chiseled it to a clear rectangular hole. It worked quite well. After assembling it all as a dry fit, I noticed my angles were all wonky, and then realized my flat, square lumber, was now bowed, and twisting ever so noticeably. But as I was about to begin sanding I hit the most egregious spots with a hand plane, and sort of made the best of it.
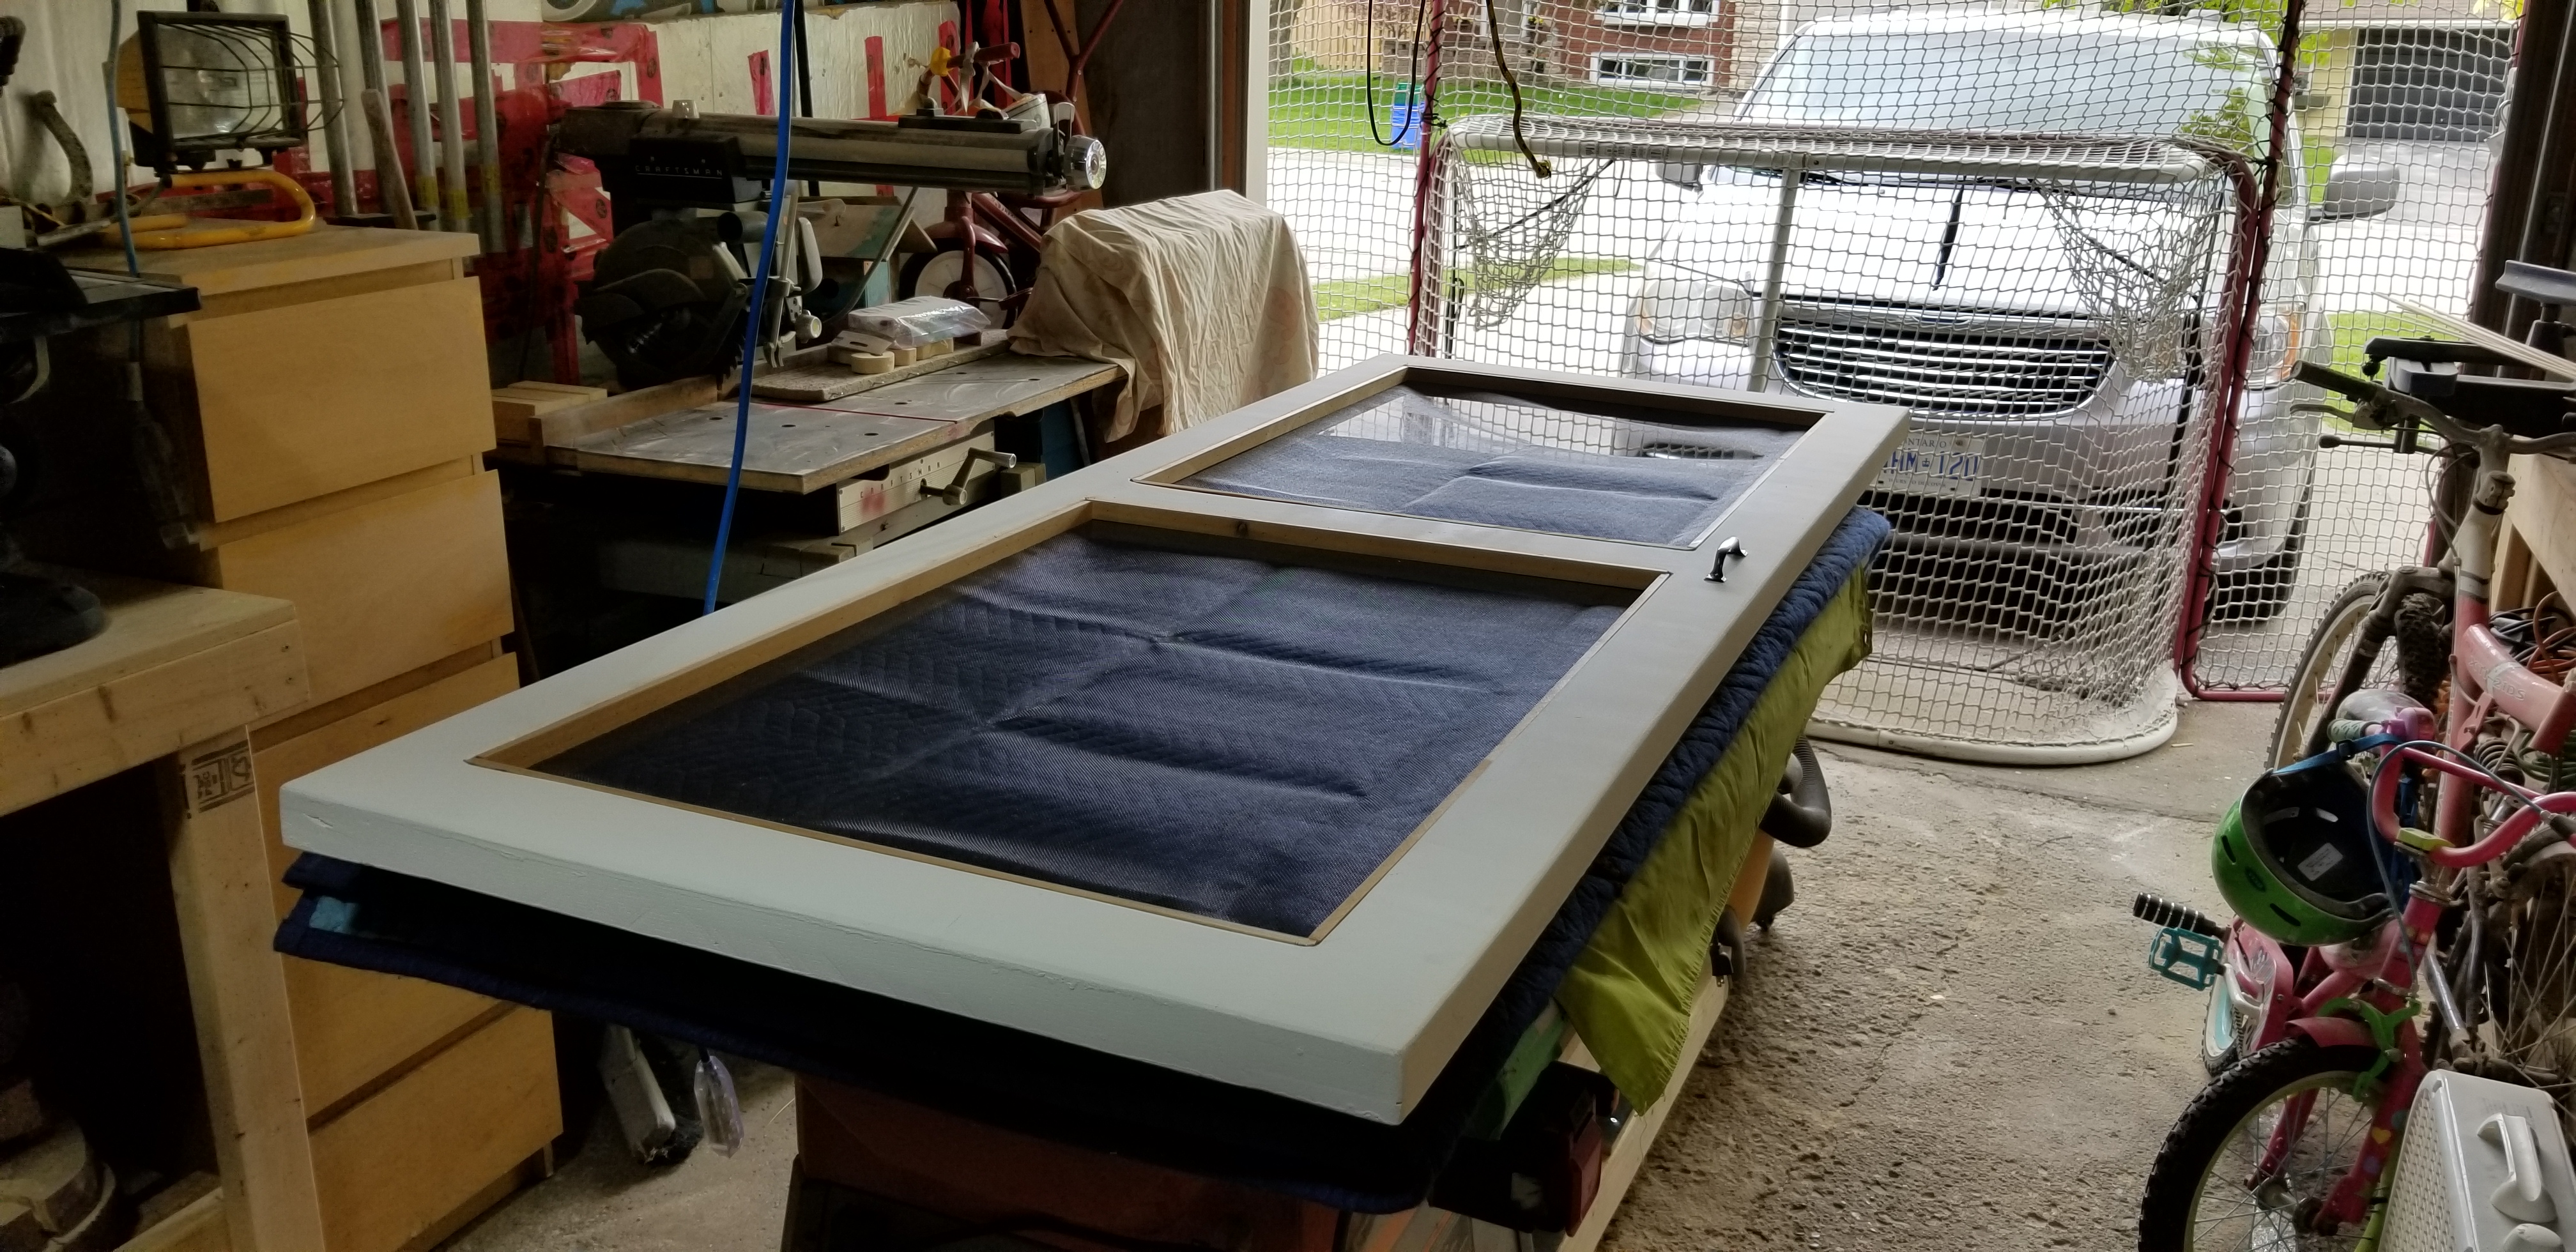
I took the time to glue the frame together. Then in each corner I drilled out a 3/8ths hole and glued some dowels through the joints. Flush cut those, and then did endless rounds up through the grits on every single surface of the door. I stopped to add copious amounts of filler, which meant no more natural wood look, but I was now going to have to paint it all white, to match the house trim.
I used an oil based primer to paint on four coats of pristine paint. Then I cut down some Cedar strips, 16 lengths in all, which would sandwich my screen mesh in place, for the two openings on my screen door. After much cutting and sanding i put the first layer in place. Cutting the mesh material was far simpler than i was imagining it would be. So i put those in place, and pin nailed my last strips on, holding the mesh as tight as i could get it.
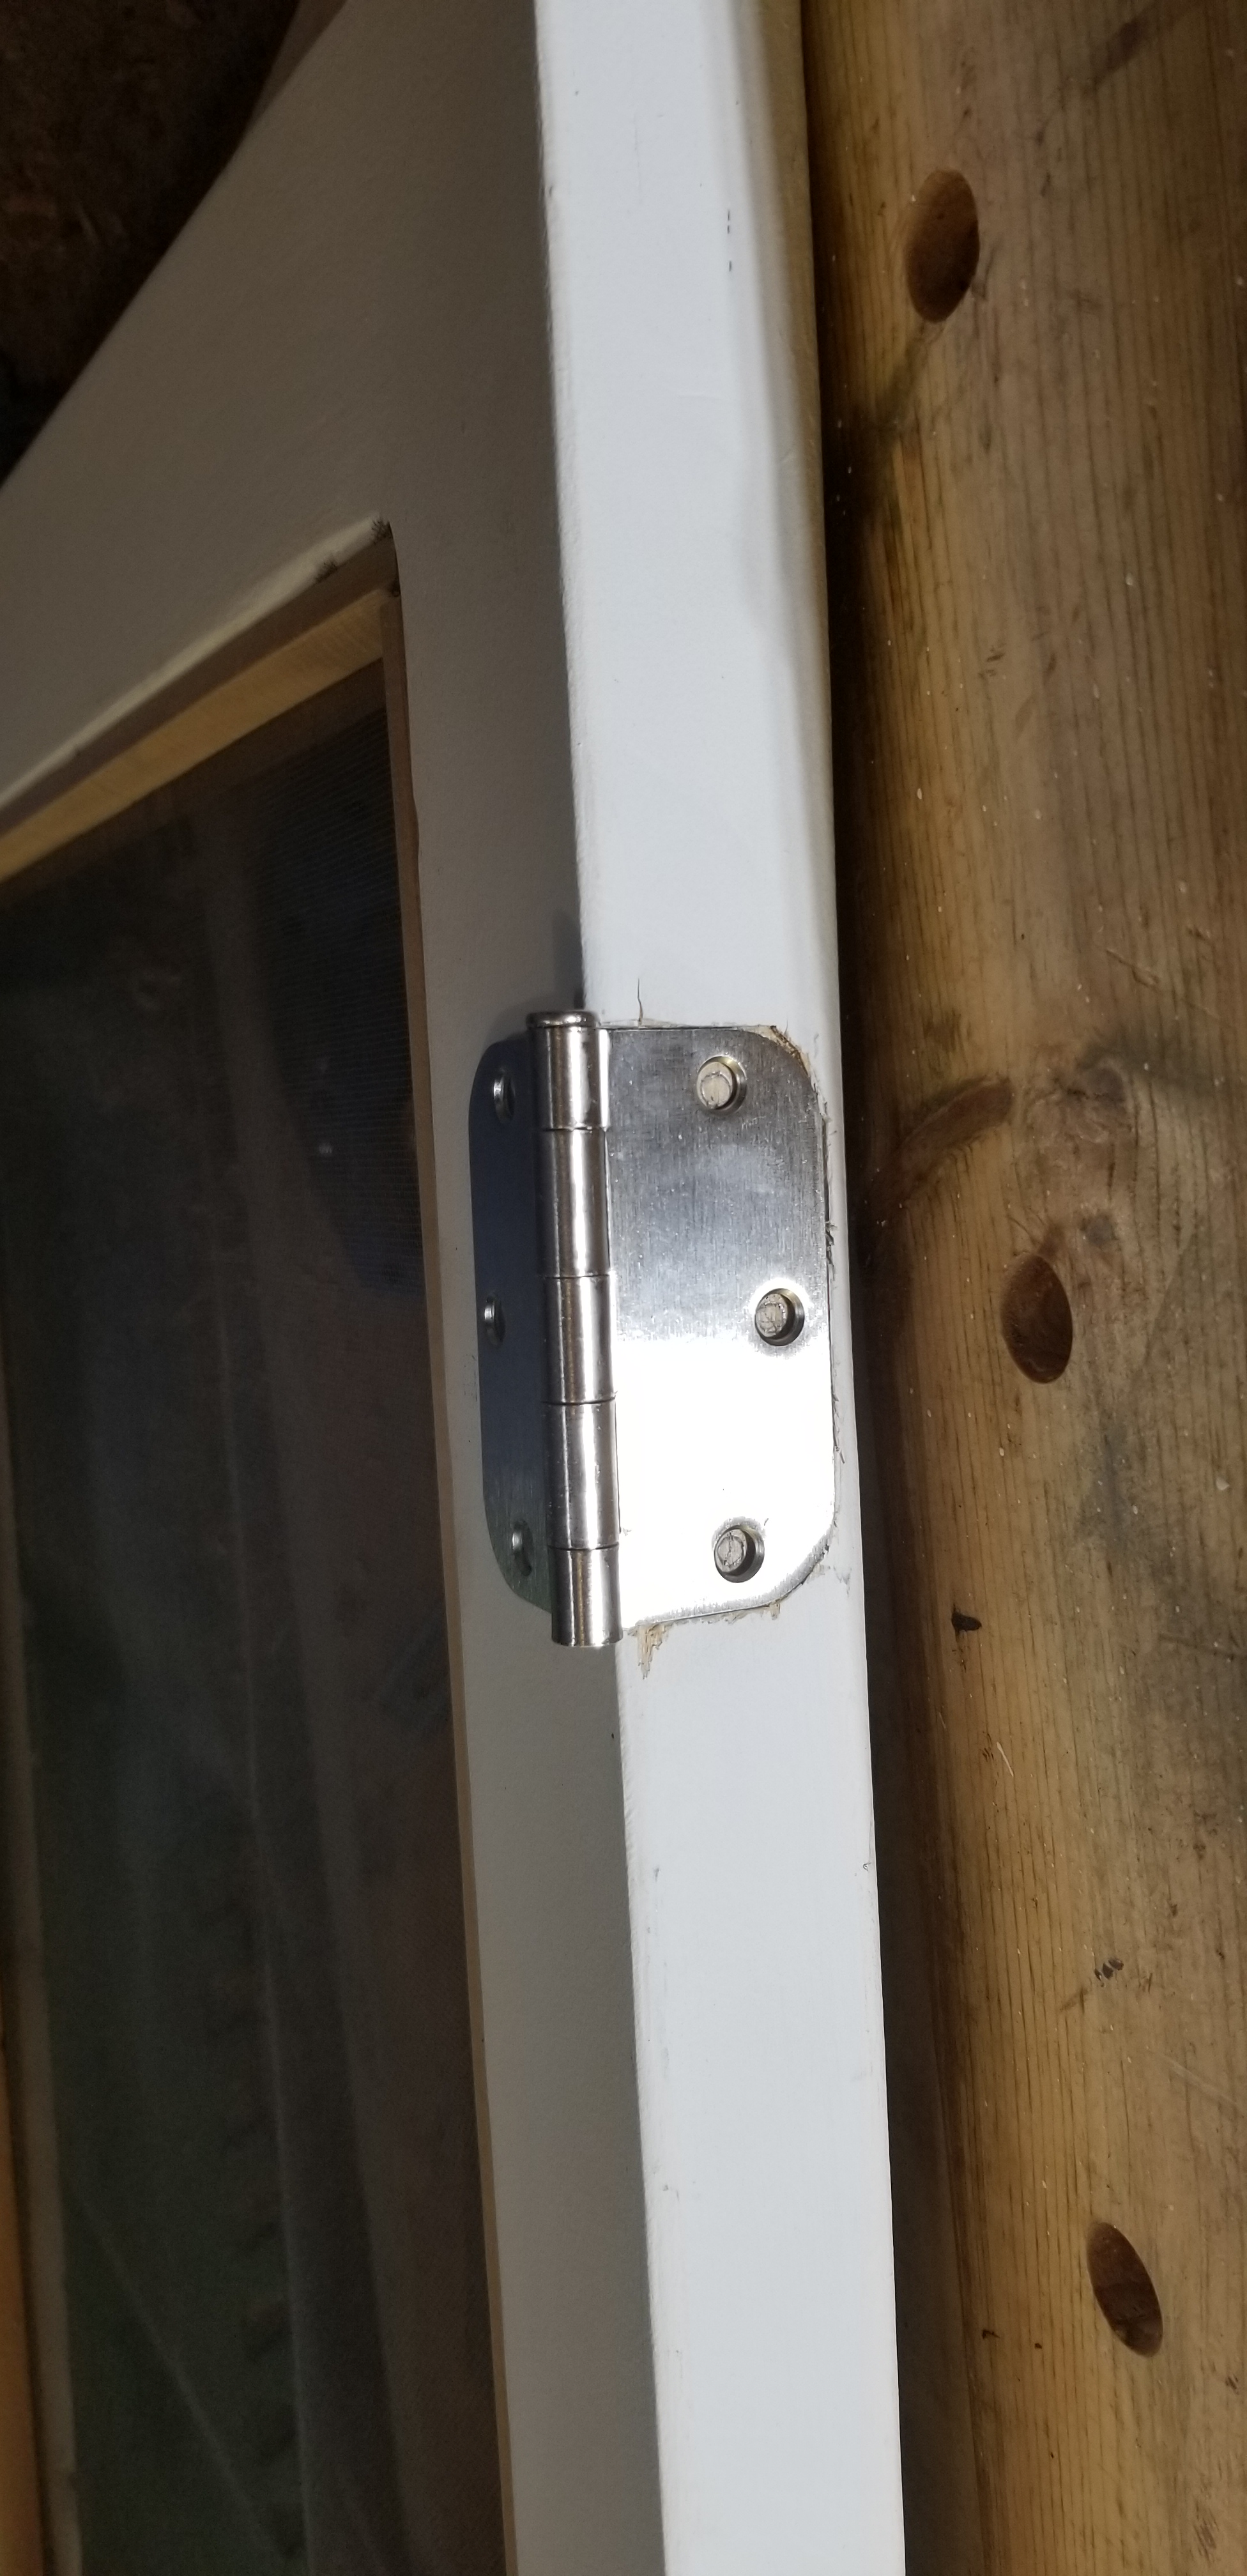
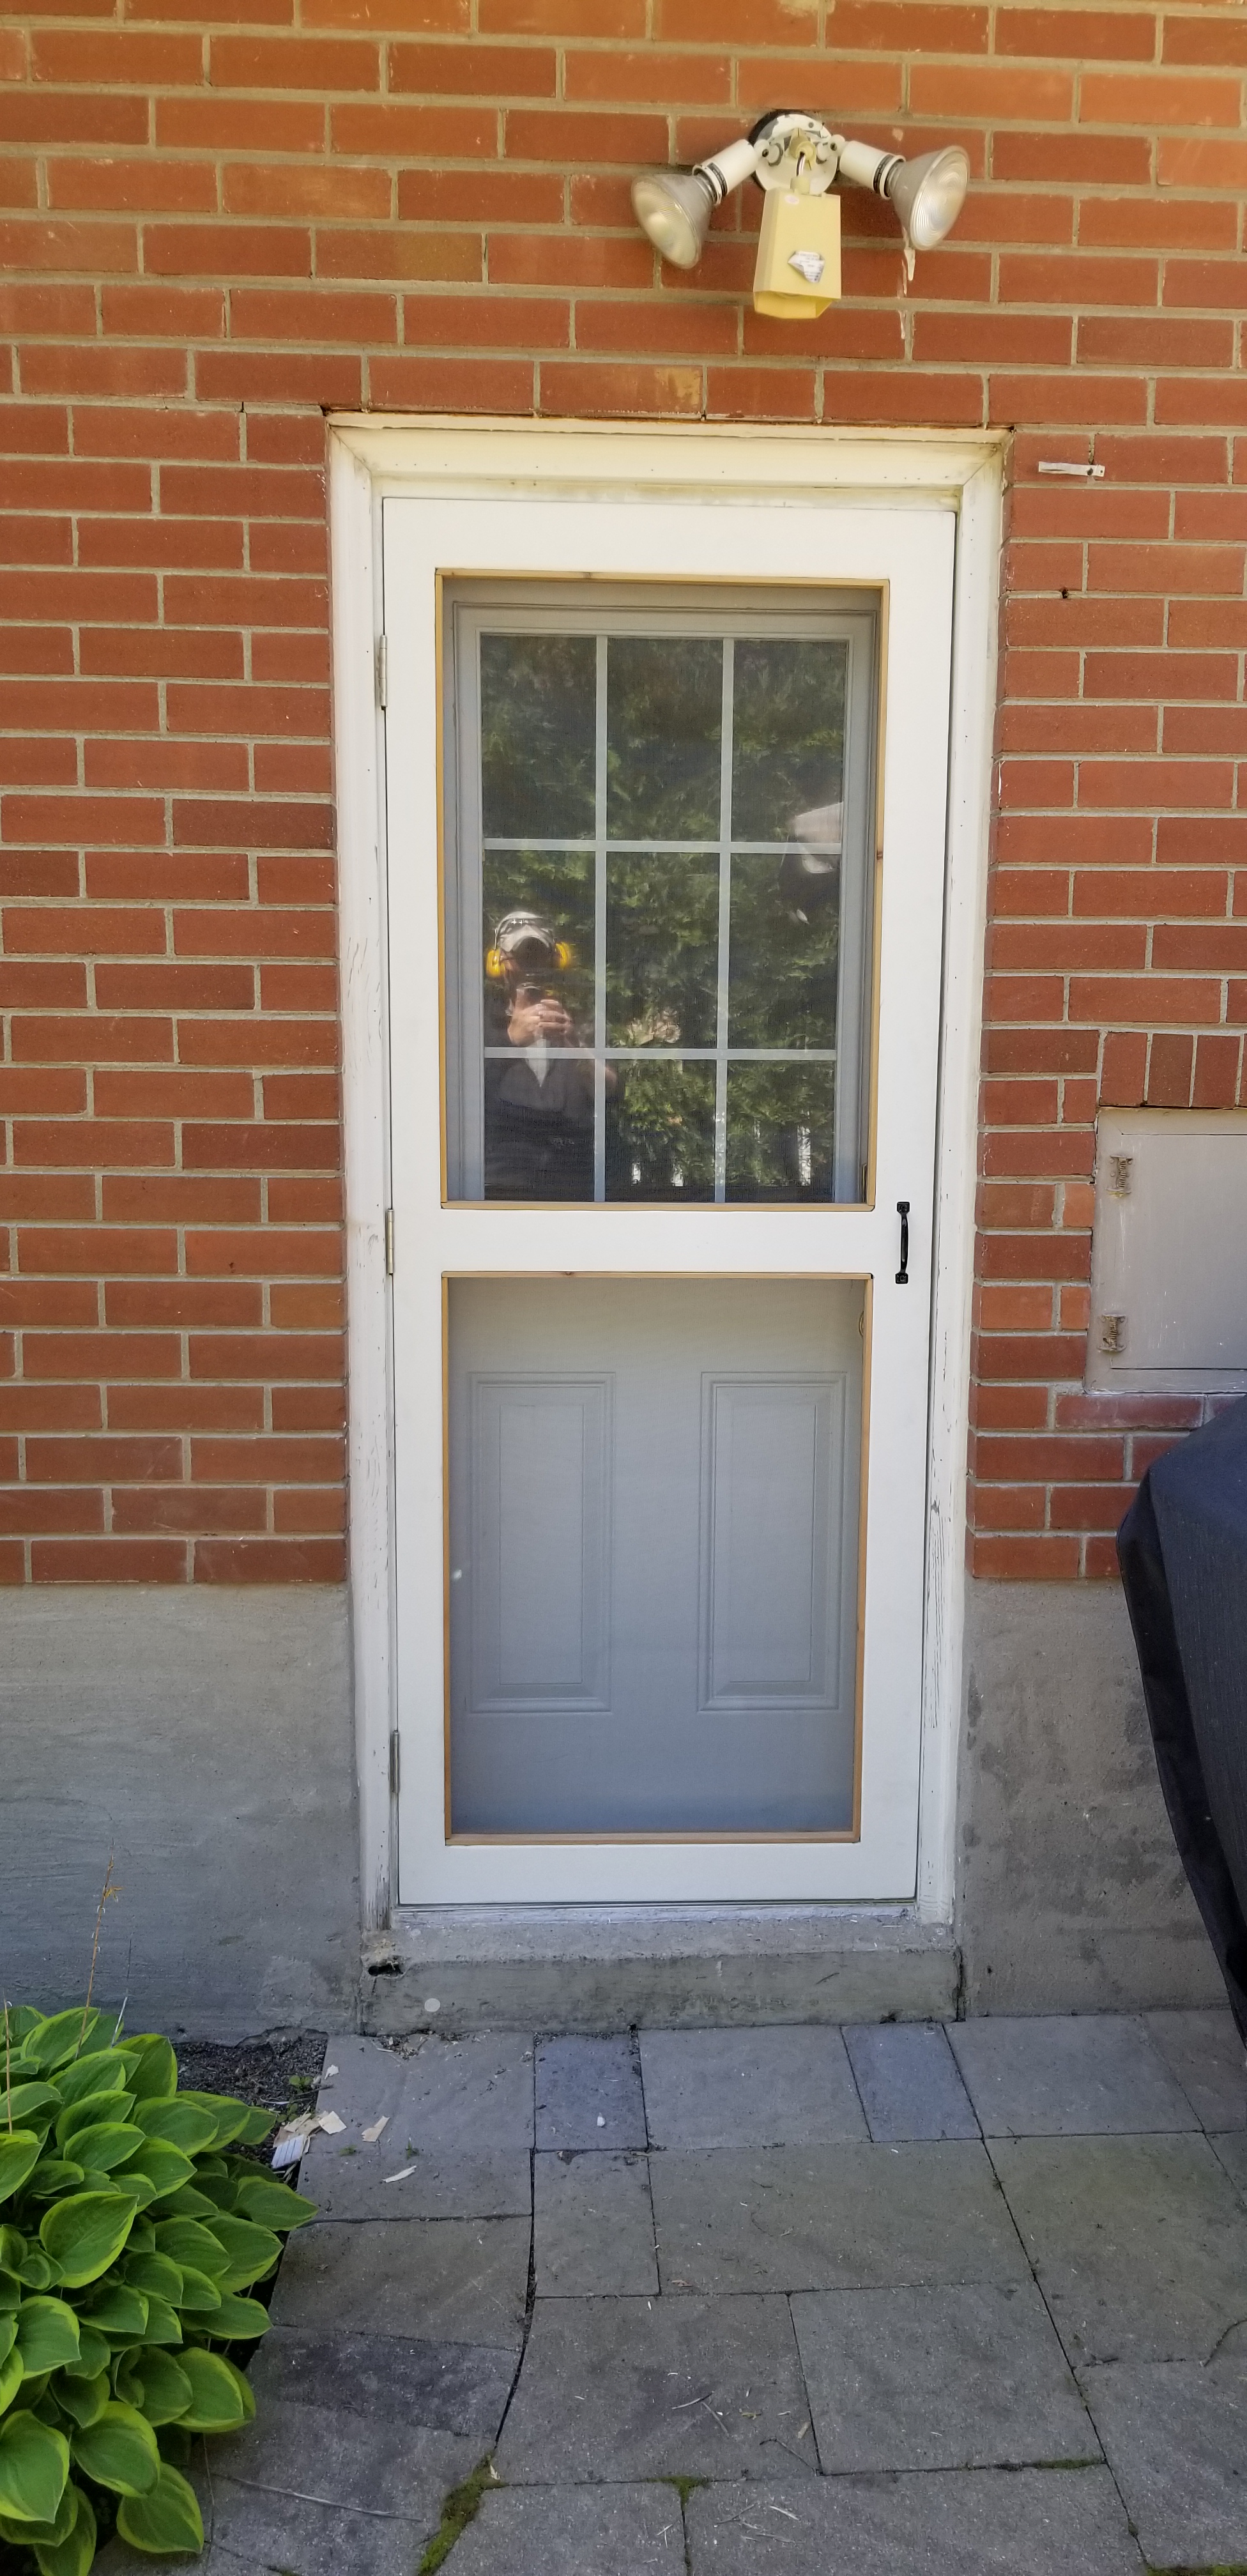
It was at this point I placed my hardware on the door. Pilot drilling holes for the handle and a push plate. I also then hand cut in my hinge recesses. Drilled and attached those. Fought with the door for an afternoon to cut in the receiving hinge slots on the house, and hung the door single handedly (do not reccomend). I then added backing trim to stop the door swinging too far inwards and binding. Added a latch, and an extra handle, and Bob’s your uncle. Done like dinner.
I didn’t take any photos while cutting the cross member tenons, but they’re there, and I did them myself.
This time around I thought I’d go a little bit fancy. Which is, or course, a relative term. To me that meant attempting repeatable tapered Hickory legs. Which required me to build a whole new jig/sled to accomplish exactly that. And would you look at that it worked. I was duly impressed with myself.
Then I cut down my skirting, and added a relief to the underside, which recieved a round over, to soften it up a bit. Followed by setting up the dado blade as fat as it’ll go, and cutting the slots for said skirting, and adding the .75″ long tenons to the end of each leg.
I rounded over all four faces to each leg, and did a test fit of the skirting. Wouldn’t you know, three of the four were spot on, and the first was a touch loose. Not a big deal. I can manage.
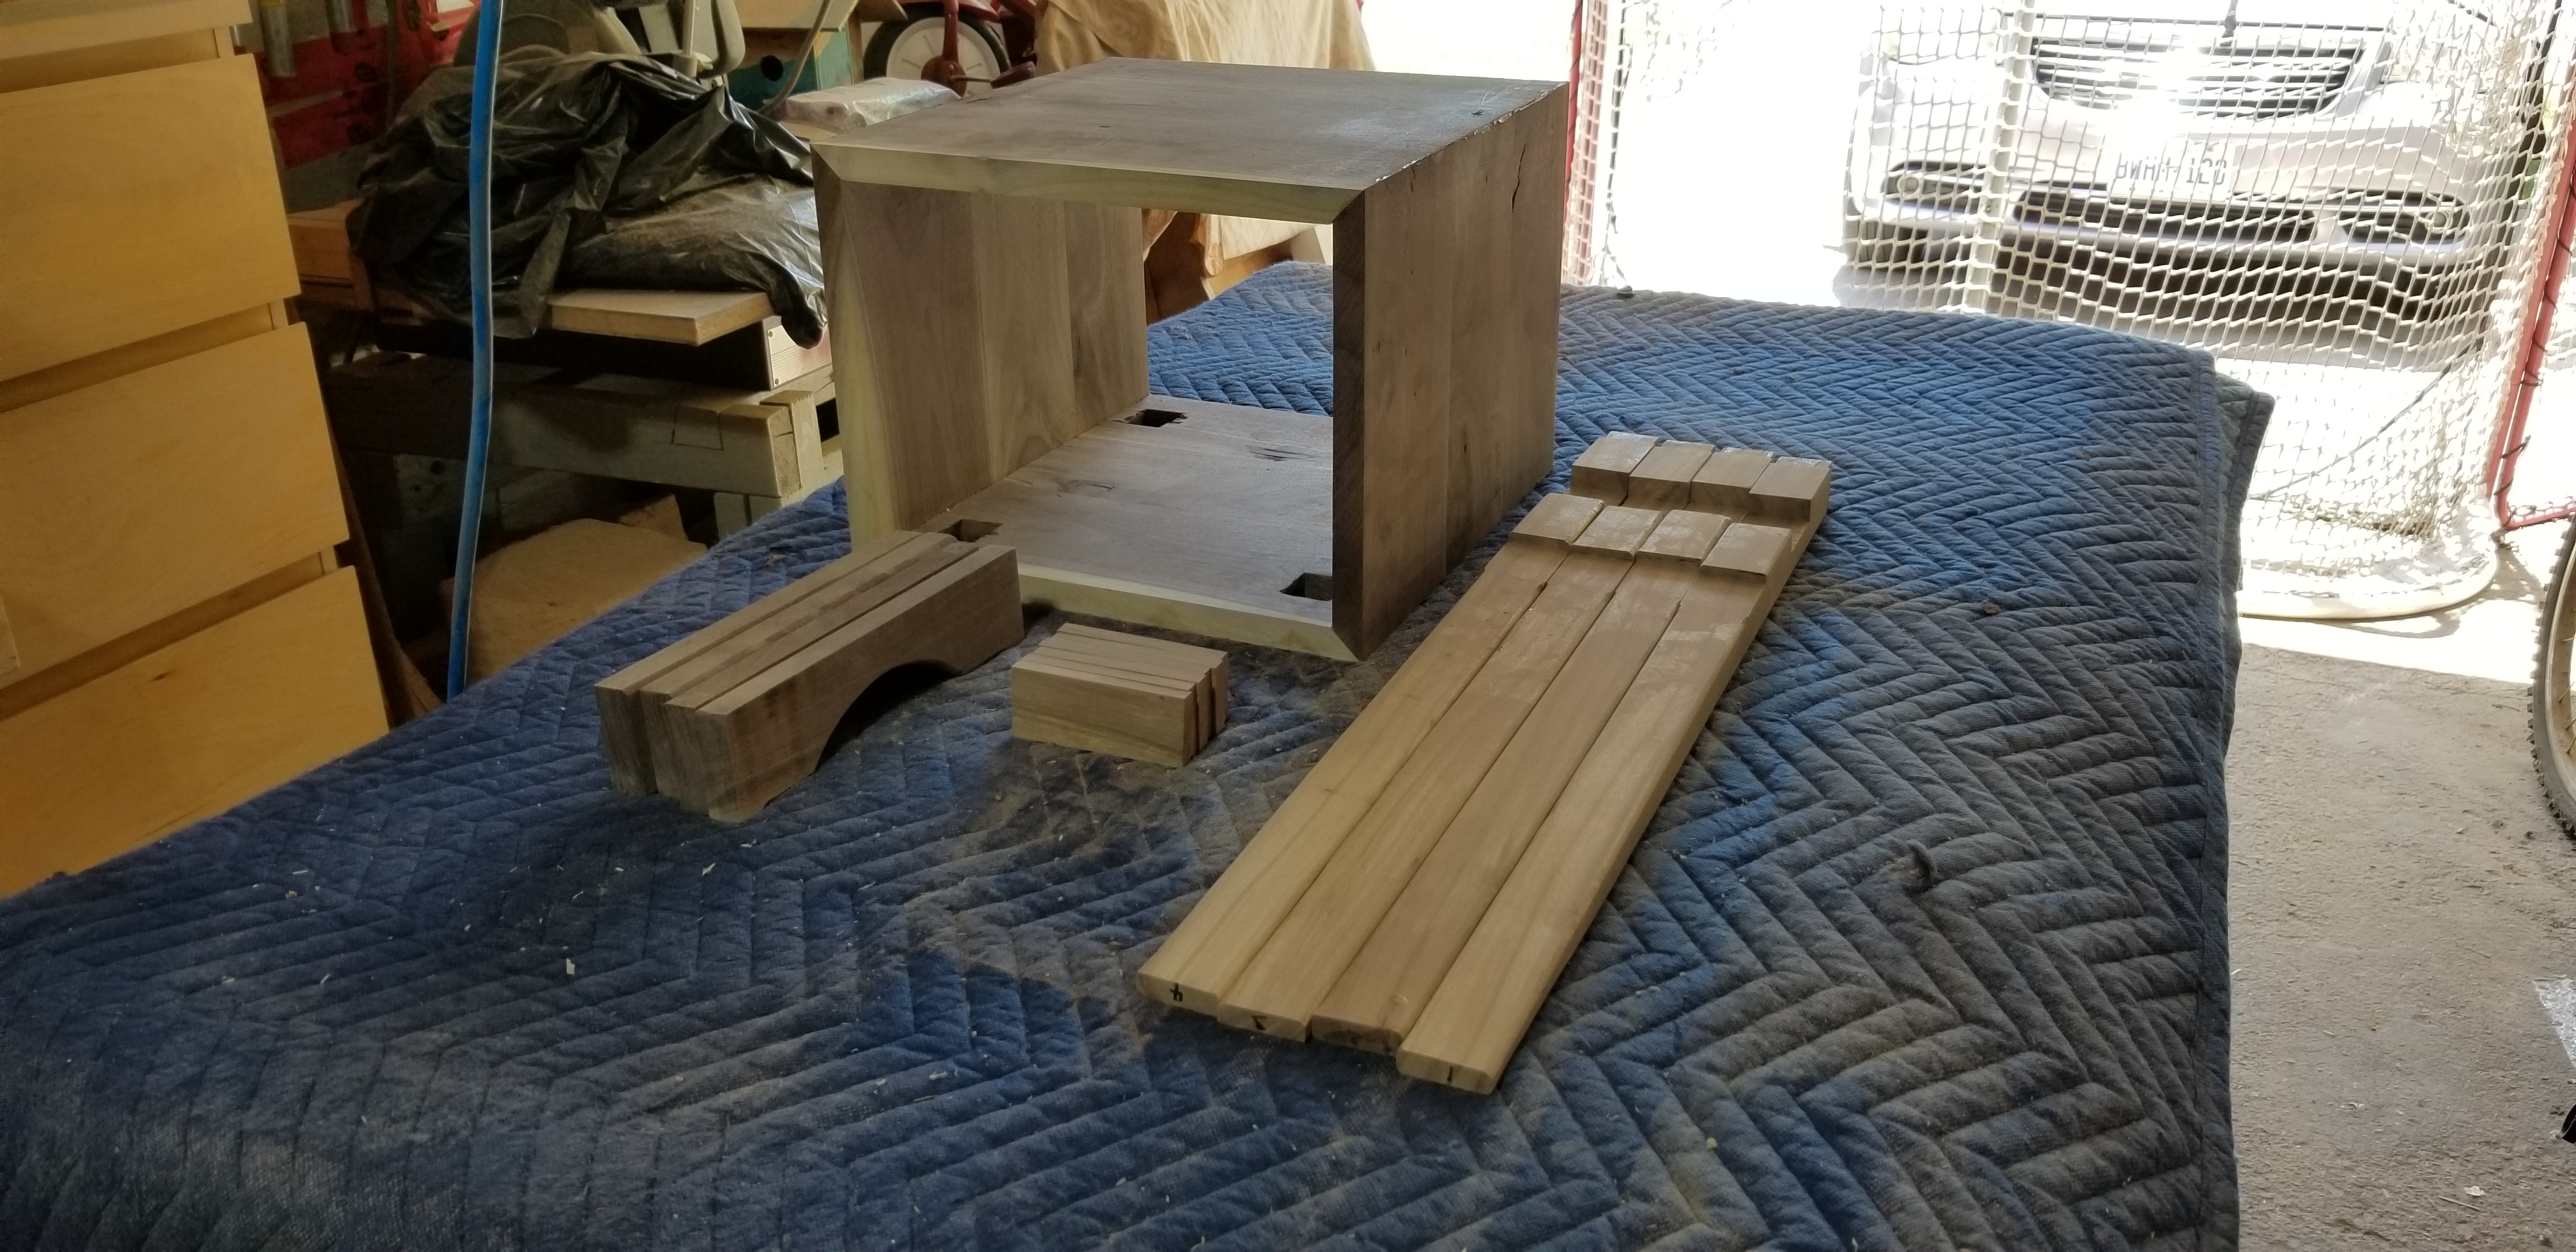
The glue up of the three Walnut boards to make one large panel was mostly uneventful. I had to joint a bunch of complementary edges, and RIP off the bark, or ruined portions. Use thirteen clamps to wrestle the twist out of the boards. Scrape the excess glue off, and then move through a series of hand planers, and my Bosch electric hand planer to even out the end product. I also took my card scraper for a spin to get a better starting surface once I complete the structural elements and begin the sanding process.
I saw a tutorial somewhere that said for tighter outside edges on a mitered box, you should over shoot 45°, for something like 44.8°. But my table saw doesn’t do that, perhaps a higher priced Cabinet saw would, but mine does not. So a straight 45 it was. Praying for no slips or binding against the fence. We will only know during the glue up.
I used a 1″ forstner bit to hog out the bulk of my mortises. I had intended to chisel out the rest, but I cracked an edge, so had to pause to blow glue into it, and reclamp it. Switched over to a coping saw to save any undue stress on the base piece of Walnut.
I will progress through, 60 / 80 / 100/ 120/ 150 / 220 / 320 grits with an random oribtal sander. Then after I glue up and I need to do touch ups, the very top most surface with get a hand sanding at 400 grit.
After assembly of the hollow top, I will cut in eight (8) splines on all four corners, to add some visual interest. Then round it all over to look a bit cleaner. The tenons of the legs are through & throughs on the base. So a pocket of colour should be seen when you get up close to it. Not finished yet, but you get the gist of it.
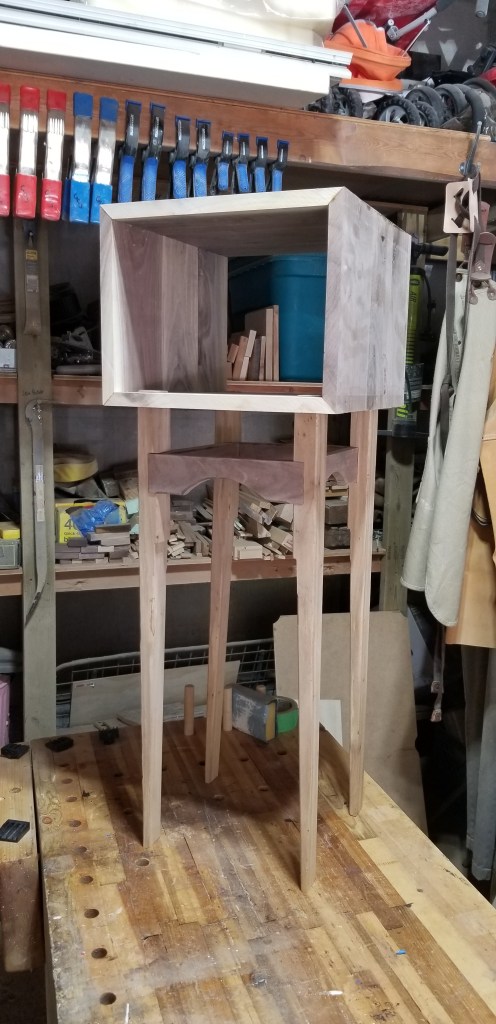
Had a brain wave the other day about building a walnut side table that was hollow, but could accept the floating bottom walnut drawer I had made a few months ago. Make it tall, on thin Hickory legs, do a thicker walnut skirt, and try a tapered edge on the legs. Round it all over, and then see how close i got to my plans. I’ll draw it out first, and then see if i was actually able to pull it off. That should give me a sense of where i am making my mistakes. I also need to finish by June 30th, before 11:00am, as that’s when schools out for the summer. Pushing against a dead line, and following a plan. Could be fun. But i have a report coming late this week, so that’ll cut into my time significantly. Chop chop, quite literally.
So I have cut up four Hickory legs, the last substantial portion of my slabs. I milled and cut up some rough walnut, and have glued up a single four foot long panel, which will be chopped down into my hollow top. I cut two inch strips for skirting too. I need to figure out a jig for careful, and repeatable tapered legs. Dado out my leg slots to hold the skirting on. I’ll keep the legs poking up above it, to tenon into the hollow top. Then it’ll be round overs on round overs, and sanding until my hands go numb. A quick and easy project.
Walnut skirting and the as of yet un tapered Hickory legs. Followed by a four foot long walnut panel glue up. Didn’t skimp on the clamps this time around.
Here’s how my other table build turned out. Doesn’t look too out of place in the basement. Good height for the sofa that’s there anyway.
The Ninja Turtle is progressing. I like the Apoxie Sculpt, a tad sticky though. But fast to work with. I may still end up detailing it out with Super Sculpey, but for now I’m enjoying the process with Apoxie Sculpt. This could potentially sit for months if need be before I come back to it. I’ll focus primarily on the furniture build, as that can warp, buckle and twist if I don’t build it sooner rather than later. Learned that lesson the hard way with my screen door.
Today is domestic duties Monday, so I need to get the second load of laundry in, run the dish washer, vacuum and tidy up a bit today. I’ll need to sort and hang the laundry too. I hear the temperature is on the rise through this week. Going to feel like 40 °C for several days in a row. Yikes. Also need to get rolling on my youngest child’s birthday party later this week. Busy – busy. Ciao Bella!


You must be logged in to post a comment.